Peaceful Days Are Over, Let's Play Devil Survivor Overclocked! [Finished]

Part 48 is out! Our ending round up continues with Gin's path. Overall, this one is a much more ethical neutral resolution to the lockdown, with the added bonus of helping Haru overcome her emotional baggage. Metatron is a fair deal more threatening when he slides into our DM's this time though. We have one more Day 7 route to go through that consists mostly of repeated content, which is Amane's route. Thankfully, past that everything we see in Amane's Day 8 and Yuzu's route is wholly unique to those paths, so the videos will become less repetitive once we overcome this next hurdle.
Part 49 is out! We blast through Amane's Day 7, and thankfully this is the last time we'll see repeated content. Everything going forward is wholly unique with one half exception on Yuzu's Day 8. Anyway, Amane's ending functions as the law route of this game, and it's a slightly more optimistic take on the concept than is typical for the series, though it still has some sinister undercurrents. The most notable thing about Amane's route is that it contains serious backstory reveals that are not discovered fully in any other route of the game, making it very interesting in that respect. Aside from that, we've seen all team leaders available in the game now, so I'll draft up a breakdown for Amane, Gin, and Izuna when I have the chance. We're closing in on completing this LP, just 4 more videos to go!
Part 50 is out! In this 3 hour behemoth of a video, no stone is left unturned as we go through Amane's 8th Day. This epilogue is a bit of a mixed bag, we set about establishing the kind of police state you tend to expect of law paths in this game, but at least there is an effort made to genuinely redeem people. This route also has some interesting character reveals and developments for Amane and Naoya, plus some of the most brutal tactical and combat challenges in the game, so it's at least not boring in spite of the exposition heavy cutscenes. There's quite a bit to this one, so I don't fault you if you can't get through the whole thing in one sitting. Mercifully, the next video will be much shorter, though I can't make the same promise for Yuzu's 8th day. We're in the home stretch now, just one more path to finish!
Units: Amane, Gin & Izuna
The final batch of team leaders you can use in this game, and certainly the least of the characters to use in this game, sad to say. Since it really doesn't matter in the context of this let's play what their expected starting stats are, I'll just be posting their level 99 stats alongside their status pictures. Let's go over them from best to worst.
Amane
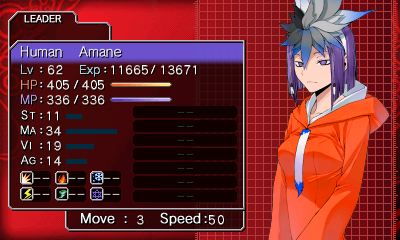
Amane at Level 99:
HP:665
MP:486
ST:17
MA:40
VI:34
AG:24
The lady of law in Devil Survivor and the most specialized mage in the game. Amane is also notable for actually having a set join level instead of a scaled one, she always joins at Level 50 in any Day 7 route where she allies with you. Anyway, Amane is somewhat similar to Mari, being a mage character who picks up a generous amount of VI, making her rather bulky for what's usually a squishy archetype. She also prioritizes AG over ST, which is definitely the better plan long term. In spite of this, she takes a much different road to level 99 than Mari, beelining for capped MA while her other stats languish. Truth be told, I find Mari to be superior in the context of playing a normal run, as she has far more survivability and tactical use at the expense of negligible amount of damage dealing potential and MP. Amane's HP growth is easily the worst of any VI focused character in the game, and since it takes awhile for her VI to grow to a appreciable level, she is beyond squishy and prone to being sniped without adequate defensive passives. Like Yuzu, she also only has 3 move but lacks the speed boon, giving her a disadvantage in the turn order comparatively. This is another thing that puts her below Mari in my eyes, Mari has both 4 Move and a speed boon, letting her put in much more work without additional aid. This LP kind of soured my perspective on Amane, she's just not that good in comparison to Naoya or Yuzu, and she only beats Mari in combat at the highest levels. She's still probably the best of the remaining jokers we have to talk about though.
Gin
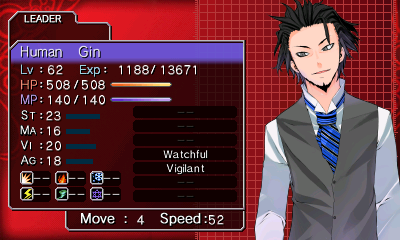
Gin's at Level 99
HP: 793
MP: 219
ST: 34
MA: 23
VI: 29
AG: 28
Gin is such a cool character, but man is he a disappointment as a usable character. Gin is literally just Atsuro but worse. His stat growth at every level is almost identical, with the key difference being that he loses out on a point of ST, VI and AG in exchange for 2 points of MA. And when I say he's Atsuro but worse, that's more true than you realize because if you actually add up Gin's combat stats, you'll notice his overall stat total is actually one point less than Atsuro's! The only thing he gets in exchange for this bizarre penalty is that he gets 2 extra points of speed. Yippee. Gin also has the distinction of being the single rarest character in the game in terms of route availability, only being usable in his own ending route. On a normal playthrough, he's available for 6 fights, and on new game + there's a 7th he can partake in. As an added kicker, Atsuro is a mandatory deploy in the Babel fight of Gin's route, so it's undesirable to even bring Gin along for his own final boss. Biggest let down of the game for sure.
Izuna
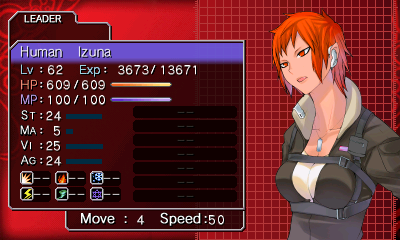
Izuna at Level 99:
HP:945
MP:160
ST:35
MA:8
VI:36
AG:36
Dear lord. It's rare that people can agree 100% on anything when it comes to team building in RPG's, but I think most people will agree that Izuna is the worst character in this game, if not one of the worst characters in the entire MegaTen franchise. And by quite a sizable amount too, it's an impressive feat to make Kaido's MA look good in comparison. Izuna is a physical fighter who takes the dubious path of raising ST, VI and AG equally while basically completely ignoring MA. This is a horrendous way to build a character in any MegaTen game, and especially bad in this one where MA is a god stat. 80% of the attacks in this game are magic, and MA governs magic defense, so in spite of her high HP Izuna is hands down the most fragile character in the game. And because she raises all her focus stats equally, that means she's never the best at anything, and is often even more fragile to physical hits while hitting softer than Atsuro. Atsuro's whole gimmick is he's supposed to be the balanced physical attacker who doesn't excel in any one stat! She doesn't have the decency to even cap a single stat, and she has no tactical boons to compensate for her dogwater combat ability. She is the epitome of a clown character, someone you only use as a self imposed challenge or a joke. I really could not ever recommend using Izuna. Fortunately you're rarely in a position to do so anyway, since she only appears in Gin and Atsuro's routes, plus she's a redundant join at the tail end of Naoya's good 8th day. In terms of usage within routes though, she is the rarest character in the game, being available for only 5 fights in Atsuro's route, 3 fights in Gin's, and 2 fights in Naoya's good 8th day. You can add one onto that for the New Game + bonus boss on Day 7, but Izuna should not be participating in that fight under any circumstance for a reason known all too well to people who have played that fight.
The final batch of team leaders you can use in this game, and certainly the least of the characters to use in this game, sad to say. Since it really doesn't matter in the context of this let's play what their expected starting stats are, I'll just be posting their level 99 stats alongside their status pictures. Let's go over them from best to worst.
Amane
Amane at Level 99:
HP:665
MP:486
ST:17
MA:40
VI:34
AG:24
The lady of law in Devil Survivor and the most specialized mage in the game. Amane is also notable for actually having a set join level instead of a scaled one, she always joins at Level 50 in any Day 7 route where she allies with you. Anyway, Amane is somewhat similar to Mari, being a mage character who picks up a generous amount of VI, making her rather bulky for what's usually a squishy archetype. She also prioritizes AG over ST, which is definitely the better plan long term. In spite of this, she takes a much different road to level 99 than Mari, beelining for capped MA while her other stats languish. Truth be told, I find Mari to be superior in the context of playing a normal run, as she has far more survivability and tactical use at the expense of negligible amount of damage dealing potential and MP. Amane's HP growth is easily the worst of any VI focused character in the game, and since it takes awhile for her VI to grow to a appreciable level, she is beyond squishy and prone to being sniped without adequate defensive passives. Like Yuzu, she also only has 3 move but lacks the speed boon, giving her a disadvantage in the turn order comparatively. This is another thing that puts her below Mari in my eyes, Mari has both 4 Move and a speed boon, letting her put in much more work without additional aid. This LP kind of soured my perspective on Amane, she's just not that good in comparison to Naoya or Yuzu, and she only beats Mari in combat at the highest levels. She's still probably the best of the remaining jokers we have to talk about though.
Gin
Gin's at Level 99
HP: 793
MP: 219
ST: 34
MA: 23
VI: 29
AG: 28
Gin is such a cool character, but man is he a disappointment as a usable character. Gin is literally just Atsuro but worse. His stat growth at every level is almost identical, with the key difference being that he loses out on a point of ST, VI and AG in exchange for 2 points of MA. And when I say he's Atsuro but worse, that's more true than you realize because if you actually add up Gin's combat stats, you'll notice his overall stat total is actually one point less than Atsuro's! The only thing he gets in exchange for this bizarre penalty is that he gets 2 extra points of speed. Yippee. Gin also has the distinction of being the single rarest character in the game in terms of route availability, only being usable in his own ending route. On a normal playthrough, he's available for 6 fights, and on new game + there's a 7th he can partake in. As an added kicker, Atsuro is a mandatory deploy in the Babel fight of Gin's route, so it's undesirable to even bring Gin along for his own final boss. Biggest let down of the game for sure.
Izuna
Izuna at Level 99:
HP:945
MP:160
ST:35
MA:8
VI:36
AG:36
Dear lord. It's rare that people can agree 100% on anything when it comes to team building in RPG's, but I think most people will agree that Izuna is the worst character in this game, if not one of the worst characters in the entire MegaTen franchise. And by quite a sizable amount too, it's an impressive feat to make Kaido's MA look good in comparison. Izuna is a physical fighter who takes the dubious path of raising ST, VI and AG equally while basically completely ignoring MA. This is a horrendous way to build a character in any MegaTen game, and especially bad in this one where MA is a god stat. 80% of the attacks in this game are magic, and MA governs magic defense, so in spite of her high HP Izuna is hands down the most fragile character in the game. And because she raises all her focus stats equally, that means she's never the best at anything, and is often even more fragile to physical hits while hitting softer than Atsuro. Atsuro's whole gimmick is he's supposed to be the balanced physical attacker who doesn't excel in any one stat! She doesn't have the decency to even cap a single stat, and she has no tactical boons to compensate for her dogwater combat ability. She is the epitome of a clown character, someone you only use as a self imposed challenge or a joke. I really could not ever recommend using Izuna. Fortunately you're rarely in a position to do so anyway, since she only appears in Gin and Atsuro's routes, plus she's a redundant join at the tail end of Naoya's good 8th day. In terms of usage within routes though, she is the rarest character in the game, being available for only 5 fights in Atsuro's route, 3 fights in Gin's, and 2 fights in Naoya's good 8th day. You can add one onto that for the New Game + bonus boss on Day 7, but Izuna should not be participating in that fight under any circumstance for a reason known all too well to people who have played that fight.
Part 51 is out! Thankfully, this is a much shorter outing than the previous marathon of a route, with Yuzu's day 7 being a quick and suitably anti-climactic ending to the lockdown situation. How are these kids going to get out of this one? Yuzu's Day 8 is the last thing we need to do before closing out on the final bonus boss, I'll be working on getting that video ready throughout the week and we'll be bringing this Let's Play to a close soon enough.
Part 52 is out! This one is marginally shorter than Amane's 8th day, although still pretty lengthy in content. In spite of that, Yuzu's 8th day definitely feels the most tacked on. Not only does it pretty much completely ignore the Day 7 ending to split off in a completely different direction, a couple of the fights seem to be unfinished with unimplemented escort aspects and rather amusingly an untranslated piece of dialogue crept slipped into the script. There are some cool aspects to this route, and it's not a terrible conclusion to the story, but I'd easily say this is my least favorite 8th day in the game. With this done though, there's just one more challenge to conquer within the game, and it'll be the sole subject of the final video.
Well, here we are. The final video, and the final challenge of Devil Survivor Overclocked. The Lightbringer himself. Ol' Louis Cypher is a bit easier in this version of the game, less due to any changes to him and more due to the fact that Overclocked gives you way more viable options to approach this fight, some of them simply much stronger than the ones available to you in the original version. Don't get careless with this fight though, any sub-standard composition will quickly be chewed up and spit out in this fight, and due to the extremely harsh level scaling in this game, entering this fight with demons and team leaders below level 95 at the very least will simply have no chance of winning this fight. Overall, I was actually shocked how well the teams I cooked up for this performed, I ended up stomping Lucifer at a breakneck pace before he could use the strongest version of Megidoladyne and had no team leader deaths. I'll go into greater detail about the teams I used for this fight, but as for some general tips for how to deal with this guy:
-You need any form of MP recovery you can get. Now most of the best demons in this game are Divine or Tyrant, so there's some MP restoration baked into the standard comp, but you'll also want Drain on all your casting demons, and any form of passive MP recovery on human casters engaged with Lucifer if they don't have Drain themselves. Once Lucifer enters his final phase and starts slinging out his own Drain, you can quickly find yourself dry on MP and in an unwinnable situation. Don't let that happen.
-So long as you have someone with Nyarlathotep positioned in the center of the map, the additional enemies that spawn in for this fight are of no issue, as they will always attack someone who is in their range, regardless of if it's a good idea or not. Truthfully, they aren't that threatening to your health in terms of raw damage they deal, but they can poke you and allow Lucifer himself to more easily secure kills against you.
-Megidoladyne becomes stronger every time it's used. It's not a bad idea to assume it'll be thrown out whenever Lucifer's turn will come up, so make sure to keep your teams at full health as best you can whenever a Lucifer turn is coming up. At the 4th usage, it deals in the ballpark of 650-800 damage depending on the MA stat of who is getting hit, so more than any other that's the one you want to be prepared for. It's also the reason why this fight is not realistically winnable without close to maxed out demons. To my knowledge, he doesn't use it again after the 4th shot, but that ended up not mattering since I killed him before he got to that point anyway.
Teams Used
Hero's Team: For myself, I used a build revolving around Dual Shadow procs. I chose to run Holy Dance for my main offence, with the passives of Dual Shadow, Phys Drain and Extra Charge. Dual Shadow + is the auto skill, giving me a 50% chance that any action I take is repeated. With the 2X damage multi-plier from Extra charge, this means that half the time Holy Dance can deal a whopping 4X damage on the Extra turn. Lucifer lacks Pierce in the final phase of this fight, making Phys Drain the optimal physical defense to have, particularly because Lucifer himself Repels physical attacks, which means bouncing anything back at him is pointless. Prayer is what I went with for healing, thought the ailment aspect of the skill is more or less irrelevant for this fight. Recarmloss is an emergency button skill, allowing me to bring back Loki or Metatron in the event they fall, though thankfully I never needed to do that. The biggest personal weakness here is that I have no resistance to the Maziodynes Lucifer throws out in the final phase, which means I'll have the occasional Shock status to deal with. For my demons, I ran Metatron and Loki, both running Holy Dance and Drain, and Samarecarm on Metatron for revival support and Prayer on Loki for extra healing options. Between Blood Wine and Tyranny, I was able to keep a steady flow of MP so I never ran short on Holy Dances to throw out. I slapped Anti-All on Metatron to cover his Elec weakness, and Phys Drain on Loki so Lucifer's Attack All's are of no issue to him, and both are running Dual Shadow to complete the build. This was easily the MVP team for shredding Lucifer in the final phase, and I got pretty good luck with the build allowing me to finish the fight way ahead of schedule.
Naoya's Team: Naoya is set up with a Magic Yin build, focusing on maximizing damage from Fire Dances. Since we can't double up on Holy Dance, and Megidolaon is way too inefficient in terms of both damage and MP use, we instead want to focus on punching through a resistance of Lucifer. It doesn't have to be Fire specifically, just as long as it isn't Elec which Lucifer drains in the final phase. By combining Magic Yin, Fire Amp, and Awakening, Naoya is able to throw out Fire Dances at about 125% power for a very affordable 46 MP. This doesn't compare to the damage I can throw out with Dual Shadow Holy Dances, but it is a very stable and reliable form of damage. Naoya has Drain in case he runs into any MP issues, and Mediarahan for healing support. For demon support, Naoya has Susano-o and Astaroth. Susano-o is set up with Holy Dance and Drain for his main sources of damage, augmented with Dual Shadow for the occasional double strike. He has Samarecarm for revival support, and Anti-Most to patch out his weaknesses. In hindsight, the latter was unnecessary since Lucifer doesn't do anything that strikes a weakness of him anyway, so it probably would have been smarter to work in Elec Drain or maybe even Extra Charge. Mana Aid gives us a good amount of insurance when combined with Tyranny to make sure that Susano-o will always have the MP to keep Awakening up and give us the most damage possible. I prefer Susano-o to Asura for this purpose because Susano-o has innate phys repel, meaning I don't have to dedicate a passive slot to a physical resistance. Astaroth is set up pretty basic, Holy Dance for damage and Drain for MP sustain. I probably should have use a Mag overload to replace Deathbound with Mediarahan, but I was confident I didn't need it and was vindicated for that decision. Astaroth already resists Elec, so I worked in Phys Drain to cover Attack Alls and Dual Shadow for extra damage on occasion. Magic Yin makes this team very prone to being MP screwed once Lucifer's Drains come into the mix, so I usually opted to lead off with my own Drains with my demons to make sure I never ran dry on MP.
Mari's Team: This one is going to be brief because Mari is not meant to engage Lucifer in any capacity other than being his punching bag when he isn't firing off Megidoladyne. Mari is running Phys Repel and Endure to make sure she survives these engages, and has Recarm to provide revive support. Otherwise she's just firing off Megidolaons augmented by Blitzkrieg alongside Nyarlathotep. Hecate is summoned to this team once Mari is in position to make sure we have no MP issues, and then Mari just holds the center against incoming enemy spawns to bait them to their doom. The only thing I'd change with this team in hindsight is I'd swap Blitzkrieg for Fortify. We have more than enough damage to dumpster the demons who engage this team, so I really should have focused on minimizing incoming damage instead, since that almost became a problem.
Black Frost's Team: The only team that has a line up change mid fight due to Lucifer's changing resistances. Black Frost himself is set up with Samarecarm to support the team, Grace as his auto skill to fully restore his team should he be Lucifer's target after a Megidoladyne, and otherwise he has Anti-All to give him Phys and Elec resistances, Life Surge to ensure he has enough HP to tank Megidoladyne, and Ares Aid to give Holy Strike better odds of critting. Holy Strike does not benefit from Phys Amp, so this is the only way independent of Auto Skills to bring its damage up. For the start of the fight, Black Frost has two familiar sights: Pierce Phys Amp Multi-Strike Garudas. Lucifer does not repel phys until his final phase, so we can run roughshod on him in the first half with these. These guys are also running Phys Repel to bounce Lucfier's Attack Alls right back at him. This team is dedicated to speedrunning the first two phases of the fight, and they do that as well as they have performed throughout the rest of the game. Unfortunately, they aren't able to carry the whole fight, so once their role is done, I have Black Frost bring in Okuninushi and Remiel. Okuninushi is here to allow us to double up, increasing Lucifer's turn delay when Black Frost attacks. He's set up with Phys Drain and Mana Aid to make him durable as well as ensure he has the MP to provide Samarecarm support. He'll be using Holy Strike for damage, though honestly Holy Dance probably would have been better. Drain is there more for HP support than MP support, as Mana Aid and Blood Wine will give Okuninushi all the MP he needs for what he's doing. Remiel is here with Holy Dance and Dual Shadow for damage, plus more Samarecarm support. Drain is a bit more important for him since he can potentially run dry on MP from Holy Dances. Between that, Blood Wine, and his own Mana Aid, Remiel can go the distance. Sadly Black Frost himself can't really do much for this team directly since there just aren't enough skill slots for it, but he does have great survivability and that's the main thing I cared about.
Overall, this set up absolutely stomped Lucifer, to a degree that surprised me. I had done a test run that was a lot messier, but I tightened up the builds and executed the strategy better, allowing me to blow through this fight in about 20 minutes, which is about double the speed I did it in on my first ever attempt. A very high note to end this series on, if I do say so myself.
And that's a wrap! This was definitely a demanding series to make, but I feel like it was worth it. Funnily enough, unlike other Let's Plays where I deep dive and thoroughly clear games, I didn't really learn anything new doing this one. In fact, doing this let's play just reinforced my faith in the strategies I use, since I seldom had any issues clearing maps in what is widely viewed as an extremely difficult game. I see this game get accused of having luck based missions a lot, and I hope I showed that's far from the truth, you just need to be mindful of the options you have for any situation. Outside of that, I felt like Devil Survivor in general was lacking playthroughs with good video quality, and Overclocked especially was lacking in any video coverage. I hope anyone who watched this enjoyed seeing the game just as much as I enjoyed playing it! This isn't quite a comprehensive 100% let's play, as there are a number of event variations that I just felt were impractical to try and show, but I do hope that anyone who is curious to see those is inspired to check it out for themselves. If nothing else, I do feel like I went above and beyond to show off things I really didn't have to, and it was nice to have an RPG with multiple endings where it felt like a worthwhile endeavor to actually see the other endings. Hope to see you in what I end up doing next, I've already got a bunch of games lined up that I'm eager to show!