Existential Trauma And Little Bits Of History Repeating - Let's Play Azur Lane!

Put your Let's Plays in here.
User avatar
Site Admin
Ahem, since people have correctly pointed out that we mainly talk about history, sass, and thirst, and not quite enough of the mechanical end, I've decided to delay the shipgirl posts for this update (yes, posts plural, I'm not putting 14 bloody ships in one update!) and put up the second proper side update. I think the next one will be the Labs, but for now, let's talk about one of the absolute basic concepts a player will run into: The Daily Grind.

SIDE UPDATE: THE DAILY GRIND

The daily grind. It’s worth talking about here, because it’s pretty simple, and easy enough to explain. You unlock the Dorm pretty early, so, as soon as you’re feeling human and logged in, the first thing you do is feed your shipgirls. The nice thing about this is that, even with the early game not being the friendliest with food, you’ll get some food just for doing this. In fact, if you only needed to put 1000 fuel in (an Oxy Cola), unlikely as that is, you’ll get 5 Secret Fuel right back for doing it. 10,000 food’s worth. That ain’t bad.

Image While the Dorm starts with a Capacity of 2 girls, you can use gems to expand that to a maximum capacity of 6. Note that expanding the dorm does accelerate the consumption of food, so what might last your girls 24 hours with only two will only stretch for 9 and a half with a full half-dozen in place.

Next up, if you’ve unlocked the Cat Dorm, you’ll take your free cat from the shop, and start training it. This can take anything between 2 hours average (for a Rare cat) to 12 hours (for a Super Rare cat), but, again, gets you another daily cheevo, and a Rare cat (and an Elite one if you do this every day.) Just like ships, you can enhance cats with other cats, but, unlike enhancing shipgirls, specifically using the same cat to enhance another cat is important, because it upgrades their skills. And you’ll want to upgrade their skills. After you’ve got the weekly, keep the rare cat, use that, keep all your freebies. It’ll make the weekly much easier.

Image Wrangling the cats is both useful and annoying, because it’s another layer of stuff you have to sort through when you rearrange your fleets. Honestly, the big winner is Steel, who is virtually indispensable for Submarine fleets due to expanding their hunting range.

We’ll be talking about cats in another mechanics update.

Next, dailies. Your dailies will get you several achievements in one go, because they’re three victories minimum (9 to 14 on Sundays, depending on what you’ve unlocked, and whether you’ve saved the Sub Weeklies for Sunday), and that’ll net you a few cubes, among the other rewards. We’ve talked about the dailies in the videos, but we’ll go into a little more detail later on.

Image Dailies count for the mission requirements of ‘get into fights’, ‘do a daily’, and so on, so just by smacking the 6 dailies that are nominally unlocked after you’ve started to beat up stuff for cognitive chips, combined with the hard mode trifecta, you’re already 90% of the way to probably the most-involved daily mission being completed.

Next up… Enhance a piece of kit. Generally speaking, if you can, enhance gear either already on a shipgirl, or a higher tier piece of kit you’re going to put on a shipgirl shortly. It only has to be one point for the achievement, but if it’s a new piece of kit, why not go for three enhancements? (and 10 enhancements is a weekly, so…)

Image Nominally, Reserve Enhancement plates for Purple or Gold-tier gear, though there’s a few items worth holding onto from the blue-tier list. Specifically, fire extinguishers, unless you feel you can laugh off later-game incendiary attacks.

This is, however, something many players ditch after a certain point, because while it does lead to T1s and T2s, which can be crafted into T3s? After a certain point, T3s become bumf, a cleaning operation which happens to net you blueprints and money (a small amount.)

Then build a single ship. If you build a light ship, then bam, you get the cube back from the daily, and you’re up 200 gold (600 for a light, 800 from the cheevo.) The weekly is 10 builds a week, but so long as you don’t go mad (or an event is going on which has a “build 3 daily” achievement), you’ll be fine, cube and gold economy wise. Combined with the dailies for beating dailies, and hard mode? You’re up 6 cubes if you only build a light a day. And that helps you get through events.

Image By building a single light girl a day and clearing the dailies, you’ll actually make a profit of 30 cubes a week as a bare minimum; for the cost of one, you’ll collect a total of four daily from the missions, and the weeklies lets you accumulate another dozen.

This is advice I don’t always follow.

If you’ve unlocked the Academy, then refresh your skill training, if you’ve got the skill books. Skill books of the right type for the skill (Red: Offensive, Blue: Defensive, Yellow: Support) will give you 150% XP, but you can use other skill books if you’ve got more of them than you need right now.

Image Speaking from personal experience you’ll always be short of Red Books, because attack skills are going to be your bread and butter. Most people typically suggest getting your girls’ skills up to tier 6 out of 10 because after that point it takes more than one Gold-tier skill book to level it further

Next… Well, which next really depends on how confident you are, or how far along you are. If it’s early game, you’ll definitely want to try and progress in the story missions some, or do a War Archive (sidenote: COLLECT YOUR WAR-ARCHIVE TOKENS. I missed those on main for the longest time, and it kinda fucked my early game, levelling wise.) This will probably also be a good time to, I dunno, refresh those commissions you’ve been doing? It’s a nice, easy way of levelling shipgirls you’re not using, gets you rewards… There’s really no reason not to. Indeed, one of the other reasons to do it involves two more achievements, because the longest commission, the 4500+ gold one, spends between 800 and 1200 fuel, depending on where you are in the game. That much gold isn’t to be sniffed at, and an easy pair of rewards for doing it?

Noice. Budget your fuel for this one, folks, it’s a doozy.

Image The fuel-hungry commission will drag a level 1 girl to level 19 without a care in the world, drop a minimum of 4,500 gold on your lap, and dunk a lapful of rewards onto you; one of the more-coveted rewards is the 5-8 cube option, but gold skillbooks and tier 3 upgrade plates are also in the running.

Image Sadly, there’s also the rare chance of 5-8 quick finishers, which is a booby prize. The game at least forewarns you of what it’ll drop on your lap, which is nice, but it will let that fuel-hog mission sit and linger until you accept it.

There are also 4 commissions that appear at around 3AM UTC, and disappear sometime around 10 or 11AM UTC. These give not only higher XP rewards than the common commissions (or even most Urgent Commissions), they also have much higher fuel rewards.

Image In North America time, that’s 10 PM Eastern, or 7 PM Pacific for when the ‘overnight’ commissions drop. Fuel, Gold, Cubes, and Skillbooks are all potential rewards.

As of the time of writing this, there’s three EX events in the War Archives, Each with 6 missions, plus 6 hard missions, and two SP events (The Encircling of Graf Spee, and Strive, Wish, and Strategize), with only 3. This is being added to over time, and I’m sure more events will be added before the LP ends (Be that with me saying “Fuck this for a game of soldiers, I’ve been at it a while”, or because I’ve beaten 13-4, and have thus finished story mode… Although, let’s be fair, there’d probably be the occasional Event update to this LP if I actually did get that far.)

Do the hard mode maps once you’re levelled enough, just doing 1 is a daily cheevo, and doing all 3 is experience. It’s recommended you get 3-4 Hard to “Safe”, because the Fox Mines are where you’ll be spending a lot of your time, sooner or later, and a Safe Hard Mode map means you only have to fight the boss. From 4-3 onwards, Hard missions take 4 wins to clear, so doing two of those, and 1 in 3-4 is a good idea. You’ll get those 3 star rewards slower, but fuckit, you’re progressing at all, and it’s XP.

Image While some people will demand that you farm the fox mines until both Akagi and Kaga fall out, more-practically, it’s simply a good spot to farm experience for lower-leveled girls, with 8 fleets, an ammo restock, and a level range of 32-35 on Normal difficulty.

Sidenote: Folks may tell you that doing so is a waste of opportunity to gain cores. This is true, you’ll get less cores in 3-4 than anywhere higher. There’s also blueprints you’ll get higher. Thing is? It’s a marathon, not a sprint. And you won’t *need* a lot that cool stuff from the core shop until much later, by which time… You’ll only occasionally want to pop into the Fox Mines, at worst.

This would all get you XP for the other possibility you can do next: Exercises. If you’ve already got 10 exercises, rather than 5, I’d say do at least 5 before the next 5 drop, regardless, but if you’re progressing one or two missions, that takes, like… Half an hour to an hour, generally speaking.

Image Exercises, aka. Automated PvP, is encouraged, but generally a background noise timekiller than anything practical. Its main draw is that it always gives full Exp, win or lose, as well as Merit points, win or lose. Win matches and you’ll gain ranks, meaning more merit points per match.

Otherwise, get yourself some levels, and presumably kit first. In between each 1, maybe 2 attempts at a mission, look for your duplicate ships you got. Because the common ones can be used to enhance ships easily, and the rare and elite ones can be used to retire. That’s two more achievements, although, for the “Retire 1 ship” one, you can retire a common, you’re only missing out on the medals from retiring a rare ship. Generally, unless it’s an event ship duplicate (you want to hold onto enough of those, if you get them, to Limit Break your ships all the way), you’re only wanting to retire or enhance ships that you don’t need for the next limit break. The wiki is your friend on where to get ships.

Image As a sidenote, the map selection panels will also tell you which girls you’ve collected on that map’s area if you tap the silhouette of a girl’s head; It might not tell you where to find some of the girls (Archives can do that, actually), but it will tell you what you’ve found in that area in case you want to hunt down a certain lass for limit breaking.

Beyond that? You can collect oil and gold anytime, but remember to use enough oil to get below your fuel limit for the collection achievements, and… Bam, you’re done with the dailies. There’s your daily routine. Check in on the Munitions Shop when it refreshes, in case there’s some food or cool stuff in the Core or Merit shop you can afford (the General Shop becomes less useful as time goes on, but it never becomes useless, as it occasionally has food, plates, and skillbooks you want. Hell, it sometimes has cubes that don’t cost gems to get.) Check your research, keep up with your commissions, all this stuff gets you cool shit. But, as always, keep it within reason. Play at your own pace.

Image In general, the big prizes in the Core Data shop, which is refreshed monthly, are the extended batteries and submarine snorkel, the VF-17 Fighter Squadron, and the 818 Swordfish Torpedo Bomber Squadron. The unique Battleship ammunition and the Rainbow-tier Oxygen Torpedos are also incredible auxiliary equipment.

As you might have guessed, there’s a lot of bumf to the daily routine, but most of it is, in game terms, useful. Like pretty much any Free To Play game, it rewards you for still playing, whether you’re a small spender who treats the game like a marathon, or someone who… Honestly, should maybe consider limiting their budget unless they’re rich enough to handle it.

Image While I have spent a few dollars on AL, I’ve held off on fiscal mismanagement for this year, so I’m doing something right.

...I refuse to use what the F2P market considers official terminology, as it’s highly demeaning. Suffice to say, their comparison to you being fish, animals to harvest, rather than people, says a lot about most F2P or microtransaction heavy game developers. And what it says is unpleasant. Azur Lane, thankfully, balances around less encouragement to be a big spender, and its lootboxes are all ingame currency buyable stuff but… I repeat, microtransaction vulnerable, stay away.

Image Honestly, while there are a few items that are Gem-exclusive and entirely quality of life improvements, such as expanding your dock capacity (at 200 gems for 10 slots, the real money comparison is approximately $3.33 USD per Dock upgrade), the main use of Gems is for People to leer at incredibly skimpy and.or Animated character skins. Most Notably is the American Light Cruiser St. Louis, which has a barely-there dress worth 1080 gems; Approximately 18$

Yes, I can’t even pretend some of those skins haven’t tempted. But I’ve stayed strong.

Image You have a HMS Unicorn nendroid.

Yes, and that was a birthday present… Koff.

Well, at least I know I've been covering my bases well, going by everything said above. Shamefully, I didn't realize how to gather the war-archive tokens for some time.

Recently announced via JP side, we're getting ASW changes to make submarine battles less awful to deal with. Some translation from a comment in a reddit post discussing it, with a few edits from my end for readability's sake:

"1. You don't need to equip sonars to detect submarines. Ships with ASW stats can automatically detect them. Sonars will improve the detection range, and also debuff submarines.
2 Sonar and depth charge will get buffed. Sonars will now debuff submarines. Depth charges damage got buffed, and will have splash damage that can damage undetected subs.
3. ASW skills also all got buffed. Skill based detection will detect whole map. Koln's skill will reduce sub evasion. Chaser will slow down enemy sub, Cooper will increase damage to subs, Odin will reduce enemy sub accuracy.

The ASW change will be implemented with the 3rd anniversary update."

User avatar
Site Admin
It's okay, Lurith, it's pretty easy to miss (I missed it for almost a year on Main, because that sodding button is hard to read as "Do this!") And that is a good announcement, even if, y'know, that's pretty much a year away.

EDIT: Because people asked me to put this here, a wee poime.
The End wrote:And the skies turned red,
And the sea boiled,
And I heard the tolling of a great bell.

Not a bell.
A cry.
"HEY SHIKIKAN!"

This is how the world ends.
Not with a bang, but with a gacha phrase.

User avatar
Site Admin
SHIP UPDATE: DAYS 5 AND 6 (PART 1)

Well, I've procrastinated enough on this one, and I really shouldn't have, because it's an update in two parts. I said it would get hectic, shipswise, but I honestly never expected it to get this hectic.

14 ships. So we're doing 7 in this one, and 7 in the next. And then, hopefully, Visitors Dyed in Red. Also, because events make things confusing in terms of "Shipgirl GET!", I've noted origins when they're in battle maps other than the main ones.

Cracks knuckles. Right, let's get into it!

PENNSYLVANIA

Image

Pennsylvania is, on the one hand, a terrifying opponent (We’ve discussed that in previous ship updates, and we’ll be going into a little more detail), but, despite her demeanour in battle, she is, honestly, a sweetheart. A gruff sweetheart, but she’s protective, she sometimes thinks the Commander has puppy-dog eyes (and, overall, has little patience for him until her affection improves, and definitely doesn’t approve of funny stuff!), and actually has a unique line for both Saratoga and Nagato where she tells them to stay behind her for protection.

Image Pennsylvania is honestly one of the best girls in the game for raw power. Unlike Warspite, who’s known for precision aim and surviving upon sheer indignant rage, Penn is on a revenge bender and plans to Hate Islands Out of Existence.

Image Her lines towards Saratoga and Nagato are a twofold reference. Firstly, she’s older than both others, and all three were participants in Operation Crossroads, where Sara and Nagato sank


Oh, and she likes a wee drink after a battle. Can’t blame her.

Image Seeing her baby sister die will do that. As shown in the 1-2 Cutscene, in AL, Arizona died in Penn’s arms. In reality, Penn got to watch as Cassin and Downes burned to death right in front of her, and as the destroyers exploded, she ended up with shrapnel damage peppering her features.

Skillwise, she only has the one skill, but it’s a doozy. Called “Sister Penn” in English (presumably due to her protective attitude, resulting in her nickname), but, more fittingly “Avalanche” everywhere else, it’s basically an extra artillery strike type barrage that has a 30-60% chance of proccing every 20 seconds.

Image This Barrage gives Penn the Ability, with a bit of luck and timing, to drop up to Twenty-four Main Battery shells on whatever’s in front of her, as her skill fires 4 waves of 3, and, if you fire her main guns at the same time, you can have up to 3 waves of 4 shells depending on the turret type chosen.

She scares me in battle, but, overall, I like her.

Image You should be scared. ‘Old Falling Apart’, as she was nicknamed, was given that name by allied crews who watched the sheer amount of artillery being expelled by her and worried that she would shake herself apart.]

Fun trivia: the USN used shell dyes so splashes could be marked as 'from that ship' to assist in aiming. Pennsylvania, she who deletes islands and fired somewhere close to her weight in 14" shells over WW2? Her assigned Shell dye was red

Image During her five years of World War II service, Pennsylvania travelled 146,052 miles (235,048 km), and fired 6,854 14-inch rounds at the enemy, with 31,678 shells from her 5-inch guns and 97,327 rounds from her anti-aircraft battery.

Image This is a direct transcript from one of Pennsylvania's battle reports.

Penn Deletes An Island wrote:"When Engebi had been secured, the PENNSYLVANIA moved southward through the lagoon to the vicinity of Parry Island. On the 20th and 21st she delivered preparation fire on this island. Parry, who is just over a mile long and less than 600 yards wide, was subjected to a naval bombardment that for volume of fire per square yard had never been equaled elsewhere.

At the beginning of the bombardment the island was covered with a dense growth of palm trees extending down to the water’s edge, and at its conclusion not a single tree remained standing. The ground was littered with broken tree trunks and palm fronds.

The air spotter of the PENNSYLVANIA reported that all visible installations were destroyed, trenches demolished and unserviceable, and areas he designated as containing Japanese troops covered with blood upon completion of the firing periods.

He further reported that the Japanese appeared to become hysterical during the bombardment and ran frantically up and down a trail on the far side of the island, into the bushes, and out into the water."

Admiral: "Pennsylvania, how are you getting on with the fortification on that island?"
Pennsy: "I've removed it."
A: "The Fortification?"
P: "No, the island."
TERROR

Image

Ahhh, Terror… The first component in Project “Fuck Your Wave” (At the time of writing, 66% complete… Or, more fittingly, 0.666 recurring. :P) and she’s…

Honestly, she’s odd. I genuinely don’t know why the Commander would have peas and a lawnmower around her, much less her calling him out for it...

Image Reference to Plants vs Zombies, naturally

...D’oh, shoulda seen that… Anyway, she also asks if we play wind instruments, wonders if it’s odd to have a heart (y’know, frankenship) or hopes her knees don’t break… But she’s honestly a good kid, and I’ll gladly supply the headpats she requests.

Image Terror’s one of the older girls on the roster, being only a few months younger than Erebus, and both having served in World War 1. As for her appearance, well, by the time of her eventual sinking in early 1941, less than 15% of her was original parts, having undergone dozens of repairs and refits over her 26-year career.

Her affection lines are interesting, because yes, she and Erebus are pretty co-dependent, and worked together in the Dardanelles on bombardment missions, but it’s a bit more than that… They’re the ones who have stood by each other.

Image Erebus and Terror, being monitors, are odd ducks within naval history, being essentially what happens when someone plunks a great honking big battleship gun on the smallest possible hull that could fit it. As a result, they tended to be sort of left to their own devices for the most part, which is what was turned into the references of Co-dependency between her and her sister.

Sadly, Terror was destroyed by a combination of cumulative damage, air strikes, and mines, after a 7-month span of, well, Terrorizing the Italian army in North Africa. Turns out that lobbing fifteen-inch ‘headache pills’ at spaghettis caused the poor girl to be considered a priority target for the luftwaffles, just as Illustrious was.

Image Mind, she had worn out her guns by that point; she had fired them so often that the barrel linings had been worn away, so she literally could no longer fire.


Skillwise, Terror shares the skill of her sister, Infinite Darkness. It’s a 30-60% barrage skill exactly like Penn’s in general, but the effect? Any lane she’s in has a 30-60% chance to, at best, get heavily damaged every 20 seconds. When it comes to normal enemies, even named ones? They’re fucked. Three V-waves of bullets tends to do that.

So yes, she, Erebus, and Abercrombie (who she disses in her introduction, but also has “Fuck Your Wave” skills) are a good fit for my pet project. One I fully expect will cause slowdown due to the massive number of projectiles on field. And I’m looking forward to that.

Image Stat-wise, Terror and Erebus are identical, with a single exception. Erebus has 91 Luck. Terror? 19.

Alas, she and her sister are a little bit squishy for their class.

Image Which is the fun of monitors being monitors. They’re small, slow, poorly-defended, but are stable platforms for utterly turbofucking some wild dipshits with the biggest guns available. In fact, in World War 1, a few were equipped with eighteen-inch guns to play ‘swat the german’ off of the Belgian coast.

My only regret is that we won’t see Abercrombie for aaaaaages. Look up her picture, it’s priceless. :allears:

Image Abercrombie’s a shooting-obsessed little shit, but the best line is if she dislikes you. Because then she uses her main gun as a percussive instrument on the commander.

SHIGURE (Actually got in VDiR War Archive)

Image

Shigure is one of the ones Grump likes, for a very simple reason: She has a particularly nasty “Special Touch” (SHUDDER) retort. “Commander, let’s play a game. I’ll give you five minutes and if you haven’t been caught by the police at that point then I’ll withdraw my report~”

Image Shigure, which translates roughly to ‘light rain’ or ‘drizzle’, is very much a survivor; second of the Shiratsuyu-class, and last of the sisters to be sunk. She tangled with the USN on multiple occasions, including taking a torpedo clean through one of her rudders, and generally made a right proper nuisance of herself for the duration of the war.

Fuckin’ right, girl. She’s loud, she’s bombastic, she’s confident in both her skill and luck, and she likes to blow things up. I like her.

Image Her MVP line is golden, too. “That was a good fight, considering how much they suck.”

Oh, and she thinks the Commander is a dumbass. Which, to be fair, many are.

(Pre-emptive) Shut up, Grump.

Image Confirmation Bias in play here. Also, IJN High command was made of Dumbasses. Look up how they punished the crews of ships for failing impossible missions, and you’ll see why Shigure specifically and the rest of the IJN girls don’t hold high command in high regard.

A good example is the destroyer Akebono, which kept getting punished for failing missions like ‘Escort this transport into the teeth of a Submarine wolfpack. No, you’re not getting sonar or new depth charges.’


Skillwise, her pre-retrofit unique skill, Shigure of Sasebo, reflects her luck. Every time she fires her main gun, she has a flat 5% chance of buffing her own evasion by 30-60% for 8 seconds. Doesn’t proc often, but with an already somewhat high evasion stat, this is no joke when it procs.

Post retrofit, however, is where it gets interesting. If she’s sortied with Yukikaze, she becomes almost as much of a torpedo terror as Yukikaze, buffing her own torpedo stat by 5-15% and, every 20 seconds, having a 30-70% chance of launching a torpedo barrage. Considering this happens to coincide with Yukikaze’s torpedo skill? It’s no joke.

However, if she’s not in the same vanguard line as Yukikaze, she’s still useful, with a 1-5% damage reduction to the other ships in the fleet, and, once per battle, when one of her fellow fleet members’ health goes below 20%, she heals them for 4-10% of their max health. Which is sometimes the difference, with a squishy ship in the fleet, between one last S… Or an A, and a morale hit.

Image Historically, Shigure and Yukikaze never actually worked together; their primary commonality is due to both of them being considered lucky ships, with Shigure based in Sasebo, while Yukikaze was based out of Kure. So, there’s some rivalry there, combined with the characterization of the pair being a black dog and a white cat. So they’re constantly at loggerheads.

This also comes back to bite them in the ass in the Azur Lane Comic Anthology, where they’re convinced to show their luck by eating increasingly spicy foods as a competition, much to the quiet amusement of everyone else on the base.


ABUKUMA (Actually got in Fallen Wings War Archive)

Image

Another shipgirl who takes precisely no shit from a lewd Commander (she will torpedo your ass, you perv!), Abukuma is mostly pretty chill… She doesn’t really feel much from victory, she likes to protect people, cruise around, go fishing… She likes to relax, she doesn’t have a name nearly as complex as you’d think… All around, a chill, reasonably protective person.

Skillwise, she fits into the utilitarian slot. Double torpedoes, like Craven, Torpedo Command (5-15% torpedo stat boost for destroyers), and an All-Out-Assault. So, pretty solid and chill there too.

Image Abukuma’s a nice girl, and last of the half-dozen Nagara-class Light Cruisers.that was rendered instantly obsolete when Fubuki was constructed. (As were the Kuma class and the Tenryuu class… Basically Fubuki rendered every CL made before 1928 obsolete)

Anyhow, I rather like her. Abukuma’s the youngest of six sisters, and spent her career acting as the mom figure for a passel of destroyers, including Shiranui, for much of the war, primarily assisting in troop landings and similar across much of Japan’s expansion from 1931 until 1943, when the US had built up enough of a head of steam to properly push Japan’s collective shit in.

Which is how she met her end; at the battle of Suriago Strait, as part of the larger battle in Leyte Gulf. After being disabled by a deep-running torpedo that passed under a destroyer, Abukuma was spotted the following morning heading home for repairs; several squadrons of B-24 bombers were sent out to disabuse her of the notion of escape, and promptly bombed her into a flaming ruin, exacerbated by her type 93 Oxygen torpedoes cooking off in the blaze.

Image The destroyer Ushio rescued Abukuma’s captain and 280 crew.

Image 250 went down with her


CLEVEBROOOOOO! (Actually got in Fallen Wings War Archive)

Image

Cleveland really earned her name as a Knight of the Sea, with 13 battle stars. And she’ll tell you that proudly, with a warm, cheeky grin. She’s got lots of sisters, and she is the big one to them all, self confident. She’s got a kinda conflict going on with being called a tomboy though, getting very irritable with… Well, the name above. Good ol’ Clevebro.

Image The Clevebro nickname was coined by players of World of Warships, where the WW2-era Light Cruiser had been relegated to Tier 6 (of 10), where she was preferentially matched against WW1 and Inter-war ships. As a result, Cleve’s 12 6” guns and radar were more than enough to carry entire 12-person teams without an issue.

She’s also one of the ones, due to the ascended meme of her in a gay relationship with Helena, that I would never pledge if I had a gajillion rings to do so. It’s such a heartwarming romance!

Image She does have an incredibly cute wedding dress, however.

Skillwise, she’s got that Anti-Air mode skill, with that 25% chance to increase her AA by 20-40%... And reduce her firepower by 40-20%... Assault Order, where every 20 seconds, she’s got a 25% chance to buff damage by 5-25% for the rest of the fleet, and an All Out Assault. So, she’s all around a power forward in the team.

Image Her skills reflect her history; despite earning 13 battle stars, Cleveland never got to unleash her guns against enemy naval assets; she spent much of her time swatting planes and brutalizing fortifications.

incidentally, her smacking of fortifications meant lots of staring at trees, which is why she has a light fascination with bonsai.


Oh, did I mention she’s athletic as hell, and loves Basketball? Clevebro’s great.

Image She’s a better basketball player than the actual NBA team based in her namesake city, too.

U-81 (Build)

Image

Oh boy… U-81 is a sneaky prankster. Like many submarines, she’ll sneak into your bed (because it’s a nice bed!), she’ll play hide and seek, and she’s ever so slightly disturbingly enthusiastic about ambushes.

Image Submarines, in general, are best described as ‘slightly creepy’ to other shipgirls, because they’re basically purpose-built assassins. And they know it. And embrace it. And they like to listen as bulkheads collapse and the water rushes in…

However, she also sank Ark Royal, and identifies that she’s “Weird” (Ohhhh, we’ll get to Ark Royal), so this immediately puts her in mine and Grump’s good graces, as a character.

Image One torpedo to take out Ark, too. U-81 was a lucky little monster

Mind, of the Hundred-odd U-boats that crept past Gibraltar to operate in the Med, of which U-81 was probably the most-notable due to shanking Ark Royal, none of them got out.


Skillwise, like many Iron Blood U-Boats, she works best in a pack of her team-mates, as it improves her second tier skill, Wolfpack (U-81 Edition :P .) What does it do? Well, without IB teammates, it adds a 20-40% evasion boost. Which is good. But if you have one IB sub in the same submarine fleet? That’s a 2.5-7% buff to her torpedo stat, reload and accuracy, doubled if there’s two IB subs in her fleet. Not for nothing do you wanna pack U-Boats together.

Image The Wolfpack Skills stack upon oneself, so 3 IB subs in a squad means a beefy +18-21% bump to torpedo, reload, and accuracy, depending on which sub you’re looking at. U-81’s natural Torp stat of 555 at level cap means she’s utterly terrifying without equipment pluses, and with? She’s even scarier.

A typical way to make the late game cry is to drop a pair of gold G7e homing torpedoes into her weapon slots, and a pair of Rainbow Type 93 Torpedoes into her aux slots. With two other U-boats, her Torpedo firepower goes from ‘rude’ at 555 up to ‘terrifying’ with the final score being around 1023. At that point, Players are slinging pocket nukes.


She has an All-Out-Assault (which, in Submarine Mission Weeklies, can be triggered manually, rather than when she enters battle), and her specialty is revealed with her first skill, Silent Hunter. 5-20% damage bonus to CVs (IE “Actual” Carriers), and a 5-15% chance of causing Flooding, a damage over time effect, for 24 seconds… Which refreshes every hit.

Image The flooding is a global chance on anything she hits, and the DoT is scarily effective at taking apart enemy health pools.

It’s somewhat of a shame, then, that subs outside of the short weeklies blow half their torpedoes when they enter, half when they reload, briefly surface to plink at enemies with their secondary guns, then fuck off.

Image That’s because jamie doesn’t have good torpedoes yet. Or Snorkels, which are in the Core Data shop.

SHIRANUI (4-1)

Image

Oh, Shiranui. She’s actually helpful, she probably isn’t a ghost (and it’s more likely that she can be believed when she says she just cosplays as one because people think of “Ghost” more than “Heat Haze”), and, eventually, she will come to believe that someday, the Commander will only look stupid.

Image Shiranui actually means ‘Phosphorescent light’ or ‘ghost light’, so her deliberate ghostyness is a proper reference to her name

D’oh, I was looking at the class, not the name. That’s on me.

However, for all her decidedly, frostily snappish nature, she’s friends with Akashi (although you wouldn’t think it to hear them talking), and her heart’s in the right place… But oh boy, do you have to do a lot of digging to get to that heart.

Image She’s the big sister to 17 siblings, being the second of the Kagero class; it’s strongly implied that she uses her time as the fleet’s shopkeep to earn money so she can get treats for her little sisters, often to her own neglect, as shown by her patched and tattered rabbit ears.

Apart from a Double Torpedo skill and the mostly usual All-Out-Assault, Shiranui shows her real role as an escort destroyer with her retrofit skill: Carrier Escort. All Carriers, light or heavy, take 5-15% less damage as long as she’s alive. Another pretty solid pick.

Image While Shiranui was a good escort for most of her career, like much of the Japanese navy, she was thrown into a fight she was woefully underprepared for, and paid the price at Suriago, when Enterprise found her.

Image Shiranui went down with all hands.

User avatar
Sheesh, I suppose it's about time I deliver the OSACA (Overly Serious Anime Clothing Analysis) report. I'm like... days late.
Salted Grump wrote:
Tue Sep 08, 2020 9:44 pm
Image
Oh dear. I'm afraid this is kinda what I was expecting on this. We'll just go from top to bottom, I suppose.

The head region's actually quite fine, the ribbons are pretty and the motif of the French flag is well used. The blue braid is perhaps a bit eccentric, but it works as part of the color motif. I even like the haircut, if I'm being honest.

Looking a bit lower though, we've already got some concerns. While the necklace is a neat touch and I appreciate the effort to add chest support, I'm mechanically unsure of whether or not this is really going to help any. While the gold straps are evidently for the halfsleeves, the black ones are for... I can't honestly tell you based on their position. They're moved a little too far to the side for me to be able to say much, and those who know me, know I don't like straps to the neck. It's evident the rigging seems to run up the back, but putting that force on just the sides of the neck is a bad idea given that it's sitting right on a muscle group and you're going to be a bit strained to turn your head all the way.

Consequently, it's design leaves me unsure of if it's really even doing anything for her chest more than just sitting under it and clamping the fabric. There may be cups or something in there as part of it, but at a base level, provided if the fringe on the top is tightly fitted or tight elastic, the actual risk there isn't that much.

The cross right below and beneath all this looks honestly a bit dangerous to the wearer, especially given it's proximity to certain regions. I in general dislike the random diamond cuts from the fabric purely for showing skin and these aren't really in that "sexy" of a spot if I'm being honest. Her bracers, albeit neat, could potentially run into some issues with how long those flared out parts are.

Cutting to the chase and going a but lower, the skirt of this minidress or whatever it is, is far too short. I don't have much faith that this is really hiding the hindquarters, and given how loose it seems to be, I don't think it really ever will. Evidently this was all for thirst of the thighs, which is somewhat unsettling to me with this character given that proportionally and look-wise, they look kinda young to me.

-------------------------

Overall Aesthetics Rating: Meh to Okay

(Comments- I appreciate all the nifty dual-color details to symbolize the flag and even the crosses, I suppose, but the general thirst of the outfit detracts from a lot of it for me.)

------------------------------------
Practicality / Comfort Rating: Low

Despite looking good, long heeled boots hit hard on this, and the upper regions of the clothes are fit rather tightly, that metal cross and those bracers pose a potential danger to the wearer... and this is with the rigging taken out of the equation.

Estimated Walking Speed: A carefully measured pace, but even then, that won't help that much.

Ribbon Rating: Quite Good

Would I Wear It: :colbert:
--------------------------------------

CCT Style Analysis:
Cute: 17.5%
Classy: 17.5%
Thirsty: 65%
-------------------
-------------------
Salted Grump wrote:
Tue Sep 08, 2020 9:44 pm
Image
Well, at least this one is mostly a different story... sort of.

The upper half of the outfit, from what I can see of it, looks perfectly fine to me, though it seems the trend of never actually wearing your coat continues. On the top half, I'm concerned both with the metal handle of the sword, (which is horribly impractical in general, which makes me think it's probably just ceremonial,) and the fact that art-wise, the coat itself is confusing. Her left sleeve is behind her rigging I suppose, but her right sleeve seems to be gigantic? That, and it's incredibly asymmetric I guess given how much cloth is on the left of the image compared to the right.

Going down a bit, I'm concerned about the length of that ribbon/belt thing with the circular ornament on it. I can't necessarily tell where it's connected to, but regardless, as is, it would be swinging around way too much during any actual combat.

As seems to be the theme for this OSACA, we've got more issues with thighs, and this time with a character that is visibly younger. The odd hotshorts/lightly pleated skirt thing is interesting given it seems to use garters and fasteners to have it maintain modesty in a sense.

It's the "skindentation" that's the real issue here. Both the strap for the dagger similar to a sgian-dubh, and the bands on the stockings look really way too tight, and given their presence right in the center of the thigh, I question how that might affect movement of the muscles there.

So I tested it myself.

After about a minute, getting a similar level of skindentation on my thigh as the dagger strap here, I found myself feeling the blood flow restriction and was still feeling it for a while after I stopped. This, combined with the fact that said strap is connected to the stockings anyways, I can only say I have little faith in the practicality of this. Y'know, also since the dagger is in plain sight as well, it's not much of a surprise weapon...

The stockings are either restricting the leg even more than the dagger strap, (in which case I am sure based on my test it would struggle against the muscles,) or it's weirdly padded to look like it is, in which I can only say this

:psyduck:

-------------------------

Overall Aesthetics Rating: Good to Okay

(Comments- Aside from the weird skindentation stuff, it's not really that bad. The coat's still a bit weird and the strange hotshort/skirt thing is odd but they're both interesting I suppose.)

------------------------------------
Practicality / Comfort Rating: Low

(That unusual coat, the ribbon, the metal handled sword, and the blood flow restriction on the legs all cut back on what would be a highly practical outfit.)

Estimated Walking Speed: Fine for a while, provided your leg doesn't start losing blood flow. If the stockings are restricting that much, then I don't think you'll be walking too long.

Ribbon Rating: Okay (+ For ribbon on beret, - for free-hanging long ribbon)

Would I Wear It: Fix some of the issues, and I might, but until then: :psyduck:
--------------------------------------

CCT Style Analysis:
Cute: 20%
Classy: 30%
Thirsty: 50%
-------------------

User avatar
Site Admin
SHIP UPDATE: DAYS 5 AND 6, PART 2

Well, goodness me. Like I said, 14 girls in two days is quite the thing, although, aside from events, it usually slows down around day 20 (Help... Meeeee), but thankfully... So many good ships. So let's get into it!

RENOWN (1-4H)

Image

Renown is efficient. Renown is dutiful. And Renown is completely clueless when it comes to matters of the heart. No, really. She asks why someone loves letters (Referring to love letters, natch), she doesn’t get the symbolism of candles in a heart shape on the beach (and actually makes the Commander cry when she asks, innocently, whether he’s worried the wind will blow them out.)

Image Renown is thick as two short planks in no small part due to her resemblance to Artoria from the Fate series, who’s just as neutron-star dense.

Eventually she gets it. But until she does, she is a reliable, dutiful, and efficient shipgirl, who is honoured to fight with HMS Hood, and gets right down to business when on sortie with Warspite or Nelson.

Image Being the eldest of the battlecruisers in the game, Renown has some big boots to fill; and being one of the oldest RN girls in general, she’s actually on the ball in a fight.

Despite being built in World War I, she missed out on the fighting then, and only really got to strut her stuff in the Second War, long after the age of the Battlecruiser had ended; She still worked in concert with a variety of ships, and even was host to an evening meal between King George VI and President Truman after the Potsdam conference.


She can equip multiple main guns, and her sole special skill, Final Glory, buffs her next main gun shot, every main gun shot, by 10-15% … I don’t think it stacks though, otherwise she’d be terrifying, rather than reliable.

Image Final Glory does not stack, sadly, but the flat buff to her power is pretty solid. Due to her firing 3 barrages at Max limit break, only the very first volley from her main guns is at ‘base’ power, while all followups are given that little extra kick.

LITTLE RENOWN (Event Ship)

Image

Okay, technically we don’t get Lil’ Renown until near the end of the Crimson Echoes event, day wise… But we got Renown today, so she’s going in here. And oh boy, you can definitely see where she got it from. Devoted to the teachings of the Codex of the Royal Knights, denying herself candy (after a significant pause), completely broadsided when she’s being told she’s cute…

...And as dutiful and eager to please as her adult self.

Image Little Renown is very much a cinnamon roll of a character, too pure for the world of combat she finds herself in, and then you look at her skills and go ‘well, shit.’

And she’s certainly no slouch when it comes to a fight. Her first skill, Knight’s Shooting Training, takes four main gun shots to pay off, but a consistent 100-120% damage for main guns at the end of it is well worth it, and those first three shots (at 40% damage, 60-80% damage, and 100%-120% damage) reload 40% faster. Her other skill, Knight’s Formation Drill, increases her firepower, reload, and accuracy by 1-5% per other Royal Navy ship, up to 4 times. In a RN fleet, that’s a 20% max buff to three stats, nothing to sneeze at!

Image With a respectable 344 firepower at level cap, that 20% buff puts her up near the level of Warspite’s Retrofit for natural gun strength; While she’s relatively fragile for a backliner with only medium armour and carrier-tier health, once she gets up to speed with her artillery, she’ll do a grand job of making the opposition miserable.

EDINBURGH (Build)

Image

Belfast’s older sister, and subordinate to her in the Maid Corps (the Queen’s maids and spies, as capable in housework as they are in wetworks), Edinburgh… Has a bit of a complex regarding her younger sister. She’s clumsy, she’s forgetful, is very protective of the Belfast gold (this, as you might imagine, might not be the best mix), and while she relies on her younger sibling… I don’t think she’s too happy about that.

Image Edinburgh was actually transporting several tons of Soviet Gold that was being used to pay for Lend-lease materials when she ended up getting sunk; and before you ask, yes, the gold was salvaged from her wreck.

Image The Belfast Foundation she mentions is the organization tasked with maintaining the physical HMS Belfast as a Museum ship, where she has been moored on the Thames river. If you’re ever in London, you should take a peek, as Belfast is one of two examples of British Naval Engineering that still exists from that time.

As for her characterization and history, Edinburgh is mostly overshadowed by Bel in part because the two never got to work together; Belfast hit a mine early in the war and was in drydock until 1943 getting her broken keel fixed. Edinburgh, meanwhile, had to do all the hard work, including the arctic convoys, which is eventually how she met her end in late 1942.

Image Ambushed first by a U-boat, then a concentrated attack from three destroyers (Of which she managed to kill one while crippled), Edinburgh was torpedoed three times in the same spot, breaking her in half with the exception of some very stressed deck plates holding her together. Her escorting destroyers took off her 900-strong crew, then scuttled her with their last torpedo.


You’ll want to outfit her with as many AP guns as you can, because Edinburgh’s skill is Piercing Shells, upping her AP damage by 15-25%. She also has an All Out Assault, but… Poor Edinburgh… She really does feel the long shadow of her older sibling.

Image A secret character trait: Of the maid corps, Edinburgh is the best cook, with Belfast flat-out admitting that her own skills in the kitchen do not compare.

CALIFORNIA (Actually in Crimson Echoes)

Image

California’s another one with a relationship to her sister, but this one’s more… Healthy sibling stuff. Sure, she gets shit from her older sister Tennessee when she screw up, but she also gets hugs. She’s enthusiastic, pushes herself almost as hard as her big sister (and seems to genuinely enjoy it), and she likes to have fun.

Image California was flagship of the Pacific fleet for 20 years, was sunk at Pearl Harbour, refloated, returned to service, and spent her wartime career doing as Pennsylvania did; trying to hate islands out of existence. She was also part of the ‘Revenant’ battle line at Suriago strait, where she and other survivors/resurrectees of Pearl proceeded to very comprehensively and viciously deluge Admiral Nishimura’s Central Force with 14 and 16 inch shells.

We, uhh… Won’t comment on the underwear forgetting thing. Beyond that it’s a line. And it exists.

Image It’s actually a reference to how she died at Pearl Harbour; when she was undergoing an inspection at the time, and had all her watertight doors and portholes open. Two torpedo hits and a bomb hit later, and her electrical system failed, shutting off her pumps. So, you know, she was caught with her pants down.

Or she’s an airhead to fit with her namesake.


Skillwise, she only has the one, but it’s a doozy. Focused Assault basically gives her a straight 10-30% chance to double her main gun damage on a main gun shot.

Image Nevada and Oklahoma get the same skill as their retrofits; Honestly, California’s at the point in the game where she, like her sister and her older cousins, deserve retrofits to maintain late-game viability beyond their stat blocks.

SHROPSHIRE (Actually in Crimson Echoes)

Image

Shropshire… Ohhh boy, Shropshire. She wants so badly to be cute, to be lovable, to flirt with the Commander… But the cracks in that confidence show early, and they show often. I’m torn between sympathising with her, and wanting to sit her down and say that she doesn’t need to put on an act to be cared about.

Image The green-haired heavy cruiser is a bit of a dork due to the cheerful and flirtatious mask she wears, but as a member of the London-class, she’s understandably worried about not standing out in a field of standouts.

She also has some abandonment issues due to being transferred to the Australians after her sisters Dorsetshire and Canberra were sunk, leaving her separated from the remainder of her family by some ten thousand or so miles.


Skillwise, she has a similar skill to Craven and company, in Double Gun. It’s, uhhh… A 15-25% chance to fire an extra main gun round on each main gun shot. I really don’t know what else you were expecting. Oh, besides an All Out Assault.

So… Shropshire. Yeah…

Image Combat-wise, she assisted with allied landings in the British East Indies of 1943, and followed that up by assisting Phoenix and Boise in killing Yamashiro at Suriago Strait. She was also present in Tokyo Harbour for the Signing of Japan’s Official Surrender, which is a feather in her cap.

By the end of the war, Shropshire had sailed some 500,000 miles, making her one of the most-heavily-patrolled vessels in the war; she remained as flagship for the Australian navy until her retirement and scrapping in 1954.


SALT LAKE CITY (Actually Fallen Wings)

Image

Salt Lake City is a good swimmer, and enjoys it. She sunburns easily. She’s well aware of her light “armour” (due to the limitations of the Treaty we discussed in Crimson Echoes), and keeps herself fit…
...And, apparently, reveals that Pensacola is handsy with her sister. Eesh.

Image Salt Lake City is a Character. And I’m not going to mince words, as a sailor that served on her did much better than I ever could. She was a positively antediluvian hulk of a ship with a perpetual list, a swaybacked appearance which gave her the nickname she was best known by, and is known as the only warship whose steering wheel fell off in battle. Twice.

Her history is well worth the read.


Still, she’s a bright, breezy shipgirl, mostly confident, easy to get along with, and skillwise, she’s the solid Pensacola class mix of an All Out Assault, and Full Firepower.

Image Her confidence is not unwarranted; as one of the Crossroads Club, she rode both nuclear blasts without so much as a hiccup, and was eventually sunk as part of a weapons test in 1948.

Z1 (Actually VDiR)

Image

Z1, aka Leberecht Maass, named after a Rear Admiral of the First World War, lives life to the fullest. She’s highly competitive, very confident (not least because she’s the eldest of her class), enjoys everything (including, possibly especially, a good fight), and she ever so subtly hates Prinz Eugen.

Image Z1 is a tomboy through and through. She’s always up for a scrap, is peppy, cheerful, and utterly loathes the Luftwaffles because her own allied air farce was responsible for sinking her, and her sister Z3.

“Your smile is so fake…” Yes. Yes it is. Post retrofit, she also gets an interesting line where she tries to name Z-46 (vier-sechs) “Iron Blood Warrior Princes, Ritter der Walküre! [Knight of the Valkyries!]”, and, apparently, Z-46 does not approve

Image We’ll talk about Z46 at some point, but no, she doesn’t much care for Z1’s flavour of tomfoolery.

Skillwise, Z1, like some shipgirl classes, works better with her own. Apart from an All Out Assault, Z1 gets the Z Vanguard skill pre retrofit, which gives all Z-Class destroyers in a fleet with her 20-40% more firepower and evasion… And post retrofit, she gets a different version of Z23’s Destruction Mode, named, accurately enough, Destruction Mode Prototype. What does it do? Every 20 seconds, it has a 50-80% chance of doing all of the following: Release a gun and torpedo barrage, buff crit damage by 30-50%, and reduce aviation damage for the whole vanguard by 10-30%... The latter two for 10 seconds.

Image The game breaker here is Z Vanguard. 40% Buff to Firepower and Evasion is Stupidly Powerful, and that’s before you remember that Z23 and Z25 have Disproportionately high firepower scores for destroyers, at 170 and 120 respectively when level capped. Combined with Z23’s Ironblood Pioneer (5% chance to buff firepower by 60% per shot) and Z25’s Full Firepower (60% chance to bump firepower by 40%), and the buffs being additive, and well…

Without gear modifications, Z23, in tandem with Z1, can get 340 firepower, rivalling most blue-tier battleships. Only Z23 will be firing her guns every second, instead of every 15-25 seconds.


She ain’t bad, and I like her enthusiasm!

Image Z1 is one of a handful of girls that Saru did not inject their fetishes into either.

Whups. That's actually twelve ships according to BPix, but still... Yes, that's Days 5 and 6 done!

User avatar
So, ladies and gents, I managed to hurt my back the other day, so I can't exactly sit upright to dribble words in your earholes for a few days.

Instead, as a consolation prize, I leave you with an archival photograph of Pennsylvania's 'Kill board', taken shortly before Guam in 1944.

Image

Yes, that picture is not lying.

Four Bombers.
Twelve Fighters.
Twelve Islands.

Don't fuck with Penn.

Just getting over a back injury that had me being an invalid for all of last weekend, so I can sympathize. Recently learned the importance of a low cost fleet after grinding for Hunter & Hardy from that last event. Had to do a desperation build of twenty cubes to try and get Hardy since I ran out of oil, got her on pull number 20.

User avatar
Site Admin
So, just a wee sidepost, but I couldn't resist recording this particular exercise.

After all, it is vitally important, when naming your shipbrides, that you do not invite karma to come and kick your ass in the form of Laffeyfleet.


User avatar
Okay, this is going to be a hard, long, and multi-posted effortpost. Not just because of its contents, but because I'm not looking at a single ship. I'm looking at a campaign.

One of the bloodiest, harshest, and longest series of battles in the Pacific, spanning just over 6 months of constant clashes on land, in the air, and on the sea.

Guadalcanal, of the Solomon Islands.

Image
On the left is Allied losses. On the right, Japanese.
Three major land battles, seven large naval battles (five nighttime surface actions and two carrier battles), and almost daily aerial battles culminated in the decisive Naval Battle of Guadalcanal in early November, with the defeat of the last Japanese attempt to bombard Henderson Field from the sea and to land enough troops to retake it.
In Azur Lane, Chapter 4, 5, 6, and 7 are all focused on the seas around the bean-shaped island, primarily along the North edge, where the sound between Guadalcanal and Savo island was eventually renamed Ironbottom.

There are also two events That take place in this stretch of time, The Solomon Ranger, and the Moonlit Overture.

So, first off, Let's look at the Order of Battles, starting on August 7th, 1942, when Allied forces landed on Savo and Florida islands, and started the amphibious assault on Guadalcanal itself. This was entirely to secure a foothold against the still-expanding Japanese military, and a preparatory measure to weaken the military stronghold of Rabaul, which was the primary IJA Staging point within the Indonesian archipelago.

And then, two days later, on the 9th of August, our first Naval battle, and also the first wrecks that gave Ironbottom Sound its name. (Within AL, this was the Moonlit Overture mini-event)

Image
That's 32 (and a half) Allied Wrecks, and 19 Japanese Wrecks, in an area that's not actually that big. For reference, Savo Island, in the upper-left corner, is 6 kilometres by 7 kilometres at its widest points

The First Battle in and around Guadalcanal was the night action off of Savo Island, which was an unmitigated and bloody defeat for the allies.

Vice-admiral Mikawa, sortieing from Rabaul with the Takao-class Choukai, was accompanied by the light cruisers Yuubari and Tenryuu, and the kamikaze-class destroyer Yuunagi. Joining Mikawa was Cruiser Division 6, under Rear Admiral Goto, who commanded his division from the Utter Asshole, Aoba. Accompanying Goto were Kinugasa, Furutaka, and Kako.

So, the Japanese had 5 Heavy Cruisers, 2 Light Cruisers, and a single destroyer on the lookout for targets of opportunity.

On the Allied side, guarding some 40 partially-unloaded transport ships, were Six Heavy Cruisers, Two Light Cruisers, and Fifteen destroyers.

On paper, it's a match made in hell, with the IJN force outgunned, outmassed, and outnumbered.

In practice, well...
Mikawa thoroughly surprised and routed the Allied force, sinking one Australian and three American cruisers, while suffering only light damage in return. The battle has often been cited as the worst defeat in the history of the United States Navy.
Image
The patrol paths of the ships involved in the night battle, with the screening destroyers on the western edge equipped with Radar. Radar that didn't work, I might add.
To protect the unloading transports during the night, Crutchley divided the Allied warship forces into three groups. A "southern" group, consisting of the Australian cruisers HMAS Australia and HMAS Canberra, cruiser USS Chicago, and destroyers USS Patterson and USS Bagley, patrolled between Lunga Point and Savo Island to block the entrance between Savo Island and Cape Esperance on Guadalcanal. A "northern" group, consisting of the cruisers USS Vincennes, USS Astoria and USS Quincy, and destroyers USS Helm and USS Wilson, conducted a box-shaped patrol between the Tulagi anchorage and Savo Island to defend the passage between Savo and Florida Islands. An "eastern" group consisting of the cruisers USS San Juan and HMAS Hobart and two U.S. destroyers guarded the eastern entrances to the sound between Florida and Guadalcanal Islands.

Crutchley placed two radar-equipped U.S. destroyers to the west of Savo Island to provide early warning for any approaching Japanese ships. The destroyer USS Ralph Talbot patrolled the northern passage and the destroyer USS Blue patrolled the southern passage, with a gap of 12–30 kilometres (8–20 mi) between their uncoordinated patrol patterns. At this time, the Allies were unaware of all of the limitations of their primitive ship-borne radars, such as the effectiveness of the radar could be greatly degraded by the presence of nearby landmasses.

Chicago's Captain Bode ordered his ship's radar to be turned off in the mistaken belief it would reveal his position. He allowed a single sweep every half hour with the fire control radar, but the timing of the last pre-engagement sweep was too early to detect the approaching Japanese cruisers.
I've discussed Chicago before, and honestly, her time under Captain Bode was not a good time for the poor girl.

The battle off of Savo also does not go well for her, as Mikawa's force not only snuck past USS Blue by using the bulk of Savo Island to shield his cruisers from the destroyer's radar, but Mikawa's cruisers had deployed their floatplanes with star shells and parachute flares to illuminate their targets.

The first victim of the raid was HMAS Canberra, a County-class Heavy Cruiser, of the Kent subclass, and technically subordinate to Captain Bode on the Chicago.
USS Patterson's crew was alert because the destroyer's captain had taken seriously the earlier daytime sightings of Japanese warships and evening sightings of unknown aircraft, and told his crew to be ready for action. At 01:43, Patterson spotted a ship, probably Kinugasa, 5,000 meters dead ahead and immediately sent a warning by radio and signal lamp: "Warning! Warning! Strange ships entering the harbor!" Patterson increased speed to full, and fired star shells towards the Japanese column. Her captain ordered a torpedo attack, but his order was not heard over the noise from the destroyer's guns.
Patterson was about the only Allied ship in the defensive screen with a diligent captain and crew; quite frankly, the allies were caught with their trousers around their ankles.
At about the same moment that Patterson sighted the Japanese ships and went into action, the Japanese floatplanes overhead, on orders from Mikawa, dropped aerial flares directly over Canberra and Chicago. Canberra responded immediately, with Captain Frank Getting ordering an increase in speed, a reversal of an initial turn to port, which kept Canberra between the Japanese and the Allied transports, and for her guns to train out and fire at any targets that could be sighted.

Less than one minute later, as Canberra's guns took aim at the Japanese, Chōkai and Furutaka opened fire on her, scoring numerous hits within a few seconds. Aoba and Kako joined in with gunfire, and within the next three minutes Canberra took up to 24 large-caliber hits. Early hits killed her gunnery officer, mortally wounded Getting, and destroyed both boiler rooms, knocking out power to the entire ship before Canberra could fire any of her guns or communicate a warning to other Allied ships. The cruiser glided to a stop, on fire, with a 5- to 10-degree list to starboard, and unable to fight the fires or pump out flooded compartments because of lack of power. Since all of the Japanese ships were on the port side of Canberra, the damage to the ship's starboard side occurred either from shells entering low on the port side and exiting below the waterline on the starboard side, or from one or two torpedo hits on the starboard side.

If torpedoes did hit Canberra on the starboard side, then they may have come from a nearby Allied ship, and at this time the U.S. destroyer Bagley was the only ship on that side of the Australian cruiser and had fired torpedoes moments earlier.
It's like reading the transcript of a low-tier world of warships battle, only the lemming train actually has a brain in it.
The crew of Chicago, observing the illumination of their ship by air-dropped flares and the sudden turn by Canberra in front of them, came alert and awakened Captain Bode from "a sound sleep". Bode ordered his 5 in (127 mm) guns to fire star shells towards the Japanese column, but the shells did not function.

At 01:47, a torpedo, probably from Kako, hit Chicago's bow, sending a shock wave throughout the ship that damaged the main battery director. A second torpedo hit but failed to explode, and a shell hit the cruiser's mainmast, killing two crewmen. Chicago steamed west for 40 minutes, leaving behind the transports she was assigned to protect. The cruiser fired her secondary batteries at the trailing ships in the Japanese column and may have hit Tenryū, causing slight damage. Bode did not try to assert control over any of the other Allied ships in the southern force, of which he was still technically in command. More significantly, Bode made no attempt to warn any of the other Allied ships or personnel in the Guadalcanal area as his ship headed away from the battle area.
While Bode was rooting around in his ass with both hands and a flashlight for his single surviving braincell, USS Patterson put on her big girl pants and actually laid into the Japanese fleet with all her available weapons.
During this time, Patterson engaged in a gun duel with the Japanese column. Patterson received a shell hit aft, causing moderate damage and killing 10 crew members. Patterson continued to pursue and fire at the Japanese ships and may have hit Kinugasa, causing moderate damage. Patterson then lost sight of the Japanese column as it headed northeast along the eastern shore of Savo Island.

Bagley, whose crew sighted the Japanese shortly after Patterson and Canberra, circled completely around to port before firing torpedoes in the general direction of the rapidly disappearing Japanese column; one or two of which may have hit Canberra. Bagley played no further role in the battle.
So, of four ships in the southern patrol, the only ones on the ball are the ones that got hurt the worst; Canberra's flooding, on fire, and slowly sinking, Patterson took a shell to her backside (which had been fired from the front of her, so poor luck), and Bagley bagged herself a blue-on-blue award.

I'd applaud, but that's just the lead-up. The first three real victims of Ironbottom Sound's yawning hunger for blood, steel, and souls are in the Northern Patrol group.
Astoria's bridge crew called general quarters upon sighting the flares south of Savo, around 01:49. At 01:52, shortly after the Japanese searchlights came on and shells began falling around the ship, Astoria's main gun director crews spotted the Japanese cruisers and opened fire. Astoria's captain, awakened to find his ship in action, rushed to the bridge and ordered a ceasefire, fearful that his ship might be firing on friendly forces. As shells continued to cascade around his ship, the captain ordered firing resumed less than a minute later. Chōkai, however, had found the range, and Astoria was quickly hit by numerous shells and set afire. Between 02:00 and 02:15, Aoba, Kinugasa, and Kako joined Chōkai in pounding Astoria, destroying the cruiser's engine room and bringing the flaming ship to a halt. At 02:16, one of Astoria's remaining operational main gun turrets fired at Kinugasa's searchlight, but missed and hit Chōkai's forward turret, putting the turret out of action and causing moderate damage to the ship.

Quincy had also seen the aircraft flares over the southern ships, received Patterson's warning, and had just sounded general quarters and was coming alert when the searchlights from the Japanese column came on. Quincy's captain gave the order to commence firing, but the gun crews were not ready. Within a few minutes, Quincy was caught in a crossfire between Aoba, Furutaka, and Tenryū, and was hit heavily and set afire. Quincy's captain ordered his cruiser to charge towards the eastern Japanese column, but as she turned to do so Quincy was hit by two torpedoes from Tenryū, causing severe damage. Quincy managed to fire a few main gun salvos, one of which hit Chōkai's chart room 6 meters (20 ft) from Admiral Mikawa and killed or wounded 36 men, although Mikawa was not injured. At 02:10, incoming shells killed or wounded almost all of Quincy's bridge crew, including the captain. At 02:16, the cruiser was hit by a torpedo from Aoba, and the ship's remaining guns were silenced. Quincy's assistant gunnery officer, sent to the bridge to ask for instructions, reported on what he found:

When I reached the bridge level, I found it a shambles of dead bodies with only three or four people still standing. In the Pilot House itself the only person standing was the signalman at the wheel who was vainly endeavoring to check the ship's swing to starboard to bring her to port. On questioning him I found out that the Captain, who at that time was laying near the wheel, had instructed him to beach the ship and he was trying to head for Savo Island, distant some four miles (6 km) on the port quarter. I stepped to the port side of the Pilot House, and looked out to find the island and noted that the ship was heeling rapidly to port, sinking by the bow. At that instant the Captain straightened up and fell back, apparently dead, without having uttered any sound other than a moan.

Quincy sank, bow first, at 02:38.
Image
Quincy, in AL, has the Lowest Luck score in the game, at a whopping 9. Being the first to die at Ironbottom is a pretty good reason why.

Vincennes didn't have it any better than her older sisters, either.
Like Quincy and Astoria, Vincennes also sighted the aerial flares to the south, and furthermore, actually sighted gunfire from the southern engagement. At 01:50, when the U.S. cruisers were illuminated by the Japanese searchlights, Vincennes hesitated to open fire, believing that the searchlight's source might be friendly ships. Shortly thereafter, Kako opened fire on Vincennes which responded with her own gunfire at 01:53. As Vincennes began to receive damaging shell hits, her commander, U.S. Captain Frederick L. Riefkohl, ordered an increase of speed to 25 knots (46 km/h), but shortly thereafter, at 01:55, two torpedoes from Chōkai hit, causing heavy damage.

Kinugasa now joined Kako in pounding Vincennes. Vincennes scored one hit on Kinugasa causing moderate damage to her steering engines. The rest of the Japanese ships also fired and hit Vincennes up to 74 times, and, at 02:03, another torpedo hit her, this time from Yūbari. With all boiler rooms destroyed, Vincennes came to a halt, burning "everywhere" and listing to port. At 02:16, Riefkohl ordered the crew to abandon ship, and Vincennes sank at 02:50.
And, off into the night did Mikawa's fleet sail, having given the allies not only a riotous gusher of a bloodied nose and a pair of black eyes, but also forcing the supplies to allied land forces to be interrupted; while in retrospect he could have pressed onwards to attack the transport vessels, he was understandably concerned about Allied air retaliation, as IJN intelligence reports had Enterprise, Saratoga, and Wasp operating together in the area.

Dawn brought forth no good news to the allies, as it was quickly determined that Canberra was unsalvageable, her engines having been destroyed entirely by the multiple shell hits, and fires raging through her internals.

USS Blue, and Patterson took off all of Canberra's crew, while the destroyers Selfridge and Ellet were tasked with scuttling the British-built cruiser. (Which took some 300 5-inch shells, and 5 torpedoes)

Image
Blue is at Canberra's bow, while Patterson is approaching from astern to assist in collecting survivors.

Astoria, also known as 'Nasty Asty', was the last of the Allied ships to sink in the battle, as her crew fought the fires that ravaged her for nearly eleven hours.
Suffering from the effects of at least 65 hits, Astoria fought for her life. A bucket brigade battled the blaze on the gun deck and the starboard passage forward from that deck, and the wounded were moved to the captain's cabin, where doctors and corpsmen proceeded with their care. Eventually, however, the deck beneath grew hot and forced the wounded back to the forecastle. The bucket brigade made steady headway, driving the fire aft on the starboard side of the gun deck, while a gasoline handy-billy rigged over the side pumped a small stream into the wardroom passage below.

Bagley came alongside Astoria's starboard bow and, by 0445, took all of the wounded off the heavy cruiser's forecastle. At that point, a small light flashed from Astoria's stern, indicating survivors on that part of the ship. Signaling the men on the heavy cruiser's stern that they had been seen, Bagley got underway and rescued men on rafts – some Vincennes survivors – and men who had been driven overboard by the fires blazing aboard Astoria.

With daylight, Bagley returned to the heavy cruiser and came alongside her starboard quarter. Since it appeared that the ship could be saved, a salvage crew of about 325 able-bodied men went back aboard Astoria. Another bucket brigade attacked the fires while the ship's first lieutenant investigated all accessible lower decks. A party of men collected the dead and prepared them for burial. Hopkins came up to assist in the salvage effort at about 0700. After securing a towline, Hopkins proceeded ahead, swinging Astoria around in an effort to tow her to the shallow water off Guadalcanal. A second gasoline-powered handy-billy, transferred from Hopkins, promptly joined the struggle against the fires. Wilson soon arrived on the scene, coming alongside the cruiser at about 0900 to pump water into the fire forward. Called away at 1000, Hopkins and Wilson departed, but the heavy cruiser received word that Buchanan was on the way to assist in battling the fires and that Alchiba was coming to tow the ship.

Nevertheless, the fire below decks increased steadily in intensity, and those topside could hear explosions. Her list increased, first to 10° and then 15°. Her stern lowered in the dark waters, and her bow was distinctively rising. All attempts to shore the shell holes – by then below the waterline due to the increasing list – proved ineffective, and the list increased still more. Buchanan arrived at 11:30, but could not approach due to the heavy port list. Directed to stand off the starboard quarter, she stood by while all hands assembled on the stern, which was now wet with seawater. With the port waterway awash at noon, Commodore William G. Greenman gave the order to abandon ship.

Astoria turned over on her port beam, rolled slowly, and settled by the stern, disappearing completely by 12:16. Buchanan lowered two motor whaleboats and, although interrupted by a fruitless hunt for a submarine, came back and assisted the men in the water. Alchiba, which arrived on the scene just before Astoria sank, rescued 32 men. Not one man from the salvage crew lost his life. Officially, 219 men were reported missing or killed.
As for the Japanese, having gotten away with beating the ever-loving crap out of the Allied forces, they almost got away scot-free, and, in fact, Admiral Mikawa's division of Choukai, Yuubari, and Tenryuu, despite damage sustained from shellfire, returned home for repairs at Rabaul unscathed by follow-up retaliation.

Cruiser Division 6, under Admiral Goto's command, however, ended up with the first incident in the 'Aoba the Asshole' post, where Goto ordered Cruiser Division 6 to stop sailing evasively 110 miles from port, despite reports of submarines in the area. The American submarine S-44 promptly plunked three torpedoes of a four-torpedo spread into Kako's flank, causing the heavy cruiser to rapidly sink, though all but 71 of Kako's crew survived.

A bloody opener at the Green Hell of the Solomons indeed; With over 1200 dead in one night, this single skirmish set the tone for the upcoming six months.
Admiral Turner assessed why his forces were so soundly defeated in the battle:

"The Navy was still obsessed with a strong feeling of technical and mental superiority over the enemy. In spite of ample evidence as to enemy capabilities, most of our officers and men despised the enemy and felt themselves sure victors in all encounters under any circumstances. The net result of all this was a fatal lethargy of mind which induced a confidence without readiness, and a routine acceptance of outworn peacetime standards of conduct. I believe that this psychological factor, as a cause of our defeat, was even more important than the element of surprise"

Historian Richard B. Frank added that "This lethargy of mind would not be completely shaken off without some more hard blows to Navy pride around Guadalcanal, but after Savo, the United States picked itself up off the deck and prepared for the most savage combat in its history."
My next historypost will continue on the Naval Campaign of the Greater Solomons;

We still have The Battle of the Eastern Solomons (The Solomon Ranger event), The Sinking of Wasp, Cape Esperance (part of Aoba being a Shit), The Santa Cruz Islands (The Death of Hornet), The Back-to-back Second and Third Battle of Guadalcanal (Where Laffey and Ayanami of the starter squad bit it), Tassafaronga (Northampton's death), and Renell Island (Chicago's sinking) to look at.

This is going to be a Long set.

I made some fanart for an upcoming event!
It's because JamieTheD lost the footage and I wanted to help fill in the gaps in the narrative.

Spoiler for the Dreamwaker's Butterfly event.
Image


Goddamn that was a rough fucking ride for the first battle of Guadalcanal. Bode seems like a bit of a dumbass with how far his head is up his ass.

User avatar
As mentioned in Chicago's history writeup, Bode was blamed for his lack of initiative and failure to warn the rest of the fleet, making his failure to radio warnings directly culpable for the sinking of Astoria, Quincy, and Vincennes.

Shortly after Chicago herself was sunk in the last major engagement around Guadalcanal, Bode learned of the inquest's findings while he was on leave and shot himself.

Well fuck. That's a somber end to that tale.

User avatar
So, back onto the subject of the Greater Solomons Clusterfuck, We've covered the first action on the seas, when the IJN's elite night-fighting crews punched the USN and RAN in the nose.

That was on August 9th. Fifteen days later, on the 24th, the second clash between the Japanese Navy and the Allies occurred, not in Ironbottom Sound, but in the Solomon Sea, which had its own hunger for blood and steel.

This battle was entirely through Naval Aviation elements, with the big names involved in this battle being Shoukaku, Zuikaku, and Ruyjuo on the Japanese side, while the Allies had Enterprise, Saratoga, and Wasp to counter the IJN push.

So, let's set the stage.
On 16 August, a convoy of three slow transport ships loaded with 1,411 Japanese soldiers from the 28th "Ichiki" Infantry Regiment, as well as several hundred naval troops from the 5th Yokosuka Special Naval Landing Force, departed the major Japanese base at Truk Lagoon and headed towards Guadalcanal. The transports were guarded by the light cruiser Jintsū, eight destroyers, and four patrol boats, led by Rear Admiral Raizō Tanaka. Also departing from Rabaul to help protect the convoy was a "close cover force" of four heavy cruisers from the 8th Fleet, commanded by Vice Admiral Gunichi Mikawa. These were the same heavy cruisers that had defeated an Allied naval surface force in the earlier Battle of Savo Island. Tanaka planned to land the troops from his convoy on Guadalcanal on 24 August.
On the 21st of August, a second force departed for the vicinity of Guadalcanal, this one led by the main instigators of the coming battle.
These ships were basically divided into three groups: the main body contained the Japanese carriers Shōkaku and Zuikaku, light carrier Ryūjō, and a screening force of one heavy cruiser and eight destroyers, commanded by Vice Admiral Chūichi Nagumo in Shōkaku; the vanguard force consisted of two battleships, three heavy cruisers, one light cruiser, and three destroyers, commanded by Rear Admiral Hiroaki Abe; and the advanced force contained five heavy cruisers, one light cruiser, six destroyers, and the seaplane carrier Chitose, commanded by Vice Admiral Nobutake Kondō.
You might know of Admiral Abe, at least. He was the man that gave allies utter fits for the duration of the Guadalcanal campaign, and it was only his wounding on November 13th, 1942 that finally turned the tide around the hotly-contested island.

(incidentally, It was everyone's favourite sleepy murderbunny that laid Admiral Abe low)

At the same time that the Japanese Assault Fleet deployed, the three heavy carriers of the USN were moving closer to Guadalcanal to reduce turnaround time on the air strikes they had been requested to apply to IJA forces on the island itself. With a focal point of the battlefield being the newly-named Henderson Airfield, a surprise attack by IJA forces on the same day had prodded the US Navy into intensifying their efforts to assist the ground pounders.

The following Day, on the 22nd, was the first encounter between IJN elements and the three US Carrier task forces in the area, when one of Enterprise's combat patrols ambushed and ventilated a Zero that was acting as reconnaissance, before the Japanese plane could report. That gave the Japanese Fleet ample forewarning that the American carriers were nearby, but the USN was unaware of the deployment of the Cranes and the other IJN surface elements.
On 23 August, a U.S. PBY Catalina flying boat (based at Ndeni in the Santa Cruz Islands) initially sighted Tanaka's convoy. By late afternoon, with no further sightings of Japanese ships, two aircraft strike forces from Saratoga and Henderson Field took off to attack the convoy. However, Tanaka, knowing that an attack would be forthcoming following the PBY sighting, reversed course once he had departed the area, and eluded the strike aircraft. After Tanaka reported to his superiors his loss of time by turning north to avoid the expected Allied airstrike, the landings of his troops on Guadalcanal was pushed back to 25 August.

By 18:23 on the same day, with no Japanese carriers sighted and no new intelligence reporting of their presence in the area, Fletcher detached Wasp (which was getting low on fuel) and the rest of Task Force 18 for the two-day trip south toward Efate Island to refuel. Thus, Wasp and her escorting warships missed the upcoming battle.
Honestly, Wasp needing to fill her tanks probably saved her life; while a Yorktown-class in all but name, Wasp had been built with no armour and minimal emergency survivability equipment due to the tonnage limitations of the Washington Naval Treaty.

Image
A Photo from Wasp's deck, showing Saratoga and Enterprise in formation.

And, at 1:45 AM on the 24th, the Prancing Dragon, Ryujuo, was detached from the Ka fleet, and ordered to close on Guadalcanal to attack Henderson Airfield, possibly due to a request from the commander of forces at Rabaul.
Nagumo ordered Rear Admiral Chūichi Hara, with the light carrier Ryūjō, the heavy cruiser Tone and destroyers Amatsukaze and Tokitsukaze, to proceed ahead of the main Japanese force and send an aircraft attack force against Henderson Field at daybreak.

The Ryūjō mission was most likely in response to a request from Nishizō Tsukahara for help from the combined fleet in neutralizing Henderson Field. The mission may also have been intended by Nagumo as a feint maneuver to divert U.S. attention allowing the rest of the Japanese force to approach the U.S. naval forces undetected as well as to help provide protection and cover for Tanaka's convoy.

Most of the aircraft on Shōkaku and Zuikaku were readied to launch on short notice if the U.S. carriers were located.
Image
The Prancing Dragon has spent her entire life dealing with jokes about her 'unique profile' and her 'flight deck chest'. She's actually rather proud of her unique silhouette.

So, the chronology of the actual battle gets a little garbled; This is one of those 'Running and Screaming' Situations where everything that could reasonably go wrong does, and with the wide dispersal between the two groups, it's easier to simply go by major action instead of direct timeline.

So, Let's first see how Ryujuo's diversionary action went.
Ryūjō launched two small airstrikes, totaling 6 B5Ns and 15 Zeros, beginning at 12:20 once the Diversionary Force was 200 nautical miles north of Lunga Point. Four Grumman F4F Wildcat fighters from Marine Fighter Squadron VMF-223 on combat air patrol near Henderson Field spotted the incoming Japanese aircraft around 14:20 and alerted the defenders. Ten more Wildcats from VMF-223 and VMF-212 scrambled, as well as 2 United States Army Air Corps Bell P-400s from the 67th Fighter Squadron in response. Nine of the Zeros strafed the airfield while the B5Ns bombed it with 60-kilogram bombs to little effect. The Americans claimed to have shot down 19 aircraft, but only three Zeros and three B5Ns were lost, with another B5N forced to crash-land. Only three Wildcats were shot down in turn.

Around 14:40, the Detached Force was spotted again by several search aircraft from the carrier USS Enterprise; the Japanese ships did not immediately spot the Americans. They launched three Zeros for a combat air patrol at 14:55, three minutes before two of the searching Grumman TBF Avenger torpedo bombers narrowly missed Ryūjō 150 meters astern with four 500-pound bombs. Two more Zeros reinforced the patrol shortly after 15:00, just in time to intercept two more searching Avengers, shooting down one. In the meantime, the carrier USS Saratoga had launched an airstrike against the Detached Force in the early afternoon that consisted of 31 Douglas SBD Dauntlesses and 8 Avengers; the long range precluded fighter escort. They found the carrier shortly afterward and attacked. They hit Ryūjō between three to five times with 1,000-pound bombs and one torpedo; the torpedo hit flooded the starboard engine and boiler rooms. No aircraft from either Ryūjō or Saratoga were shot down in the attack.

The bomb hits set the carrier on fire and she took on a list from the flooding caused by the torpedo hit. Ryūjō turned north at 14:08, but her list continued to increase even after the fires were put out. The progressive flooding disabled her machinery and caused her to drift to a stop at 14:20. The order to abandon ship was given at 15:15 and the destroyer Amatsukaze moved alongside to rescue the crew. The ships were bombed several times by multiple B-17s without effect before Ryūjō capsized about 17:55, with the loss of 7 officers and 113 crewmen.

The Fourteen surviving aircraft that she had dispatched on raids returned shortly after Ryūjō sank and circled over the force until they were forced to ditch. Seven pilots were rescued.
Sara's not blowing smoke when she casually mentions that she's perfectly capable of kicking ass and taking names; Ryujuo was one of her more-prominent victims, but Sara's bad luck with torpedoes in general prevented her from taking as prominent a role in the Pacific as her nieces.

Image
A bombardier's view of the crippled Dragon, as B-17 bombers tried to harass her and her escorting destroyers; all that was accomplished was delaying the evacuation of the carrier's crew.

Reeling the clock back once more to 14:20-ish that day (or 2:20 in the afternoon for those not versed in military time), Enterprise and Sara had been spotted by IJN recon planes, and unlike on the 23rd, the recon lived long enough to report the CVs' location.
The first wave of aircraft (27 Aichi D3A2 "Val" dive bombers and 15 Zeros), under the command of Lieutenant Commander Mamoru Seki, was off by 14:50 and on its way toward Enterprise and Saratoga. Coincidentally about this same time, two U.S. scout aircraft finally sighted the main Japanese force. However, due to communication problems, these sighting reports never reached Fletcher.

Before leaving the area, the two U.S. scout aircraft attacked Shōkaku, causing negligible damage, but forcing five of the first wave Zeros to give chase, thus aborting their mission. At 16:00 a second wave of 27 Vals and nine Zeros, under the command of Lieutenant Sadamu Takahashi, was launched by the Japanese carriers and headed south toward the U.S. carriers. Abe's "Vanguard" force also surged ahead in anticipation of meeting the U.S. ships in a surface action after nightfall.
Shoukaku really had no luck in regards to being bullied. As Capable and skilled as she was, everyone would crack her one as soon as possible. So, the US girls ended up getting swarmed just after 4 PM.
At 16:02, still waiting for a definitive report on the location of the Japanese fleet carriers, the U.S. carriers' radar detected the first incoming wave of Japanese strike aircraft. Fifty-three F4F-4 Wildcat fighters from the two U.S. carriers were directed by radar control towards the attackers. However, communication problems, limitations of the aircraft identification capabilities of the radar, primitive control procedures, and effective screening of the Japanese dive bombers by their escorting Zeros, prevented all but a few of the U.S. fighters from engaging the Vals before they began their attacks on the U.S. carriers.

Just before the Japanese dive bombers began their attacks, Enterprise and Saratoga cleared their decks for the impending action by launching the aircraft that they had been holding ready in case the Japanese fleet carriers were sighted. These aircraft were told to fly north and attack anything they could find, or else to circle outside the battle zone, until it was safe to return.
And then we get to the first time Enterprise was actually seriously damaged in battle; while the dutiful, loyal and brave girl still racked up 20 battle stars for being involved in nearly every battle in the Pacific, she still had to be pulled off the line for repairs and refits during the four years of constant fighting.
At 16:29, the Japanese dive bombers began their attacks. Although several attempted to set up to attack the Saratoga, they quickly shifted back to the nearer carrier, Enterprise. Thus, Enterprise was the target of almost the entire Japanese air attack. Several Wildcats followed the Vals into their attack dives, despite the intense anti-aircraft artillery fire from Enterprise and her screening warships, in a desperate attempt to disrupt their attacks. As many as four Wildcats were shot down by U.S. anti-aircraft fire, as well as several Vals.

Because of the effective anti-aircraft fire from the U.S. ships, plus evasive maneuvers, the bombs from the first nine Vals missed Enterprise. However, one of the Vals from the second division (led by Lieutenant Keiichi Arima) managed to score a hit with armor-piercing, delayed-action bomb that penetrated the flight deck near the aft elevator and passed through three decks before detonating below the waterline, killing 35 men and wounding 70 more. Incoming sea water caused Enterprise to develop a slight list, but it was not a major breach of hull integrity.
Image
A Val taking enough shots to the engine to burst into flame over Enterprise; the photo appears to have been taken from one of the Forward AA emplacements just ahead of the carrier's bridge.
Just 30 seconds later, the next Val planted its bomb only 15 feet away from where the first bomb hit. The resulting detonation ignited a large secondary explosion from one of the nearby 5" guns' ready powder casings, killing 35 members of the nearby gun crews and starting a large fire.
Image
A running joke among enterprise's gun crews was that her natural state in the pacific was either 'on fire' or 'still smoking'
About a minute later, at 16:46, the third and last bomb hit Enterprise on the flight deck forward of where the first two bombs hit. This bomb exploded on contact, creating a 10 ft hole in the deck, but caused no further damage. Seven Vals (three from Shokaku, four from Zuikaku) then broke off from the attack on Enterprise to attack the U.S. battleship North Carolina. However, all of their bombs missed and all the Vals involved were shot down by either anti-aircraft fire or U.S. fighters.
Image
The bomb was dropped by a Japanese Aichi D3A1 "Val" dive bomber piloted by Kazumi Horie who died in the attack. According to the original photo caption in the US Navy's archives, this explosion killed the photographer, Photographer's Mate 3rd Class Robert F. Read. This image, however, was actually taken by Photographer's Mate 2nd Class Marion Riley, who survived the battle although his photographic equipment was damaged. Robert Read was stationed in the aft starboard 5" gun gallery and was killed by the second bomb to hit Enterprise. The smoke from the bomb explosion that killed Read can be seen in the upper left of this photograph.

Both sides thought that they had inflicted more damage than was the case; a lot of this is simple puffery and the chaos of battle, or gun cameras recording the same plane from two or more angles in the swirling dogfight overhead of the carriers. The U.S. claimed to have shot down 70 Japanese aircraft, even though there were only 37 aircraft in all. Actual Japanese losses—from all causes—in the engagement were 25 aircraft, with most of the crews of the lost aircraft not being recovered or rescued. The Japanese, for their part, mistakenly believed that they had heavily damaged two U.S. carriers, instead of just one. The U.S. lost six aircraft in the engagement, with five pilots lost.
Although Enterprise was heavily damaged and on fire, her damage-control teams were able to make sufficient repairs for the ship to resume flight operations at 17:46, only one hour after the engagement ended. At 18:05, the Saratoga strike force returned from sinking Ryūjō and landed without major incident. The second wave of Japanese aircraft approached the U.S. carriers at 18:15 but was unable to locate the U.S. formation because of communication problems and had to return to their carriers without attacking any U.S. ships, losing five aircraft in the process from operational mishaps. Most of the U.S. carrier aircraft launched just before the first wave of Japanese aircraft attacked failed to find any targets. However, two SBD Dauntlesses from Saratoga sighted Kondo's advanced force and attacked the seaplane tender Chitose, scoring two near-hits which heavily damaged the unarmored ship.
Chitose did not have a good day; the near misses caved in her sides and caused severe flooding along popped seams over much of her length, but she survived, was converted to a CVL, and eventually met her end at the three-pronged battle of Leyte Gulf in 1944.

The following Day, Admiral Tanaka's fleet of troop transports was discovered by patrolling aircraft from Henderson field, which were champing at the bit to get some revenge for being bombed the day before and shelled by IJN destroyers overnight.
Believing that two U.S. carriers had been taken out of action with heavy damage, Tanaka's reinforcement convoy again headed toward Guadalcanal, and by 08:00 on 25 August they were within 150 miles of their destination. At this time, Tanaka's convoy was joined by five destroyers which had shelled Henderson Field the night before, causing slight damage. At 08:05, 18 U.S. aircraft from Henderson Field attacked Tanaka's convoy, causing heavy damage to Jintsu, killing 24 crewmen, and knocking Tanaka unconscious. The troop transport Kinryu Maru was also hit and eventually sank. Just as the destroyer Mutsuki pulled alongside Kinryu Maru to rescue her crew and embarked troops, she was attacked by four U.S. B-17s from Espiritu Santo, which landed five bombs on or around Mutsuki, sinking her immediately.

The U.S. lost only seven aircrew members in the two-day battle. However, the Japanese lost 61 veteran aircrew, who were hard for the Japanese to replace because of an institutionalized limited capacity in their naval aircrew training programs and an absence of trained reserves. The troops in Tanaka's convoy were later loaded onto destroyers at the Shortland Islands and delivered piecemeal, without most of their heavy equipment, to Guadalcanal beginning on 29 August.

Emphasizing the strategic value of Henderson Field, in a separate reinforcement effort, the Japanese destroyer Asagiri was sunk and two other Japanese destroyers heavily damaged on 28 August, 70 miles north of Guadalcanal in "The Slot" by U.S. aircraft based at the airfield.

Enterprise traveled to Pearl Harbor for extensive repairs, which were completed on 15 October. She returned to the South Pacific on 24 October, just in time for the Battle of the Santa Cruz Islands and her rematch with Shōkaku and Zuikaku.
Saratoga, for her part, was soon taken off the line of battle as well, due to an unfortunate encounter with the Japanese Submarine I-26.
Fletcher rendezvoused with TF 18 east of San Cristobal on the evening of 26 August and transferred four Wildcats to Wasp the next day to bring the latter's fighters up to strength. TF 17, with the carrier Hornet, arrived on 29 August. Two days later, a torpedo from I-26 struck Saratoga on her starboard side, just aft of the island.

The torpedo wounded a dozen of her sailors, including Admiral Fletcher, flooded one fireroom, giving the ship a 4° list, and it caused multiple electrical short circuits. These damaged Saratoga's turbo-electric propulsion system and left her dead in the water for a time. The heavy cruiser Minneapolis took Saratoga in tow while she launched her aircraft for Espiritu Santo, retaining 36 fighters aboard. By noon, the list had been corrected and she was able to steam under her own power later that afternoon.
And that left Hornet and Wasp as the only two Allied carriers available in the entire Pacific ocean.

For all of two weeks.

And then Wasp ran afoul of the I-19.

Image
Wasp, as shown here, is very similar physically to her bigger, better-protected sisters. Honestly, calling her a 'baby yorktown' is more accurate than naming her as a separate class.
On Tuesday, 15 September 1942, the carriers Wasp and Hornet and battleship North Carolina with 10 other warships were escorting the transports carrying the 7th Marine Regiment to Guadalcanal as reinforcements. Wasp was operating some 150 nautical miles southeast of San Cristobal Island.

About 14:20, the carrier turned into the wind to launch eight F4F Wildcats and 18 SBD Dauntlesses and to recover eight F4F Wildcats and three Dauntlesses that had been airborne since before noon. The ship rapidly completed the recovery of the 11 aircraft before turning to starboard, heeling slightly as she did so. At 14:44 a lookout reported "three torpedoes ... three points forward of the starboard beam".

A spread of six Type 95 torpedoes was fired at Wasp at about 14:44 from the tubes of the B1 Type submarine I-19. Wasp put over her rudder hard to starboard to avoid the salvo, but it was too late. Three torpedoes struck in quick succession about 14:45; one actually breached, left the water, and struck the ship slightly above the waterline. All hit in the vicinity of the ship's gasoline tanks and magazines.

Two of the spread of torpedoes passed ahead of Wasp and were observed passing astern of Helena before O'Brien was hit by one at 14:51 while maneuvering to avoid the other (structural damage from this torpedo hit would eventually lead to O'Brien's sinking a month later). The sixth torpedo passed either astern or under Wasp, narrowly missed Lansdowne in Wasp's screen about 14:48, was seen by Mustin in North Carolina's screen about 14:50, and struck North Carolina about 14:52.
Image
And then the littlest Yorktown died, screaming as explosions and fire tore through her.
There was a rapid succession of explosions in the forward part of the ship. Aircraft on the flight and hangar decks were thrown about and dropped on the deck with such force that landing gears snapped. Aircraft suspended in the hangar overhead fell and landed upon those on the hangar deck; fires broke out in the hangar and below decks. Soon, the heat of the intense gasoline fires detonated the ready ammunition at the forward anti-aircraft guns on the starboard side, and fragments showered the forward part of the ship. The number two 1.1" mount was blown overboard.

Water mains in the forward part of the ship had been rendered inoperable meaning no water was available to fight the fire forward, and the fires continued to set off ammunition, bombs, and gasoline. As the ship listed 10–15° to starboard, oil and gasoline, released from the tanks by the torpedo hit, caught fire on the water.

Captain Sherman slowed to 10 knots, ordering the rudder put to port to try to get the wind on the starboard bow; he then went astern with right rudder until the wind was on the starboard quarter, in an attempt to keep the fire forward. At that point, flames made the central station unusable, and communication circuits went dead. Soon, a serious gasoline fire broke out in the forward portion of the hangar; within 24 minutes of the initial attack, there were three additional major gasoline vapor explosions. Ten minutes later Sherman decided to abandon ship as the firefighting was ineffectual. Survivors would have to disembark quickly to minimize loss of life.

After consulting with Rear Admiral Leigh Noyes, Captain Sherman ordered "abandon ship" at 15:20. All badly injured men were lowered into rafts or rubber boats. Many unwounded men had to abandon ship from aft because the forward fires were burning with such intensity. The departure, as Sherman observed it, looked "orderly", and there was no panic. The only delays occurred when many men showed reluctance to leave until all the wounded had been taken off

Although the submarine hazard caused the accompanying destroyers to lie well clear or to shift position, they carried out rescue operations until Laffey, Lansdowne, Helena, and Salt Lake City had 1,946 men embarked. The fires on Wasp, drifting, traveled aft and there were four violent explosions at nightfall.

Lansdowne was ordered to torpedo the carrier and stand by until she was sunk. Lansdowne's Mark 15 torpedoes had the same unrecognized flaws reported for the Mark 14 torpedo. The first two torpedoes were fired perfectly, but did not explode, leaving Lansdowne with only three more. The magnetic influence detonators on these were disabled and the depth set at 10 feet. All three detonated, but Wasp remained afloat for some time, finally sinking at 21:00.

193 men had died and 366 were wounded during the attack. All but one of her 26 airborne aircraft made a safe trip to carrier Hornet nearby before Wasp sank, but 45 aircraft went down with the ship. Another Japanese submarine, I-15, duly observed and reported the sinking of Wasp, as other US destroyers kept I-19 busy avoiding 80 depth charges. I-19 escaped safely.
While Mogami managed to sink five ships with six torpedoes, I-19's six-torpedo spread is nearly as impressive, as she flat-out killed a Fleet carrier, heavily damaged a state-of-the-art Battleship (North Carolina was in Drydock until the 16th of November), and O'Brien sank en route to repairs due to structural damage from the initial torpedo hit.

Image
O'Brien had already lost two sisters; Sims and Hammann, at Coral Sea and Midway, respectively. It seems that proximity to the Yorktown family was not conductive to the Sims-class' lifespans.

So, that's the Solomon Ranger event summarized.

The next battle at or around Guadalcanal is Cape Esperance, where Aoba, the Utter Idiot, manages to get Fubuki and Furutaka sunk due to Admiral Goto's utter incompetence; Cape Esperance is also the closest to World 4 in the game.

User avatar
Site Admin
Okay, so, while I disentangle the fustercluck that is "Working out when the hell I actually got Map 5 done" (Spoilers, folks, it sure as hell ain't Day 9), a fun little thread exercise for folks. Think of one of your favourite shipgirls (doesn't even have to be the ones shown so far), and think of a tune that best fits them.

This is inspired, by the way, by two things: A planned shitposty part of the next campaign episode, and Grump asking me which shipgirl best fits Tom Petty's "The Last DJ"

Me: Zuikaku. That chorus really speaks to how she takes no bullshit, "She plays what she wants to play... She says what she wants to say" (to paraphrase)
Grump: Warspite. Same reasoning. She went to her grave on her own terms, not to the scrapyard.

I'll start with my own: Hornet, I'd associate with Six Shooter, by Coyote Kisses. Why? First, the obvious association (Six Shooter, she cowgirl), and secondly, the attitude (She throws herself into things, and is a scrapper.)


All of the Sirens:


Prinz Eugen:


User avatar

The Glory and the Iron
With the expectations of two empires on their shoulders driving them to early graves, I personally think that Hood and Bismarck share a song.


User avatar
So, uh, I don't really have a favorite botegirl given that actually playing the game isn't part of my OSACA contract.

I suppose I can contribute in another way though.

Life of an OSACA Employee


"Sodium Grouch and Insane Celt"

For a selection of songs though, that just happened to be really concentrated in release year.

...I could definitely put some more unusual stuff up, but I'd have to think about what that'd even qualify under.

(...And most of the songs that I know that mention clothes really don't match to anything I can think of.)

I'm still posting illiterate, so I have no idea how to do those collapsed links or anything like that. Bear in mind that I'm still not super familiar with the full history and lore of each of the girls as they are in the game as I haven't had a chance to go through many events/reruns yet.

For a fave, I thought that Starlight Brigade by TWRP was a good fit for Enterprise. Not perfect, but it seemed to fit with some of her quotes and her storied history and impact on media too.

A silly one I thought of was Sweet but Psycho by Ava Max for Akagi. Not a big reach, but it amused me.

User avatar
Lurith wrote:
Sat Oct 03, 2020 1:58 pm
For a fave, I thought that Starlight Brigade by TWRP was a good fit for Enterprise. Not perfect, but it seemed to fit with some of her quotes and her storied history and impact on media too.
Aw heck, someone else who knows about TWRP!

I was going to put Ladyworld up, but couldn't think of a proper title for it at the time.

User avatar
Site Admin
Editing is currently being a fuck, so...

SIDE UPDATE: MEOWFFICERS

Image

See this cat? You want this cat in a submarine fleet the moment you get it.

Ship’s cats are a historical tradition. They kept mice down, the notable ones became symbols of luck, good or bad, they’re easyish to feed (y’know, cats being picky and all), and provide a little morale boost to sailors who like cats… Ship’s cats are a fine tradition, although it should be noted I’m biased, liking cats a lot.

So what if you had cats that buffed your fleet’s skills? And you could have two of them at once? Welcome to Meowfficers, one of Akashi’s little side gigs, and a buff customisation mechanic that costs currency only… Although you may, if you’re not the patient type, go on a purchasing spree once you’ve got your first Super Rare Cat.

Anyway, the cattes in question come in three basic flavours: Rare. Elite. Super Rare. No such thing as a common cat in this videogame! They also have three stats, Directives, Tactics, and Logistics, which buff Shipgirl stats by a small amount regardless of their talents or skills (which we’ll get to.) The formula, like a few formulae in the game, is pretty unwieldy, but let’s leave it at “Not a big stat upgrade, but it’s a stat upgrade.”

In any case, Directives contributes its entire stat’s worth to the formula for Anti Sub Warfare, ⅓ worth to Torpedo, and ⅔ worth to Firepower. Tactics fully contributes to Anti Air, then Torpedo, then Aviation, and Logistics contributes first to HP, then Aviation, then Firepower.
“But what about Reload? What about Evasion? What about-?”

This, reader, is where Talents and skills come in. Let’s take one of my stand up cats for LaffeyFleet as the example for explaining cats, Bunny. Bunny has three levels of skills, that, like Limit Breaking, it needs to consume other Bunnies for its powers. 4 in total, one for level 2 skill, three for level 3. Being an Elite cat, this wasn’t so hard, as you get a guaranteed Elite cat once a week, and it’s a random chance for each free cat you get a day (It even shows you the odds.)

Bunny’s a Command cat, so you put him in the Command position of your fleet for the skill to take effect (that’s the… Left… Panel... Staff Catte on the right.), and his skill is, amusingly, called Bite Their Fingers. When you get them, they’re nasty enough with a destroyer fleet. When encountering a non-boss fleet, and you have destroyers in that fleet, there’s a 15% the fleet will launch a torpedo strike, like a sub would (In fact, subs will not torpedo strike a ship if Bite Their Fingers goes off, which procs before Subs move, and, as a result, if it’s the only ship in a sub’s hunting zone, they won’t move at all, and you’ve saved yourself a sub torpedo.)

At level two, if you have a destroyer in the leading position (this one is always the one to be shown for the torpedo part of the skill when the first level procs), then, once per battle, most usually at the start, so long as the lead destroyer isn’t dead when you go into the fight, there’s a special barrage fired the first time the destroyers get in close range to something. Level 3 upgrades this barrage from 18 Destroyer High Explosive bullets of base 18 damage each, to 27 DD HE bullets of 28 base damage each. They always start with Rookie Destroyer Engineer as a talent, and, after that, it’s a bit random, until you have up to 6 talent points.

Oh, talent points (or, as they’re known, pawprints)! So, you get six of these, and you can respec them (at an escalating cost that goes from 3000 for 1, to 12000 for 6), you get them every five levels, and each level gives you a pick of four things, aka “A maximum of four talents), and, as implied by the “6 talent points” part, the current cap on Meowfficer levels is 30. Considering how little XP they get, you generally specialise early, and then stick to it.

And that's the absolute basics on catte!

User avatar
So, it's the thanksgiving weekend up here in the frozen northlands, so what better way to commemorate colonialism, conflict, and sundry by continuing to look over the shenanigans and fuckery known as history?

In this, part three of the Greater Solomons Clusterfuck, we'll be looking at the battle of Cape Esperance, or, in AL terms, Maps 4-1 and 4-2.

This is also the infamous 'I am Aoba' moment, as detailed in the 'Aoba, the Utter Asshole' post from a while back.

So, let's lead off with the setup.
On the night of 11 October, Japanese naval forces in the Solomon Islands area—under the command of Vice Admiral Gunichi Mikawa—sent a major supply and reinforcement convoy to their forces on Guadalcanal. The convoy consisted of two seaplane tenders and six destroyers and was commanded by Rear Admiral Takatsugu Jojima.

At the same time, but in a separate operation, three heavy cruisers and two destroyers—under the command of Rear Admiral Aritomo Gotō—were to bombard the Allied airfield on Guadalcanal (called Henderson Field by the Allies) with the object of destroying Allied aircraft and the airfield's facilities.

Shortly before midnight on 11 October, a U.S. force of four cruisers and five destroyers—under the command of Rear Admiral Norman Scott—intercepted Gotō's force as it approached Savo Island near Guadalcanal. Taking the Japanese by surprise, Scott's warships sank one of Gotō's cruisers and one of his destroyers, heavily damaged another cruiser, mortally wounded Gotō, and forced the rest of Gotō's warships to abandon the bombardment mission and retreat.

During the exchange of gunfire, one of Scott's destroyers was sunk and one cruiser and another destroyer were heavily damaged. In the meantime, the Japanese supply convoy successfully completed unloading at Guadalcanal and began its return journey without being discovered by Scott's force. Later on the morning of 12 October, four Japanese destroyers from the supply convoy turned back to assist Gotō's retreating, damaged warships. Air attacks by U.S. aircraft from Henderson Field sank two of these destroyers later that day.
You may recall that Mikawa was the man that punched the Allies in the nose during the Moonlit Overture at Savo, sinking the Astoria, Quincy, and Vincennes, and so badly damaging HMAS Canberra that the County-class cruiser had to be scuttled. In fact, between him and Admiral Abe, who we'll get to later, the Japanese Navy had the cream of the crop working to bottle up the Allied offensive through the Solomon islands.

Now, you might ask why Guadalcanal became such a bloody hellscape for both army and navy forces; it's primarily because of the Allied control over Henderson Airfield, which was a strategic advantage that the Japanese recognised and prioritized for destruction or capture. Let's take a look at some extra information on the leadup into the why of this battle.
Due to the threat posed by Allied aircraft, the Japanese were unable to use large, slow transport ships to deliver their troops and supplies to the island, and warships were used instead. These ships—mainly light cruisers and destroyers—were usually able to make the round trip down "the Slot" to Guadalcanal and back in a single night, thereby minimizing their exposure to air attacks.

Delivering troops in this manner, however, prevented most of the heavy equipment and supplies, such as heavy artillery, vehicles, and much food and ammunition, from being delivered. In addition, they expended destroyers, which were desperately needed for commerce defense. These high-speed runs occurred throughout the campaign and were later called the "Tokyo Express" by the Allies and "Rat Transportation" by the Japanese.

Due to the heavier concentration of Japanese surface combat vessels and their well-positioned logistical base at Simpson Harbor, Rabaul, and their victory at the Battle of Savo Island in early August, the Japanese had established operational control over the waters around Guadalcanal at night. However, any Japanese ship remaining within range—about 200 miles—of American aircraft at Henderson Field, during the daylight hours, was in danger of damaging air attacks.

This persisted for the months of August and September, 1942. The presence of Admiral Scott's task force at Cape Esperance represented the U.S. Navy's first major attempt to wrest night time operational control of waters around Guadalcanal away from the Japanese.

The Japanese set their third major attempt to recapture Henderson Field for the 20th of October and moved most of the 2nd and 38th infantry divisions, totalling 17,500 troops, from the Dutch East Indies to Rabaul in preparation for delivering them to Guadalcanal. From the 14th of September to October 9th, numerous Tokyo Express runs delivered troops from the Japanese 2nd Infantry Division to Guadalcanal.

In addition to cruisers and destroyers, some of these runs included the seaplane carrier Nisshin, which delivered heavy equipment to the island including vehicles and heavy artillery other warships could not carry because of space limitations. The Japanese Navy promised to support the Army's planned offensive by delivering the necessary troops, equipment, and supplies to the island, and by stepping up air attacks on Henderson Field and sending warships to bombard the airfield.

In the meantime, Major General Millard F. Harmon—commander of United States Army forces in the South Pacific—convinced Vice Admiral Robert L. Ghormley—overall commander of Allied forces in the South Pacific—that the marines on Guadalcanal needed to be reinforced immediately if the Allies were to successfully defend the island from the next expected Japanese offensive. Thus, on 8 October, the 2,837 men of the 164th Infantry Regiment from the U.S. Army's Americal Division boarded ships at New Caledonia for the trip to Guadalcanal with a projected arrival date of 13 October.
So, that's the strategic view. We know what's been going on and why, so let's take a look at the wherefore of the upcoming night battle.
To protect the transports carrying the 164th to Guadalcanal, Ghormley ordered Task Force 64, consisting of four cruisers San Francisco, Boise, Salt Lake City, and Helena and five destroyers Farenholt, Duncan, Buchanan, McCalla, and Laffey under U.S. Rear Admiral Norman Scott, to intercept and combat any Japanese ships approaching Guadalcanal and threatening the convoy.

Scott conducted one night battle practice with his ships on 8 October, then took station south of Guadalcanal near Rennell Island on 9 October, to await word of any Japanese naval movement toward the southern Solomons.
That one night battle practice made Admiral Scott the most-experienced man in the entire US Navy in regards to combat at night.
Continuing with preparations for the October offensive, Japanese Vice Admiral Gunichi Mikawa's Eighth Fleet staff, headquartered at Rabaul, scheduled a large and important Tokyo Express supply run for the night of 11 October. Nisshin would be joined by the seaplane carrier Chitose to deliver 728 soldiers, four large howitzers, two field guns, one anti-aircraft gun, and a large assortment of ammunition and other equipment from the Japanese naval bases in the Shortland Islands and at Buin, Bougainville, to Guadalcanal.
You might recall that Chitose nearly got killed by Saratoga in the same sprawling aviation battle that killed Ryujuo; the fact that she's back in action, even as a cargo hauler, was a testament to the speed and diligence of repair crews that worked on her.
Six destroyers, five of them carrying troops, would accompany Nisshin and Chitose. The supply convoy—called the "Reinforcement Group" by the Japanese—was under the command of Rear Admiral Takatsugu Jojima. At the same time but in a separate operation, the three heavy cruisers of Cruiser Division 6 —Aoba, Kinugasa, and Furutaka, under the command of Rear Admiral Aritomo Gotō—were to bombard Henderson Field with special explosive shells with the object of destroying the Cactus Air Force and the airfield's facilities. Two screening destroyers—Fubuki and Hatsuyuki—accompanied CruDiv6. Since U.S. Navy warships had yet to attempt to interdict any Tokyo Express missions to Guadalcanal, the Japanese were not expecting any opposition from U.S. naval surface forces that night.
The 'special' shells loaded in the 8" guns of the three heavy cruisers of Cruiser Division 6 were roughly analog to the modern Rockeye Cluster Bomb that was primarily used by close-air support planes from the 1970's onwards to destroy light targets such as supply vehicles.

While originally intended for use as anti-aircraft weapons, the 'Thermite Shotgun' effect of the Type 3 Fragmentation Shells turned out to be tremendously effective against land-based targets; While an upward spray of burning thermite and fragments wouldn't do much more than amuse the pilots of most dive bombers, the same spray aimed at a maintenance hut or airplane park on an airfield will very quickly devastate the buildings, planes, and people caught within its area of effect. The Japanese quickly took that into account for harassing Henderson Airfield, which endured nearly-nightly 'Thunder Runs' where a Capital Ship would zip down at top speed, park offshore to unload 3-5 barrages onto the airfield, and bugger off before meaningful retaliation could be brought to bear.


So, on the one side, you have Three veteran heavy cruisers, two destroyers, and the supreme confidence that because the USN hasn't been intercepting and punching at your forces during the 'Tokyo Express', they won't push again.

On the other side, you have Four cruisers; two light, two heavy, five destroyers, and supreme confidence in as-yet new technology.

Yeah, that'll go over well.
To protect the reinforcement group's approach to Guadalcanal from the CAF, the Japanese 11th Air Fleet, based at Rabaul, Kavieng, and Buin, planned two air strikes on Henderson Field for 11 October. A "fighter sweep" of 17 Zero fighters swept over Henderson Field just after mid-day but failed to engage any U.S. aircraft. Forty-five minutes later, the second wave—45 "Betty" bombers and 30 Zeros—arrived over Henderson Field.

In an ensuing air battle with the CAF, one Betty and two U.S. fighters were downed. Although the Japanese attacks failed to inflict significant damage, they did prevent CAF bombers from finding and attacking the reinforcement group. As the reinforcement group transited the Slot, relays of 11th Air Fleet Zeros from Buin provided escort. Emphasizing the importance of this convoy for Japanese plans, the last flight of the day was ordered to remain on station over the convoy until darkness, then ditch their aircraft and await pickup by the reinforcement group's destroyers. All six Zeros ditched; only one pilot was recovered.
As mentioned in my commentary about the sinking of Ryujuo and Wasp, Japanese training doctrine meant that all of their skilled pilots were effectively unreplacable. This will come back to bite the IJN in the ass.
Allied reconnaissance aircraft sighted Jojima's supply convoy 210 miles from Guadalcanal between Kolombangara and Choiseul in the Slot at 14:45 on the same day, and reported it as two "cruisers" and six destroyers. Gotō's force—following the convoy—was not sighted. In response to the sighting of Jojima's force, at 16:07 Scott turned toward Guadalcanal for an interception.

Scott crafted a simple battle plan for the expected engagement. His ships would steam in column with his destroyers at the front and rear of his cruiser column, searching across a 300 degree arc with SG surface radar in an effort to gain positional advantage on the approaching enemy force. The destroyers were to illuminate any targets with searchlights and discharge torpedoes while the cruisers were to open fire at any available targets without awaiting orders. The cruiser's float aircraft, launched in advance, were to find and illuminate the Japanese warships with flares. Although Helena and Boise carried the new, greatly improved SG radar, Scott chose San Francisco as his flagship.
There's a reason, in-game, Helena practically cuddles her Radar. It saved her from being ambushed more times than she'd care to count, even in the knife fights of Guadalcanal.
At 22:00, as Scott's ships neared Cape Hunter at the northwest end of Guadalcanal, three of Scott's cruisers launched floatplanes. One crashed on takeoff, but the other two patrolled over Savo Island, Guadalcanal, and Ironbottom Sound. As the floatplanes were launched, Jojima's force was just passing around the mountainous northwestern shoulder of Guadalcanal, and neither force sighted each other. At 22:20, Jojima radioed Gotō and told him no U.S. ships were in the vicinity. Although Jojima's force later heard Scott's floatplanes overhead while unloading along the north shore of Guadalcanal, they failed to report this to Gotō.
So, why did only three floatplanes take off, from four cruisers, and why did one crash? Helena did not receive the instruction from Scott aboard his flagship, and so her crew dumped the aircraft overboard to reduce the risk of fire in the event of a battle; it was later determined that her radios were having issues with the humidity that night.

As for the crashed plane? That's on poor old Salt Lake City, the eldest of the american ships involved in the battle. In the process of launching, Salt Lake City′s plane caught fire as flares ignited in the cockpit. The plane crashed close to the ship and the pilot managed to get free. He was later found safe on a nearby island. (Which is a damn good thing, considering the waters of Ironbottom are known to be shark-heavy)

So, let's look at the collision course and carnage.

Image
This battle chart shows the routes the Japanese ships took in the battle; the light-grey line was the planned route, while the actual route is filled-in.
Gotō's force passed through several rain squalls as they approached Guadalcanal at 30 knots. Gotō's flagship Aoba led the Japanese cruisers in column, followed by Furutaka and Kinugasa. Fubuki was starboard of Aoba and Hatsuyuki to port. At 23:30, Gotō's ships emerged from the last rain squall and began appearing on the radar scopes of Helena and Salt Lake City. The Japanese, however, whose warships were not equipped with radar, remained unaware of Scott's presence.
And, contact.

This is when things get interesting.
Scott's ships assumed battle formation. The column was led by Farenholt, Duncan, and Laffey, and followed by San Francisco, Boise, Salt Lake City, and Helena. Buchanan and McCalla brought up the rear. The distance between each ship ranged from 460 to 640 metres. Visibility was poor because the moon had already set, leaving no ambient light and no visible sea horizon.

Scott, believing more Japanese ships were likely still on the way, continued his course towards the west side of Savo Island. At 23:33, Scott ordered his column to turn towards the southwest to a heading of 230°. All of Scott's ships understood the order as a column movement except Scott's own ship, San Francisco. As the three lead U.S. destroyers executed the column movement, San Francisco turned simultaneously. Boise—following immediately behind—followed San Francisco, thereby throwing the three vanguard destroyers out of formation.

At 23:32, Helena's radar showed the Japanese warships to be about 25,300 metres away. At 23:35, Boise's and Duncan's radars also detected Gotō's ships. Between 23:42 and 23:44, Helena and Boise reported their contacts to Scott on San Francisco who mistakenly believed the two cruisers were actually tracking the three U.S. destroyers that were thrown out of formation during the column turn. Scott radioed Farenholt to ask if the destroyer was attempting to resume its station at the front of the column. Farenholt replied, "Affirmative, coming up on your starboard side," further confirming Scott's belief that the radar contacts were his own destroyers.
Looks like a proper shambles, right? Because it is. Right up until Helena, being more than a little bloodthirsty, acted.
At 23:45, Farenholt and Laffey—still unaware of Gotō's approaching warships—increased speed to resume their stations at the front of the U.S. column. Duncan's crew, however, thinking that Farenholt and Laffey were commencing an attack on the Japanese warships, increased speed to launch a solitary torpedo attack on Gotō's force without telling Scott what they were doing.

San Francisco's radar registered the Japanese ships, but Scott was not informed of the sighting. By 23:45, Gotō's ships were only 4,600 metres away from Scott's formation and visible to Helena's and Salt Lake City's lookouts. The U.S. formation at this point was in position to cross the T of the Japanese formation, giving Scott's ships a significant tactical advantage.

At 23:46, still assuming that Scott was aware of the rapidly approaching Japanese warships, Helena radioed for permission to open fire, using the general procedure request, "Interrogatory Roger" (meaning, basically, "Are we clear to act?"). Scott answered with, "Roger", meaning only that the message was received, not that he was confirming the request to act. Upon receipt of Scott's "Roger", Helena—thinking they now had permission—opened fire, quickly followed by Boise, Salt Lake City, and to Scott's further surprise, San Francisco.
Helena’s gunnery director called for automatic continuous mode to maintain the barrage. Chick Morris described the scene: “Now suddenly it was a blazing bedlam. Helena herself reared and lurched sideways, trembling from the tremendous shock of recoil. In the radio shack and coding room we were sent reeling and stumbling against bulkheads, smothered by a snowstorm of books and papers from the tables. The clock leaped from its pedestal. Electric fans hit the deck with a metallic clatter. Not a man in the room had a breath left in him.”
Helena gained the nickname 'Machinegun Cruiser' due to the high rate of fire her guncrews could attain with her fifteen 6" guns. Boise, her sister, was almost as fast, but in this night, she wouldn't get to show off.
Gotō's force was taken almost completely by surprise. At 23:43, Aoba's lookouts sighted Scott's force, but Gotō assumed that they were Jojima's ships. Two minutes later, Aoba's lookouts identified the ships as American, but Gotō remained skeptical and directed his ships to flash identification signals. As Aoba's crew executed Gotō's order, the first American salvo smashed into Aoba's superstructure. Aoba was quickly hit by up to 40 shells from Helena, Salt Lake City, San Francisco, Farenholt, and Laffey. The shell hits heavily damaged Aoba's communications systems and demolished two of her main gun turrets as well as her main gun director. Other hits put four of the Aoba’s boilers offline. Several large-caliber projectiles passed through Aoba's flag bridge without exploding, but the force of their passage killed many men and mortally wounded Gotō. In total, at least 80 of Aoba's crew died in the opening exchange of shellfire.

Scott—still unsure who his ships were firing at, and afraid they might be firing on his own destroyers—ordered a ceasefire at 23:47, although not every ship complied. Scott ordered Farenholt to flash her recognition signals and upon observing that Farenholt was close to his formation, he ordered the fire resumed at 23:51.
"I am Aoba!" Blam!

Image
Aoba, offloading wounded at Buin in Papua New Guinea; Admiral Yamamoto personally inspected the mauled cruiser before ordering her to return to Japan.
Aoba, continuing to receive damaging hits, turned to starboard to head away from Scott's formation and began making a smoke screen which led most of the Americans to believe that she was sinking. Scott's ships shifted their fire to Furutaka, which was following behind Aoba. At 23:49, Furutaka was hit in her torpedo tubes, igniting a large fire that attracted even more shellfire from the US ships. At 23:58, a torpedo from Buchanan hit Furutaka in her forward engine room, causing severe damage; Furutaka was hit at least 90 times, and left drifting, until she sank at 02:28 the following morning.

During this time, San Francisco and Boise sighted Fubuki about 1,300 metres away and raked her with shellfire, joined soon by most of the rest of Scott's formation. Heavily damaged, Fubuki began to sink. Kinugasa and Hatsuyuki chose turning to port rather than starboard and escaped the Americans' immediate attention.
To expand on this, Fubuki had been ordered to advance and identify the ships Aoba had signalled, because Goto didn't believe that there were Americans about, meaning she ended up at spitting distance between herself and two very large, very grumpy cruisers. And thus the Mother of Modern Destroyers was unceremoniously blatted with as much firepower as could be spared, with a multitude of 8, 6, and 5-inch shells turning the destroyer into swiss cheese.

Furutaka, for her part, broke from the line of battle and charged the American formation, both diverting attention from Aoba's retreat, and, due to the closing range, ended up in a short but vicious duel with Salt Lake City, the two old heavy cruisers hammering each other with large-calibre gunfire for several minutes, with Salt Lake coming out the better of the duel, as Furutaka diverted much of her firepower to do to Duncan what had been done to Fubuki mere minutes before.
In the confused, close-range action, either Helena or Boise (the only ships armed with 6-inch guns) accidentally hit Farenholt, causing flooding and a fuel leak that forced her to withdraw from the battle. She escaped from the crossfire by crossing ahead of San Francisco and passing to the disengaged side of Scott's column. Duncan—still engaged in her solitary torpedo attack on the Japanese formation—was also hit by gunfire from both sides, set afire, and looped away in her own effort to escape the crossfire.
Both Farenholt and Duncan were victims of the confusion of night battle, the destroyers taking nearly as many friendly fire hits as they had enemy hits. Farenholt would be repaired and return to service quickly, but Duncan, gutted by fires that ravaged her superstructure and bridge, would be abandoned and left to drift.
Duncan pumped several salvos into a cruiser, then shifted fire to a destroyer, at the same time maneuvering radically to avoid enemy fire and that from her own forces, who were now joining in the attack. She got off two torpedoes toward her first target, Furutaka, and kept firing until hits she had received put her out of action.

The commanding officer ordered the bridge, isolated by fire, abandoned, and the wounded lowered into life rafts.

The men on board attempted to beach the ship on Savo Island, but then, believing she might yet be saved, continued to fight the fires until power failed, when they abandoned ship. Destroyer McCalla rescued 195 men from the shark-infested waters and made an attempt to salvage Duncan, but she sank on 12 October 1942, about 6 miles north of Savo Island.
Image
This photograph was taken five days before the Gleaves-class destroyer would be sunk.
As Gotō's ships endeavored to escape, Scott's ships tightened their formation and then turned to pursue the retreating Japanese warships. At 00:06, two torpedoes from Kinugasa barely missed Boise.

Boise and Salt Lake City turned on their searchlights to help target the Japanese ships, giving Kinugasa's gunners clear targets. At 00:10, two shells from Kinugasa exploded in Boise's main ammunition magazine between turrets one and two. The resulting explosions killed over 100 men and threatened to blow the ship apart. Seawater rushed in through rents in her hull opened by the explosion and helped quench the fires before they could detonate the ship's powder magazines.

Boise immediately sheered out of the column and retreated from the action. Kinugasa and Salt Lake City exchanged fire with each other, each hitting the other several times, causing minor damage to Kinugasa and damaging one of Salt Lake City's boilers, reducing her speed.

Ten minutes later, at 00:20 (or 12:20 AM), the shooting stopped as the two forces successfully disengaged.
An absolute tangle in the dark, and a bloody shambles on both sides. Yet, at the end of the day, an allied victory, of sorts.
During the battle between Scott's and Gotō's ships, Jojima's reinforcement group completed unloading at Guadalcanal and began its return journey unseen by Scott's warships, using a route that passed south of the Russell Islands and New Georgia. Despite extensive damage, Aoba was able to join Kinugasa in retirement to the north through the Slot. Furutaka's damage caused her to lose power around 00:50, and she sank at 02:28, 22 miles northwest of Savo Island. Hatsuyuki picked up Furutaka's survivors and joined the retreat northward.

Boise extinguished her fires by 02:40 and at 03:05 rejoined Scott's formation. Duncan—on fire—was abandoned by her crew at 02:00. Unaware of Duncan's fate, Scott detached McCalla to search for her and retired with the rest of his ships towards Nouméa, arriving in the afternoon of 13 October. McCalla located the burning, abandoned Duncan about 03:00, and several members of McCalla's crew made an attempt to keep her from sinking. By 12:00, however, they had to abandon the effort as bulkheads within Duncan collapsed causing the ship to finally sink.

American servicemen in boats from Guadalcanal as well as McCalla picked up Duncan's scattered survivors from the sea around Savo. In total, 195 Duncan sailors survived; 48 did not. As they rescued Duncan's crew, the Americans came across more than 100 Fubuki survivors, floating in the same general area. The Japanese initially refused all rescue attempts but a day later allowed themselves to be picked up and taken prisoner.

Jojima—learning of the bombardment force's crisis—detached destroyers Shirayuki and Murakumo to assist Furutaka or her survivors and Asagumo and Natsugumo to rendezvous with Kinugasa, which had paused in her retreat northward to cover the withdrawal of Jojima's ships. At 07:00, five CAF SBD Dauntless dive bombers attacked Kinugasa but inflicted no damage. At 08:20, 11 more SBDs found and attacked Shirayuki and Murakumo.

Although they scored no direct hits, a near miss caused Murakumo to begin leaking oil, marking a trail for other CAF aircraft to follow. A short time later, seven more CAF SBDs plus six TBF-1 Avenger torpedo bombers, accompanied by 14 F4F-4 Wildcats, found the two Japanese destroyers 170 miles from Guadalcanal. In the ensuing attack, Murakumo was hit by a torpedo in her engineering spaces, leaving her without power. In the meantime, Aoba and Hatsuyuki reached the sanctuary of the Japanese base in the Shortland Islands at 10:00.

Rushing to assist Murakumo, Asagumo and Natsugumo were attacked by another group of 11 SBDs and TBFs escorted by 12 fighters at 15:45. An SBD placed its bomb almost directly amidships on Natsugumo while two more near misses contributed to her severe damage. After Asagumo took off her survivors, Natsugumo sank at 16:27. The CAF aircraft also scored several more hits on the stationary Murakumo, setting her afire. After her crew abandoned ship, Shirayuki scuttled her with a torpedo, picked up her survivors, and joined the rest of the Japanese warships for the remainder of their return trip to the Shortland Islands.
Henderson Airfield's pilots tended to be vicious in targeting ships, which is why the IJN and IJA pushed hard to recapture the airfield during the 6-month battle on the island.
Captain Kikunori Kijima—Gotō's chief of staff and commander of the bombardment force during the return trip to the Shortland Islands after Gotō's death in battle—claimed that his force had sunk two American cruisers and one destroyer. Furutaka's captain—who survived the sinking of his ship—blamed the loss of his cruiser on bad air reconnaissance and poor leadership from the 8th fleet staff under Admiral Mikawa.

Although Gotō's bombardment mission failed, Jojima's reinforcement convoy was successful in delivering the crucial men and equipment to Guadalcanal. Aoba journeyed to Kure, Japan, for repairs that were completed on February 15, 1943.

Scott claimed that his force sank three Japanese cruisers and four destroyers. News of the victory was widely publicized in the American media. Boise—which was damaged enough to require a trip to the Philadelphia Naval Shipyard for repairs—was dubbed the "one-ship fleet" by the press for her exploits in the battle, although this was mainly because the names of the other involved ships were withheld for security reasons. Boise was under repair until 20 March 1943.

Although a tactical victory for the U.S., Cape Esperance had little immediate strategic effect on the situation on Guadalcanal.

Just two days later on the night of 13 October, the Japanese battleships Kongō and Haruna bombarded and almost destroyed Henderson Field. One day after that, a large Japanese convoy successfully delivered 4,500 troops and equipment to the island.

These troops and equipment helped complete Japanese preparations for the large land offensive scheduled to begin on 23 October. The convoy of U.S. Army troops reached Guadalcanal on 13 October as planned and were key participants for the Allied side in the decisive land battle for Henderson Field that took place.

The Cape Esperance victory helped prevent an accurate U.S. assessment of Japanese skills and tactics in naval night fighting. The U.S. was still unaware of the range and power of Japanese torpedoes, the effectiveness of Japanese night optics, and the skilled fighting ability of most Japanese destroyer and cruiser commanders.

Incorrectly applying the perceived lessons learned from this battle, U.S. commanders in future naval night battles in the Solomons consistently tried to prove that American naval gunfire was more effective than Japanese torpedo attacks. This belief was severely tested just two months later during the Battle of Tassafaronga.
A junior officer on Helena later wrote, "Cape Esperance was a three-sided battle in which chance was the major winner."

As a naval battle, Cape Esperance could be considered inconclusive. With comparatively minor losses on both sides, it really had been little more than blind luck that things had not turned out as poorly as the previous Battle at Savo Island.

However, the morale swing was a much larger momentum booster. Allied ships had successfully tangled with, and fought off a near-equivalent force of enemy cruisers, which, after the severe bludgeoning Admiral Mikawa had applied in August, was a genuine relief to American crews. Combined with the stalemate and pressing supply issues on Guadalcanal itself, and even rumours of cannibalism on the island, the IJN and IJA's morale was beginning to flag.

I apologize for the lack of pictures this time; there simply wasn't much available, unlike the daytime actions of the Solomon Sea and the Santa Cruz islands.

Which we'll be getting to, next time.

User avatar
Due to hardware issues outside of the control of this LP, combined with a mantra of 'Fuck 2020', this LP is on hiatus until further notice.

Thank you for your time, consideration, and commentary during how far we have gotten to this point.

Sad to see this go, but really enjoyed it while it lasted. Thanks for introducing me to a pretty fun game!

User avatar
It's not dead, just on Hiatus until the universe stops trying to bend Jamie and I over spiked barrels.

At the very least, I'll still be trying to poison brains with historyfacts in the beach discord.

My apologies, still looking forward to more and hope the universe learns to chill.

User avatar
Okay. It's been nearly a year since I put out something. In the last 359 days, there's been some upheavals, some good news, some bad news, but I figured I'd dust off my big boy pants and get my thumb out of my ass, especially because I promised myself I'd actually continue on from where we left off.

Specifically, in Historyposts, I last left off with the conclusion of Part 3 of the "Greater Solomons Naval Clusterfuck", which was the bloody night battle of Cape Esperance, on the night of October 11th, 1942, where the USN bloodied the IJN's nose and killed Admiral Goto, which, in retrospect, was widely seen as improving the Japanese Admiralty's average IQ by around 50 points.

At the time of that Battle, the USN's local aviation assets had been badly depleted; Enterprise had been pulled back for repairs after the Battle of the Eastern Solomons, where the Lucky E had taken 3 bomb hits in as many minutes.

Saratoga had been torpedoed almost directly underneath her bridge and was languishing in drydock getting the 45-foot wide hole patched, and despite her age, being the oldest surviving Carrier in the US navy, her formidable air wing (roughly 78 modern planes) was sorely missed.

And Wasp, the 'Littlest Yorktown', basically built from leftover tonnage allocation from a treaty that nobody actually took seriously, had died screaming after taking three torpedo hits from the I-19, leaving only USS Hornet, the youngest and last of the Yorktown-class carriers holding seaborne air supremacy.

On land, as much as the 'Fetid Green Hell' of Guadalcanal could be called land, the constant battles between the US Army and IJA over control of what was known as Henderson Airfield had dragged into a loose stalemate, one the Japanese hoped to break on October 25th, only a few days after Enterprise returned to the field of battle, in company with Hornet.

And the IJN had made plans to see if they could break the USN's two remaining carriers, specifically by sending the Cranes, Shoukaku and Zuikaku, to pound any flat-top they could find.

For a drier, historical summary, well, allow me the luxury of quoting.
After the Battle of the Eastern Solomons on 24–25 August, in which the fleet carrier USS Enterprise was heavily damaged and forced to sail to Pearl Harbor, Hawaii, for a month of major repairs, three U.S. carrier task forces remained in the South Pacific area. The task forces were based around the fleet carriers USS Wasp, Saratoga, and Hornet plus their respective air groups and supporting surface warships, including battleships, cruisers, and destroyers, and were primarily stationed between the Solomons and New Hebrides (Vanuatu) islands. In this area of operations, the carriers were charged with guarding the line of communication between the major Allied bases at New Caledonia and Espiritu Santo, supporting the Allied ground forces at Guadalcanal and Tulagi against any Japanese counteroffensives, covering the movement of supply ships to Guadalcanal, and engaging and destroying any Japanese warships, especially carriers, that came within range. The area of ocean in which the U.S. carrier task forces operated was known as "Torpedo Junction" by U.S. forces because of the high concentration of Japanese submarines in the area.

On 31 August, Saratoga was torpedoed by Japanese submarine I-26 and was out of action for three months for repairs. On 14 September, Wasp was hit by three torpedoes fired by Japanese submarine I-19 while supporting a major reinforcement and resupply convoy to Guadalcanal and almost engaging the Japanese carriers Shōkaku and Zuikaku, which withdrew just before the two adversaries came into range of each other's aircraft. With power knocked out from torpedo damage, Wasp's damage-control teams were unable to contain the ensuing large fires, and she was abandoned and scuttled.
Image
While warships are incredibly durable, fire is and has remained the eternal equalizer from as far back as the days of dugout canoes. Wasp burning to death is one of the nastier recorded instances, even with the relatively low loss of life.
The stalemate on Guadalcanal was briefly interrupted by two large-ship naval actions. On the night of 11–12 October, a U.S. naval force intercepted and defeated a Japanese naval force en route to bombard Henderson Field in the Battle of Cape Esperance. But just two nights later, a Japanese force that included the battleships Haruna and Kongō successfully bombarded Henderson Field, destroying most of the U.S. aircraft there and inflicting severe damage on the field's facilities.

The U.S. made two moves to try to break the stalemate in the battle for Guadalcanal. First, repairs to Enterprise were expedited so that she could return to the South Pacific as soon as possible. On 10 October, Enterprise received her new air group and on 16 October, she left Pearl Harbor; and on 23 October, she arrived back in the South Pacific and rendezvoused with Hornet and the rest of the Allied South Pacific naval forces on 24 October. The second was replacing Admiral Ghormley with one Admiral William "Bull" Halsey.
Let's take a moment to look at these details. Firstly, What Kongou and Haruna applied to Henderson Airfield is what became known as a "Thunder Run"; and, in fact, it was so successful that it became commonplace for the Japanese Navy to run one of the four Kongou-class 'Fast battleships' (really, up-armoured battlecruisers in all but name) down through "The Slot" between Rabaul and Guadalcanal, and proceed to unload some 48-72 shells down-range into the airfield's environs. High-explosive 14" shells were dangerous enough, but the Japanese repurposed their 'Type 3' "Beehive" Shells (known officially as Sanshikidan) to detonate as airbursts over the airfield, the combination of shrapnel, incendiaries, and explosive charge in the shell itself creating what could only be described as a "Thermite Shotgun" effect.

On the American Side, while I could speak at length about Admiral Halsey, the three most important facts about him during his placement in Naval Command over the Solomons was his motto of "Hit Fast, Hit Hard, Hit Often", his declaration on December 8th, 1941 that "When I am through with them, the Japanese Language will be spoken only in Hell", and, in a message to Admiral Chester Nimitz, declared that upon arriving at the Solomon Islands, Halsey "Had to begin throwing punches immediately."

So, Enterprise has been back in the area for all of 48 hours before shit goes down. Hornet's with her, and, they're basically surrounded by a veritable arsenal of heavy USN assets, including the battleship South Dakota (having taken over while North Carolina was being repaired from the same attack that had killed Wasp), backed up by Portland, Northampton, and Pensacola as the big guns between the two carrier groups.

On the Japanese side, you have the heavy hitters of Shoukaku and Zuikaku, officially deemed Carrier Division One after Akagi and Kaga were destroyed at Midway. Hiyou and Jun'you, taking the place of the also-sunk Souryuu and Hiryuu, were also deployed to support the Cranes, though the two converted passenger liners were kept busy; during several raids in the lead-up to the land battle (which was a five-day span from the 20th to 25th of October), Hiyou lost several of her bombers harassing American destroyers, and ended up suffering an engine fire that kept her out of what would become the fourth Carrier-centric battle of the war. Rounding out Japanese Aviation elements was the light carrier Zuihou, a converted submarine tender (Much like the later conversions of Chitose and Chiyoda, which would be officially deemed part of the same class)

For Gun Elements, the Japanese fleet was sending most of its heavy assets as well; All four Kongou-class 'Fast battleships' were in attendance, along with three Takao-class heavy cruisers, Myoukou, lead of her class, Suzuya and Kumano, the second pair of the Mogami-class, and both Tone-class. (Also, Isuzu, of the Nagara-class tagged along; this is probably where the Azur Lane iteration got one of her many crippling fears from)
From 20 to 25 October, Japanese land forces on Guadalcanal attempted to capture Henderson Field with a large-scale attack against the U.S. defenders. The attack was decisively defeated with heavy casualties for the Japanese. Incorrectly believing that the Japanese army troops had succeeded in capturing Henderson Field, the Japanese sent warships toward Guadalcanal on the morning of 25 October to support their ground forces on the island. Aircraft from Henderson Field attacked the convoy throughout the day, sinking the light cruiser Yura and damaging the destroyer Akizuki.
"Heavy Casualties" is putting it lightly, of the 20,000 Japanese soldiers involved in the five day battle, 3,000 soldiers were killed, to a confirmed loss of 86 Allied soldiers. Also, a shore artillery battery plunked a shell into Akatsuki (The Ninja that's Afraid of the dark), just to add insult to injury.

On the naval side of things, despite Yura's loss and the knowledge that Henderson Airfield was still in the hands of the allies, the Japanese fleet lingered, hoping to draw the American fleet into a proper battle. Which didn't take long in coming; a Catalina Flying Boat soon spotted the Japanese fleet and promptly reported the location whilst smartly buggering off, pursued by angry Zeroes. With the American and Japanese fleets closing to within 200 nautical miles of each other by 5 AM on the 26th, Recon planes were launched from the carriers as well to see about getting a proper sight upon their respective enemies.
At 06:45, a U.S. scout aircraft sighted the carriers of Nagumo's main body. At 06:58, a Japanese scout aircraft reported the location of Hornet's task force. Both sides raced to be the first to attack the other. The Japanese were first to get their strike force launched, with 64 aircraft, including 21 Aichi D3A2 dive bombers, 22 Nakajima B5N2 torpedo bombers, and 21 A6M3 Zero fighters on the way towards Hornet by 07:40.

At 08:10, Shōkaku launched a second wave of strike aircraft, consisting of 19 dive bombers and five Zeros, and Zuikaku launched 16 torpedo bombers and 4 Zeros at 08:40. Thus, by 09:10 the Japanese had 110 aircraft on the way to attack the U.S. carriers.

Also at 07:40, two U.S. SBD-3 Dauntless scout aircraft, responding to the earlier sighting of the Japanese carriers, arrived and dove on Zuihō. With the Japanese combat air patrol busy chasing other U.S. scout aircraft away, the two U.S. aircraft were able to hit Zuihō with both their 500-pound bombs, causing heavy damage and preventing the carrier's flight deck from being able to land aircraft.
A combined half-tonne of explosion will do that to the unarmoured flight decks preferred by both the USN and IJN at the time. It would not be until Taihou and USS Midway that the respective fleets would have Armoured Carriers, whilst the Royal Navy was taunting the hell out of Italy and Germany with their Illustrious-class.
The U.S. strike aircraft were running about 20 minutes behind the Japanese. Believing that a speedy attack was more important than a massed attack, and because they lacked fuel to spend time assembling prior to the strike, the U.S. aircraft proceeded in small groups towards the Japanese ships, rather than forming into a single large strike force. The first group—consisting of 15 SBD Dauntless dive bombers, 6 TBF-1 Avenger torpedo bombers, and 8 F4F Wildcat fighters, from Hornet—was on its way by about 08:00. A second group—consisting of three SBDs, nine TBFs, and eight Wildcats from Enterprise—was off by 08:10. A third group—consisting of nine SBDs, ten TBFs, and seven F4Fs from Hornet—was on its way by 08:20.
So, three quick strike packages, and let's be fair, managing to launch 29 planes and then 26 more in a twenty-minute span is plenty fast. Hornet's air crews had learned hard after the lessons of Midway, where her fifteen-plane torpedo squadron VT-8 had been sliced apart with only a single surviving crewman of the forty-five. (VT-8, in its rebuilt form, had actually been assigned to Henderson Airfield after Saratoga had been withdrawn due to torpedo damage, and the squadron acquitted itself admirably until battle losses forced its temporary dissolution in December of '42)
At 08:40, the opposing aircraft strike formations passed within sight of each other. Nine Zeros from Zuihō surprised and attacked the Enterprise group, attacking the climbing aircraft from out of the sun. In the resulting engagement, four Zeros, three Wildcats, and two TBFs were shot down, with another two TBFs and a Wildcat forced to return to Enterprise with heavy damage. The remaining Zuihō Zeros, having exhausted their ammunition, withdrew from the action.
For those not doing the math at home, Enty's strike package is down to half its original escort contingent, and has 7/12ths of its bombers still in action; Zuiho's planes, however, would find themselves unable to land on their floating bird farm, and instead would end up parking on Zuikaku's deck.
At 08:50, the lead U.S. attack formation from Hornet spotted four ships from Abe's Vanguard force. Pressing on, the U.S. aircraft sighted the Japanese carriers and prepared to attack. Three Zeros from Zuihō attacked the formation's Wildcats, drawing them away from the bombers they were assigned to protect. Thus, the dive bombers in the first group initiated their attacks without fighter escort. Twelve Zeros from the Japanese carrier CAP attacked the SBD formation, shot down two, and forced two more to abort. The remaining 11 SBDs commenced their attack dives on Shōkaku at 09:27, hitting her with three to six bombs, wrecking her flight deck, and causing serious damage to the interior of the ship. The final SBD of the 11 lost track of Shōkaku and instead dropped its bomb near the Japanese destroyer Teruzuki, causing minor damage. The six TBFs in the first strike force, having become separated from their strike group, did not find the Japanese carriers and eventually turned back towards Hornet. On the way back, they attacked the Japanese heavy cruiser Tone, missing with all their torpedoes.
And Shoukaku, once more, takes the punishment. Basically every time she deployed, she would end up getting mauled, and this battle was no exception. There's a reason the Soaring Crane's Damage Control crews were regarded as the most-experienced and skilled in the entire Imperial Navy.

Image
Jokes about Japanese Damage control involving bucket brigades may not have always been accurate, but when your ship's on fire, you don't care how you get the water to the blaze. Still, with her deck torn to hell, Shoukaku was out of the fight again.
The TBFs of the second U.S. attack formation from Enterprise were unable to locate the Japanese carriers and instead attacked the Japanese heavy cruiser Suzuya from Abe's Vanguard force but caused no damage. At about the same time, nine SBDs from the third U.S. attack formation—from Hornet—found Abe's ships and attacked the Japanese heavy cruiser Chikuma, hitting her with two 1,000 pound bombs and causing heavy damage. The three Enterprise SBDs then arrived and also attacked Chikuma, causing more damage with one bomb hit and two near-misses. Finally, the nine TBFs from the third strike group arrived and attacked the smoking Chikuma, scoring one more hit. Chikuma, escorted by two destroyers, withdrew from the battle and headed towards Truk for repairs.
Chikuma was very likely the most-heavily damaged Japanese ship in the entire battle; one of those 1,000 pound bombs had ended up in the captain's chair on the bridge before exploding, leaving the cruiser functionally uncontrolled for long minutes before she was ordered to withdraw.

Image
Quick-thinking crewmen jettisoned her torpedoes seconds before a 500 pound bomb hit her starboard forward torpedo room, which, considering the volatility of oxygen fuel, likely saved Chikuma from being destroyed wholesale.

And now we turn the clock back to when the two combat formations intercepted each other on the way to ruin their floating homes; Naturally, the aircrews on both sides had forewarned the carriers and subsequently the fleets, but back luck and poor coordination would have its turn in the sun first.
The U.S. carrier forces received word from their outbound strike aircraft at 08:30 that Japanese attack aircraft were headed their way. At 08:52, the Japanese strike force commander sighted the Hornet task force—the Enterprise task force was hidden by a rain squall—and deployed his aircraft for attack. At 08:55, the U.S. carriers detected the approaching Japanese aircraft on radar—about 35 nautical miles away—and began to vector the 37 Wildcats of their CAP to engage the incoming Japanese aircraft.

However, communication problems, mistakes by the U.S. fighter control directors, and primitive control procedures prevented all but a few of the Wildcats from engaging the Japanese aircraft before they began their attacks on Hornet. Although the U.S. CAP was able to shoot down or damage several dive bombers, most of the Japanese aircraft commenced their attacks relatively unmolested by U.S. fighters, and had more to worry about from the Anti-air Guns on the ships below.
While official details are sparse, anecdotes and interviews from the people that were there laid the blame firmly on Enterprise's Combat Air Group commander, who, when being told of an enemy attack and their heading, ordered Enterprise's CAP to attack relative to Enterprise's heading, essentially sending 20 fighter planes off in the wrong direction.
At 09:09, the anti-aircraft guns of Hornet and her escorting warships opened fire as the 20 untouched Japanese torpedo planes and remaining 16 dive bombers commenced their attacks on the carrier.
Remember, this is the First strike force of some 64 planes; 21 Dive and 22 Torpedo bombers originally, so only 7 Japanese planes were intercepted by the American CAP.
At 09:12, a dive bomber placed its 250 kg semi-armor-piercing bomb dead center on Hornet's flight deck, across from the island, which penetrated three decks before exploding, killing 60 men. Moments later, a 242 kg high-explosive bomb struck the flight deck, detonating on impact to create an 11 foot hole and kill 30 men. A minute or so later, a third bomb hit Hornet near where the first bomb hit, penetrating three decks before exploding, causing severe damage but no loss of life. At 09:14, a dive bomber was set on fire by Hornet's anti-aircraft guns; the pilot, Warrant Officer Shigeyuki Sato, deliberately crashed into Hornet's stack, killing seven men and spreading burning aviation fuel over the signal deck.

At the same time as the dive bombers were attacking, the 20 torpedo bombers were also approaching Hornet from two different directions. Despite suffering heavy losses from anti-aircraft fire, the torpedo planes planted two torpedoes in Hornet's side between 09:13 and 09:17, knocking out her engines. As Hornet came to a stop, a damaged Japanese dive bomber approached and purposely crashed into the carrier's side, starting a fire near the ship's main supply of aviation fuel. At 09:20, the surviving Japanese aircraft departed, leaving Hornet dead in the water and burning.
Image
The first of two images of Sato's last moments, choosing to die in order to spite his adversary.
Image
Boom.

With the assistance of three destroyers and the Heavy Cruiser Northampton, Hornet's fires were brought under control by 10:00, and the cruiser had rigged towlines to Hornet, slowly heading southeast, away from the direction of battle. However, the second wave from Shoukaku and Zuikaku were incoming.

Enterprise was having her own trials; with Hornet out of action and her flight deck ruined, she was acting as the lone landing point for two carrier's worth of planes.
Starting at 09:30, Enterprise landed many of the damaged and fuel-depleted CAP fighters and returning scout aircraft from both carriers. However, with her flight deck full, and the second wave of incoming Japanese aircraft detected on radar at 09:30, Enterprise ceased landing operations at 10:00. Fuel-depleted aircraft then began ditching in the ocean, and the carrier's escorting destroyers rescued the aircrews.

One of the ditching aircraft, a damaged TBF from Enterprise's strike force that had been attacked earlier by Zeros from Zuihō, crashed into the water near the destroyer USS Porter. As Porter rescued the TBF's aircrew, she was struck by a torpedo, possibly from the ditched aircraft, causing heavy damage and killing 15 crewmen. After the task force commander ordered the destroyer scuttled, the crew was rescued by the destroyer USS Shaw which then sank Porter with gunfire.
That's probably the worst way to go. Not in battle, but in a recovery operation, caused by a damaged 'friendly' weapon arming itself and playing silly buggers.
As the first wave of Japanese strike aircraft began returning to their carriers from their attack on Hornet, one of them spotted the Enterprise task force, which had now emerged from the rain squall, and reported the carrier's position. The second Japanese aircraft strike wave, believing Hornet to be sinking, directed their attacks on the Enterprise task force, beginning at 10:08. Again, the U.S. CAP had trouble intercepting the Japanese aircraft before they attacked Enterprise, shooting down only 2 of the 19 dive bombers as they began their dives on the carrier. Attacking through the intense anti-aircraft fire put up by Enterprise and her escorting warships, Seki's division attacked first and scored no hits. Next attacked the division led by Lieutenant Keiichi Arima that scored hits on the carrier with two 250 kg semi-Armour-Piercing bombs. The 2 bombs killed 44 men and wounded 75, and caused heavy damage to the carrier, including jamming her forward elevator in the "up" position. In addition, Arima's division also achieved a near-miss with another bomb. However, ten of the nineteen Japanese bombers were lost in this attack, with two more ditching on their return.

Twenty minutes later, the 16 Zuikaku torpedo planes arrived and split up to attack Enterprise. One group of torpedo bombers was attacked by two CAP Wildcats which shot down three of them and damaged a fourth. On fire, the fourth damaged aircraft purposely crashed into the destroyer Smith, setting the ship on fire and killing 57 of her crew. The torpedo carried by this aircraft detonated shortly after impact, causing more damage. The fires initially seemed out of control until Smith's commanding officer ordered the destroyer to steer into the large spraying wake of the battleship USS South Dakota, which helped put out the fires. Smith then resumed her station, firing her remaining anti-aircraft guns at the torpedo planes.
If USS Smith gets added to AL, She best be emulating Mad Max to the best of her ability, because that shit is purely Mad Max on Water.
The forward part of the ship was enveloped in a sheet of smoke and flame from bursting gasoline tanks and the bridge had to be abandoned. The entire forward deckhouse was aflame, making topside forward of number one stack untenable. Smith's gunners claimed to have downed six of the planes. By early afternoon, the crew had extinguished all of the fires forward—largely assisted by decision her Commanding Officer, Lt.Cdr. Hunter Wood to steer the burning ship into the wake of South Dakota. With 57 killed or missing, 12 wounded, her magazines flooded, and temporary loss of steering control from the pilothouse, Smith retained her position in the screen with all serviceable guns firing.
There's a running theory among historians that Destroyers only stayed above water in battles due to the Intense Gravitational Pull of the Planet-sized Balls of their commanding officers. USS Smith is just one of many examples.

Now, that was the first wave that hit Hornet, and the Second wave, from Shoukaku and Zuikaku that hit Enterprise. But we haven't talked about Jun'you, yet. The conversion from passenger liner was one of the few Japanese carriers to survive the war, and also faced Enterprise's wrath several times and lived. (Little wonder she's gone completely cracked in Azur Lane, and even in the older Kantai Collection, she's little more than a semi-functional alcoholic)
As the Japanese main body and advanced force maneuvered to try to join formations, Jun'yō readied follow-up strikes. At 11:21, the Jun'yō aircraft arrived and dove on the Enterprise task force. The dive bombers scored one near miss on Enterprise, causing more damage, and one hit each on South Dakota and light cruiser San Juan, causing moderate damage to both ships. Eight of the seventeen Japanese dive bombers were destroyed in this attack, with three more ditching on their return.

At 11:35, with Hornet out of action, Enterprise heavily damaged, and the Japanese assumed to have one or two undamaged carriers in the area, Admiral Kinkaid decided to withdraw Enterprise and her screening ships from the battle. Leaving Hornet behind, Kinkaid directed the carrier and her task force to retreat as soon as they were able. Between 11:39 and 13:22, Enterprise recovered 57 of the 73 airborne U.S. aircraft as she retreated. The remaining U.S. aircraft ditched in the ocean, and their aircrews were rescued by escorting warships.
USN doctrine to at least try to rescue their pilots put them in a good position mid and late war. As Veteran pilots could then teach rookies the 'tricks of the trade', the rookies would get shot down less often, and thus live to become veterans in their own right. Japanese doctrine was... less-defensive about the human cost, and the loss of valuable experience, combined with a doctrine of "Keep flying until you are shot down" instead of teaching newer pilots essentially forced the Japanese Air Force to collapse skill-wise.
Masatake Okumiya, Jun'yō's air staff officer, described the return of the carrier's first strike groups:

"We searched the sky with apprehension. There were only a few planes in the air in comparison with the numbers launched several hours before... The planes lurched and staggered onto the deck, every single fighter and bomber bullet holed ... As the pilots climbed wearily from their cramped cockpits, they told of unbelievable opposition, of skies choked with antiaircraft shell bursts and tracers."

Only one of Jun'yō's bomber leaders returned from the first strike, and upon landing he appeared "so shaken that at times he could not speak coherently"
And, of course, the battle was not yet over, even as both sides began to disengage, damaged ships peeling away to head to their respective safe waters.
At 13:06, Jun'yō launched her second strike of seven torpedo planes, which were escorted by eight Zeros. At the same time, Zuikaku launched her third strike of seven torpedo planes, two dive bombers, and five Zeros. Most of the torpedo planes were armed with single 800 kg armor-piercing bombs. At 15:35, Jun'yō launched the last Japanese strike force of the day, consisting of four dive bombers and six Zeros.

At the same time Northampton had been slowly towing Hornet out of the battle area at, at a speed of only five knots. Hornet's crew was on the verge of restoring partial power, but at 15:20, Jun'yō's second strike arrived, and the seven torpedo planes attacked the almost stationary carrier. Although six of the torpedo planes missed, at 15:23, one torpedo struck Hornet amidships, which proved to be the fatal blow. The torpedo hit destroyed the repairs to the power system and caused heavy flooding leading to 14-degree list. With no power to pump out the water, Hornet was given up for lost, and the crew abandoned ship. The third strike from Zuikaku attacked Hornet during this time, where B5N level bombers hit the sinking ship with one 800 kg bomb. All of Hornet's crewmen were off by 16:27. During the last Japanese attack of the day, a dive bomber from Jun'yō's third strike dropped one more 250 kg semi-AP bomb on the sinking carrier at 17:20.
Image
The Last Image of USS Hornet taken by an American Camera, the slowly-sinking carrier was too stubborn to die easily, much like her big sister, Yorktown.
The destroyers USS Mustin and Anderson attempted to scuttle Hornet with Nine torpedoes and over 400 shells, but she still remained afloat. With advancing Japanese naval forces only 20 minutes away, the two U.S. destroyers abandoned Hornet's burning hulk at 20:40. By 22:20, the rest of Kondō's and Abe's warships had arrived at Hornet's location. The destroyers Makigumo and Akigumo then finished Hornet with four 24 inch (610 mm) torpedoes. At 01:35 on 27 October 1942, she finally sank, taking with her the 140 who had died during the day's desperate fighting.
And thus ended the Fourth 'Carrier-only' Battle of the Pacific, with the Japanese navy having won on the tactical level, with Hornet sunk and Enterprise out of action for repairs for two weeks, but strategically? The blood shed by the Japanese Aircrews was a strategic loss they never recovered from.
Although the Battle of Santa Cruz was a tactical victory for the Japanese in terms of ships sunk, it came at a high cost for their naval forces, as Jun'yō was the only active aircraft carrier left to challenge Enterprise or Henderson Field for the remainder of the Guadalcanal campaign. Zuikaku, despite being undamaged and having recovered the aircraft from the two damaged carriers, returned to home islands via Truk for training and aircraft ferrying duties, returning to the South Pacific only in February 1943 to cover the evacuation of Japanese ground forces from Guadalcanal. Both damaged carriers were forced to return to Japan for extensive repairs and refitting. After repair, Zuihō returned to Truk in late January 1943. Shōkaku was under repair until March 1943 and did not return to the front until July 1943, when she was reunited with Zuikaku at Truk.

The most significant losses for the Japanese Navy were in aircrew. The U.S. lost 81 of the 175 aircraft that were available at the start of the battle; of these, 33 were fighters, 28 were dive-bombers, and 20 were torpedo bombers. Only 26 pilots and aircrew members were lost, though.

The Japanese fared much worse, especially in airmen; in addition to losing 99 aircraft of the 203 involved in the battle, they lost 148 pilots and aircrew members, including two dive bomber group leaders, three torpedo squadron leaders, and eighteen other section or flight leaders. Forty-nine percent of the Japanese torpedo bomber aircrews involved in the battle were killed, along with 39% of the dive bomber crews and 20% of the fighter pilots. The Japanese lost more aircrew at Santa Cruz than they had lost in each of the three previous carrier battles at Coral Sea (90), Midway (110), and Eastern Solomons (61). By the end of the Santa Cruz battle, at least 409 of the 765 elite Japanese carrier aviators who had participated in the attack on Pearl Harbor were dead.
Having lost so many of its veteran carrier aircrew, and with no quick way to replace them—because of an institutionalized limited capacity in its naval aircrew training programs and an absence of trained reserves—the undamaged Zuikaku and Jun'yō were also forced to return to Japan because of the scarcity of trained aircrew to man their air groups; despite returning to the Solomons region in early 1943, they had no further presence in the battles for the hard-fought islands.

In retrospect, despite being a tactical victory, the battle effectively ended any hope the Japanese Navy might have had of scoring a decisive victory before the industrial might of the United States placed that goal out of reach. Historian Eric Hammel summed up the significance of the Battle of the Santa Cruz Islands as, "Santa Cruz was a Japanese victory. That victory cost Japan her last best hope to win the war."

In Azur Lane, Santa Cruz is World Map 5, with 5-3 specifically calling out Hornet's death in battle. Below are two images leaked by one of the artists that had been commissioned to work upon Azur Lane's main storyboards, showing Hornet and Northampton together. The old 'tinclad' heavy cruiser had been the faithful escort for each of the Yorktown-class carriers in turn, and had borne witness to the deaths of Yorktown and Wasp before Santa Cruz took her last, and newest friend from her.

Image
Image

User avatar
Shipgirl Showcase Special Edition:

So, as most of you readers know, my passion for history is basically the only thing keeping this thread open, much less semi-active; and, well, I'm going to be honest. One of the reason I got into studying naval history in particular was due to my maternal grandfather, who joined the Kreigsmarine shortly before World War II kicked off. He did so partly for the pay, which at the time was considerable, but mostly because the German Navy was full of Imperial Navy and Reichsmarine veterans, which meant that the entire command structure was made up of people that had even less tolerance for the Nazi ideology than most.

This does not absolve the Kreigsmarine from its actions, of course, but I just wanted you to get an idea of where I'm coming from when I point out that, of all the warships in the world, the first one that I really learned about was the Bismarck.

So, without further ado, a Showcase for the most-famous, and infamous battleship built by Germany.

[Bismarck-class]

Probably the most-infamous warships to ever touch the Atlantic ocean, the Bismarck-class battleships are, on paper, formidable. The third-most-armoured ships in the Western hemisphere, only behind the Scharnhorst class and King George Vs, the Bismarck class was designed from the ground up not as a raider, but as a brawler, intended to get in close to enemy formations in the high seas and nearly nonexistent visibility of the North Sea, which factored in to many of the design decisions that left the last German Battleships being widely considered the pinnacle of World War I-styled designs.

With a top speed of 30 knots making them as fast or faster than any other battleship at the time,with very few exceptions, Eight 15” rifles in four main turrets, a total of 28 secondary and tertiary guns (150mm secondaries and 105mm dual-purpose guns), and a not-inconsiderable number of light AA guns, the Bismarck-class was designed before air power’s dominance came to be known; subsequently, after the loss of Bismarck due, in no small part to the efforts of naval aviation, Tirpitz was loaded with as many light and medium AA guns as was humanly possible.

Of note is that the Bismarck-class were the last battleships constructed with a ‘Turtleback’ Armour scheme, involving sloped internal armour decks to deflect enemy cannonfire away from the machinery spaces and ammunition magazines. While considered obsolete compared to the All or Nothing armour scheme used by virtually every nation after 1922, it was still incredibly capable of keeping the warships combat-capable in the role they had been designed for.

[Bismarck]

Image
Undergoing sea trials in 1940, Bismarck managed to be imposing even at rest.

So, here she is. The boogeyman of the entire German navy, the ship that was so infamous that in a week’s span, she went from ready to deploy on her very first mission to being run down by every Royal Navy Asset in the Atlantic that could be spared.
“The British would ultimately deploy six battleships, three battlecruisers, two aircraft carriers, 16 cruisers, 33 destroyers and eight submarines, along with patrol aircraft. It would become the largest naval force assigned to a single operation up to that point in the war.”
Launched on February 14th, 1939, Bismarck’s fitting out and trials were held in the Baltic sea, with her only commander being Ernst Lindemann, a man known for being both the premier large-calibre gun instructor in all of Germany, and also insistent that crew within his hearing only refer to Bismarck as “he”, as, in his words, “No vessel of war this powerful could ever be considered female.”

Naturally the crew ignored Lindemann’s edict, regardless of how much they respected him. During maneuver trials lasting from August of 1940 to March 1941, the warship’s crew discovered a severe flaw in the design; one that would eventually become lethal; due to how closely-set the battleship’s three propeller shafts were in relation to the broad hull, (at 118 feet wide, only the Yamato-class battleships were wider from side-to-side), it was discovered that while it was possible to steer the Bismarck using only propeller output, it was nearly impossible to hold a steady course.
“The Naval High Command (Oberkommando der Marine or OKM), commanded by Admiral Erich Raeder, intended to continue the practice of using heavy ships as surface raiders against Allied merchant traffic in the Atlantic Ocean. The two Scharnhorst-class battleships were based in Brest, France, at the time, having just completed Operation Berlin, a major raid into the Atlantic. Bismarck's sister ship Tirpitz was rapidly approaching completion. Bismarck and Tirpitz were to sortie from the Baltic and rendezvous with the two Scharnhorst-class ships in the Atlantic; the operation was initially scheduled for around 25 April 1941, when a new moon period would make conditions more favourable.

Work on Tirpitz was completed later than anticipated, and she was not commissioned until 25 February; the ship was not ready for combat until late in the year. To further complicate the situation, Gneisenau was torpedoed in Brest and damaged further by bombs when in drydock. Scharnhorst required a boiler overhaul following Operation Berlin; the workers discovered during the overhaul that the boilers were in worse condition than expected. She would also be unavailable for the planned sortie. Attacks by British bombers on supply depots in Kiel delayed repairs to the heavy cruisers Admiral Scheer and Admiral Hipper. The two ships would not be ready for action until July or August. Admiral Günther Lütjens, Flottenchef (Fleet Chief) of the Kriegsmarine, chosen to lead the operation, wished to delay the operation at least until either Scharnhorst or Tirpitz became available, but the OKM decided to proceed with the operation, codenamed Operation Rheinübung, with a force consisting of only Bismarck and the heavy cruiser Prinz Eugen.”
In theory, if the planned operation had managed to collect all four modern battleships, backed up with three of the four heavy cruisers available, it would have very likely gone far differently. But, instead, spurred by political pressure and the knowledge of the upcoming Operation Barbarossa, which the Kreigsmarine would have little involvement in, the OKM high command ordered Bismarck’s first mission to be carried out immediately.

And so, on the 20th of May, 1941, Bismarck would set sail on her first, and last combat mission, and into the annals of history.

Within German waters, on the way to their first staging point near Bergen, Norway, Bismarck and Prinz Eugen were spotted not only by a dozen planes on patrol from Sweden, but also the seaplane tender/cruiser Gotland, which promptly reported on the movements of “Two large ships, three destroyers, and five escorts” to both Swedish command, and, through back channels, the British Admiralty.

Of course, the Germans tasked their own reconnaissance flights to make sure that the Home Fleet remained in Scapa Flow, which ended up falling for the oldest tricks in the book; it turns out wood and canvas props, at sufficient distance, can look like battleships at anchor.

Upon refuelling and repainting at Bergen, Bismarck and Prinz Eugen detached from their destroyer screen and headed westwards, intending to break out into the open Atlantic just in time to see if they could sup upon the eleven convoys heading to the British isles.
“Admiral John Tovey ordered the battlecruiser HMS Hood, the newly commissioned battleship HMS Prince of Wales, and six destroyers to reinforce the pair of cruisers patrolling the Denmark Strait. The rest of the Home Fleet was placed on high alert in Scapa Flow. Eighteen bombers were dispatched to attack the Germans, but weather over the fjord had worsened and they were unable to find the German warships.”
Charging into the ice and mine-choked Denmark strait at approximately 4 AM on the 23rd, at a ‘Damn the consequences’ speed of 27 knots, fog reducing functional visibility to less than 3,000 metres, and both German ships having warmed up their radar sets (and Eugen having warmed up her hydrophone array), Bismarck and Prinz Eugen were alerted to the presence of HMS Suffolk and HMS Norfolk within the ice-choked waterway at the same time the British ships became aware of the German vessels.

Image
Suffolk in her May 1941 arctic paint, shortly after arriving at Reykjavik, Iceland in preparation for her patrol in the Denmark Strait.
“This was Suffolk, racing on a southwest course to travel along the edge of the fog bank; briefly, the three-stacked silhouette of the cruiser was in sight before she plunged into the mist. There was no time to get a bearing or open fire.

Aboard Suffolk, Able Seamen Newell, in the after starboard lookout, was scanning his sector with binoculars. In these latitudes, the ice and light played tricks, and even the most-experienced sailor could be fooled. Suddenly, a great black shape loomed out of the mist no more than seven miles away. "Ship bearing Green one-four-o" he shouted. Then a second ship appeared, and he shouted the alarm again.

Captain Ellis brought Suffolk hard over and she heeled heavily to starboard as he brought her deep into the fog, while alarm bells rang and sailors rushed to action stations, china and cutlery clattering to the floor in the messdecks.

Once safely in the fog, Suffolk slowed down and waited for Bismarck and Eugen to pass her before taking up a position to the rear, just within radar range.

At thirteen miles, this meant the Bismarck's guns could easily reach her at any time. The cruiser roared along at 30 knots, edging at her top speed, and the vibration was tremendous. It was all she could do to keep up with the big German ships, which had increased speed.

In the plotting room, the Suffolk's piloting officer found it nearly impossible to hold the ruler on the chart due to the way the ship was shaking.

Meanwhile, Norfolk had been alerted and was racing back through the fog to join Suffolk. But her captain had misjudged his relative position and emerged six miles in front of Bismarck, with the great gray leviathan closing fast.

Before Norfolk could escape back into the mist, five salvoes straddled her. One shell bounced off the water and ricocheted off of the Captain's bridge. But only shell splinters landed aboard, and no one was hurt.”
Image
An image of Dorsetshire, Norfolk's identical twin sister, at Scapa Flow, August 1941.

Now being followed just within radar range by two heavy cruisers, secrecy had been lost; More importantly, the concussion from Bismarck’s main guns had cracked the FuMO 23 ‘Seetakt’ Radar mounted forward, essentially blinding the battleship’s non-optical gunnery options and early warning system, which prompted a shuffling of position; Prinz Eugen took the lead in the formation, with Bismarck following; her aft radar still functioned, so she could keep track of the two heavy cruisers that now dogged her.
“At around 22:00, Lütjens ordered Bismarck to make a 180-degree turn in an effort to surprise the two heavy cruisers shadowing him. Although Bismarck was visually obscured in a rain squall, Suffolk's radar quickly detected the manoeuvre, allowing the cruiser to evade. The cruisers remained on station through the night, continually relaying the location and bearing of the German ships. The harsh weather broke on the morning of 24 May, revealing a clear sky. At 05:07, hydrophone operators aboard Prinz Eugen detected a pair of unidentified vessels approaching the German formation at a range of 20 nautical miles (37 km), reporting "Noise of two fast-moving turbine ships at 280° relative bearing!"”
HMS Hood and Prince of Wales had arrived.

Image

The Battle of the Denmark Strait remains one of the most-heavily debated engagements in the battle of the Atlantic, but, the long and short of it is that the Royal Navy, already stretched to the breaking point bottling up the Vichy French Navy, the Marina Militaire, maintaining its holdings in the Indian Ocean and Indonesian archipelago, AND fighting a desperate battle against the hordes of U-boats that swarmed the convoys that were so vital to keep the British isles away from total starvation and collapse, had basically thrown a tired old warhorse long overdue for a refit and a near-literal baby less than three weeks out of the shipyard into the path of the Bismarck and Eugen.

On paper, Hood and Prince of Wales would be more than a match for the two German ships; with a total of eighteen big guns to Bismarck’s eight, the biggest concern for the British commander, Admiral Lancelot Holland, was that a shell fired from extreme range would punch through Hood’s lightly-armoured deck and explode deep in the battlecruiser’s guts; so he plotted an intercept that would minimize the threat of a distant shell, intending to close to brawling range where Hood’s main armour belt would take the worst abuse thrown in her direction.

At 5:52 AM local time, Hood opened fire, followed by Wales. Three minutes later, at 5:55, Captain Lindemann overruled Admiral Lutjens aboard Bismarck and commanded the battleship to open fire. Four minutes later, at 5:59, Hood exploded, killing all but three of her 1,418 crew. (I will go into her unfortunate fate in more detail in her own section, and there are more details on the Denmark Strait in Prinz Eugen's own writeup earlier in the thread.)

Image
Painted by J.C. Schmitz-Westerholt while aboard the Prinz Eugen, the original canvas has remarks from the cruiser's captain written on the back.

Wales didn’t escape unscathed either, taking no less than seven hits from both Bismarck and Prinz Eugen, the newly-constructed battleship forced to retreat as a combination of damage and jams left her with only one operable gun; Even with flooding due to two hits at or below the waterline, however, Wales would link up with Suffolk and Norfolk to pursue the small German Flotilla.
“The British battleship scored a hit on Bismarck with her sixth salvo, but the German ship found her mark with her first salvo. One of the shells struck the bridge on Prince of Wales, though it did not explode and instead exited the other side, killing everyone in the ship's command centre, save Captain John Leach, the ship's commanding officer, and one other. The two German ships continued to fire upon Prince of Wales, causing serious damage. Guns malfunctioned on the recently commissioned British ship, which still had civilian technicians aboard. Despite the technical faults in the main battery, Prince of Wales scored three hits on Bismarck in the engagement.

The first struck her in the forecastle above the waterline but low enough to allow the crashing waves to enter the hull. The second shell struck below the armoured belt and exploded on contact with the torpedo bulkhead, completely flooding a turbo-generator room and partially flooding an adjacent boiler room. The third shell passed through one of the boats carried aboard the ship and then went through the floatplane catapult without exploding.”
The first hit would be more telling than the description states; not only did the 14” shell from Wales punch clean through both sides of Bismarck’s bow, but the addition of some 1,000 tons of water forward contaminated a significant amount of the battleship’s fuel reserves, and, as Bismarck continued to head south at high speed, the holes were torn open further due to inrushing water.

With the Royal navy enraged to a level that would make God of War’s Kratos suggest they take a chill pill, and Bismarck’s trail visible due to the thick streams of oil leaking from the bow hit, it was decided that, in order to let Prinz Eugen carry on the mission, the Battleship would loop back to distract the pursuit force, which had just been reinforced internally by Prince of Wales getting 9 of her guns back into readiness. (The tenth, which had failed on the first salvo the battleship had fired, needed to be replaced entirely.)
“Prinz Eugen was successfully detached at 18:14. Bismarck turned around to face Wake-Walker's formation, forcing Suffolk to turn away at high speed. Prince of Wales fired twelve salvos at Bismarck, which responded with nine salvos, none of which hit. The action diverted British attention and permitted Prinz Eugen to slip away. After Bismarck resumed her previous heading, Wake-Walker's three ships took up station on Bismarck's port side.”
While Bismarck’s damage had slowed her down, she could still maintain speeds of 28 knots, meaning only cruisers and destroyers could outrun her; even the King George V-class battleships could match that speed, not exceed it. Thus, the Admiralty called upon HMS Victorious to see if she was up to the task of slowing Bismarck down.

That night, at 22:00 (10 PM), Victorious launched a squadron of fifteen planes to intercept Bismarck, which was still being shadowed and reported on by Suffolk, Norfolk, and Wales. The aviators, raw rookies to a man, very nearly attacked Suffolk, and the nearby American Coast Guard cutter Modoc in the confusion, alerting Bismarck’s anti-air gunners, which caused all hell to break loose.
“Modoc, acting as a neutral vessel that was rescuing survivors from torpedoed convoy vessels, found herself witness to one of the skirmishes in the Pursuit of the Bismarck. Close to midnight of May 24th, Modoc found herself in the midst of an attack in which eight planes and three warships were involved. Antiaircraft fire from Bismarck whizzed dangerously close to the cutter's port bow. HMS Norfolk was about to take the cutter under fire until HMS Prince of Wales identified her as U.S. Coast Guard. The cutter was luckily undamaged, although they were near the fighting and at times only six miles from Bismarck. The widespread movements of the combatants, 19 vessels if one included destroyers and smaller ships, had distributed danger over a wide area.

Bismarck also used her main and secondary batteries to fire at maximum depression to create giant splashes in the paths of the incoming torpedo bombers. None of the attacking aircraft were shot down. Bismarck evaded eight of the torpedoes launched at her, but the ninth struck amidships on the main armoured belt, throwing one man into a bulkhead, killing him, and injuring five others.

The explosion also caused minor damage to electrical equipment. The ship suffered more serious damage from manoeuvres to evade the torpedoes: rapid shifts in speed and course loosened collision mats, which increased the flooding from the forward shell hole and eventually forced abandonment of the port number 2 boiler room. This loss of a second boiler, combined with fuel losses and increasing bow trim, forced the ship to slow to 16 knots. Divers repaired the collision mats in the bow, after which speed increased to 20 knots.”
Prince of Wales, low on fuel but not yet forced to retreat, closed in for another gun duel with Bismarck, though neither battleship hit each other; at the same time, Bismarck’s repair teams managed to prevent seawater from entering the turbo-electric generator feedwater system, which could have been catastrophic; they also siphoned uncontaminated fuel from the forward tanks, which lightened the weight forward, allowing Bismarck to once again pick up speed.

As the chase extended into open ocean, the threat of Submarines forced the three British shadows behind Bismarck to begin Zig-Zagging, each leg of the maneuver being some ten minutes, and, in the last few minutes of the portward maneuver, Bismarck would be out of range of Suffolk’s radar.

Bismarck accelerated to maximum speed, then turned west, followed by northwards, looping back on her previous course and successfully breaking radar contact; with the shadowing forces unable to regain radar returns on Bismarck’s position, the British had, essentially, lost the battleship.

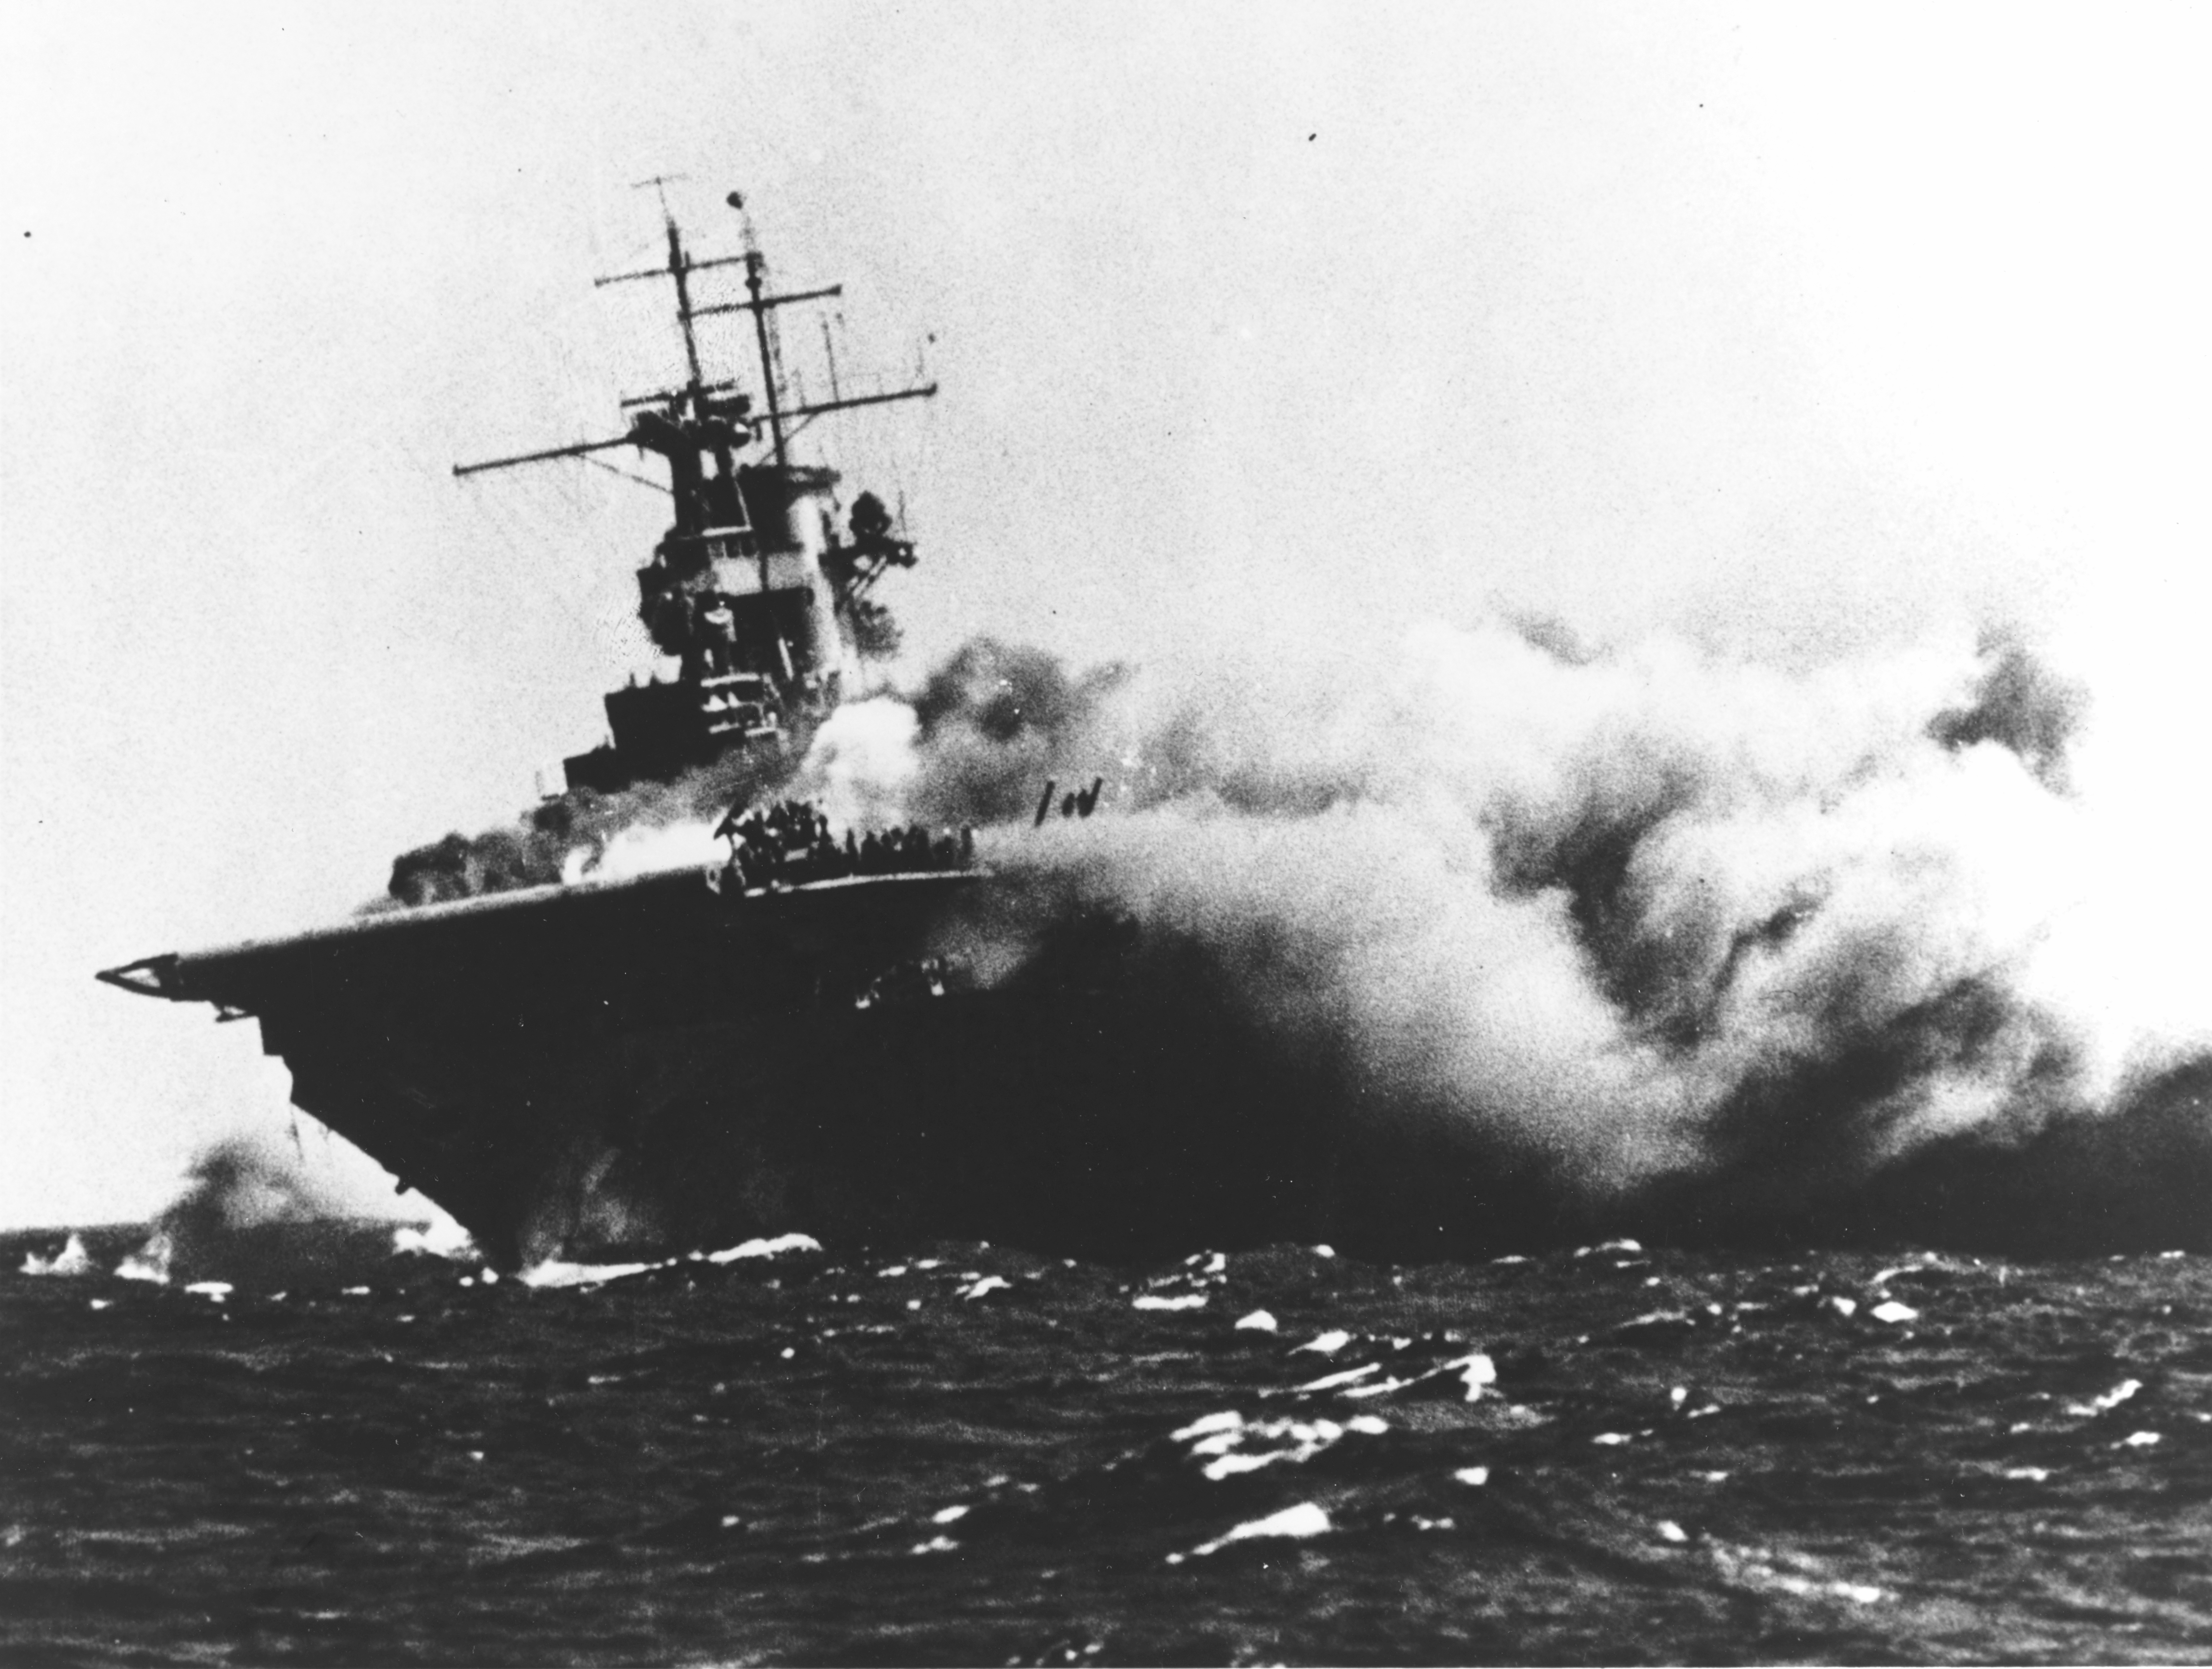
Two days later, on May 26th, Bismarck was discovered once more, less than 700 miles away from safe harbour in Occupied France. Most of the Royal Navy’s ships that had set off in pursuit, and eventually to search for Bismarck were low on fuel, out of position, or both, which left only one option for the Admiralty to try and slow or stop the battleship before she reached the protective envelope of U-boats and Luftwaffe planes.

Ark Royal.

The carrier was several hundred miles away, but her planes were less than 60 miles away from where Bismarck had been spotted by a Catalina Flying Boat; at the same time, HMS Sheffield had also been dispatched to try to get a radar lock on Bismarck, which unfortunately had not been communicated to the pilots of 818 squadron.

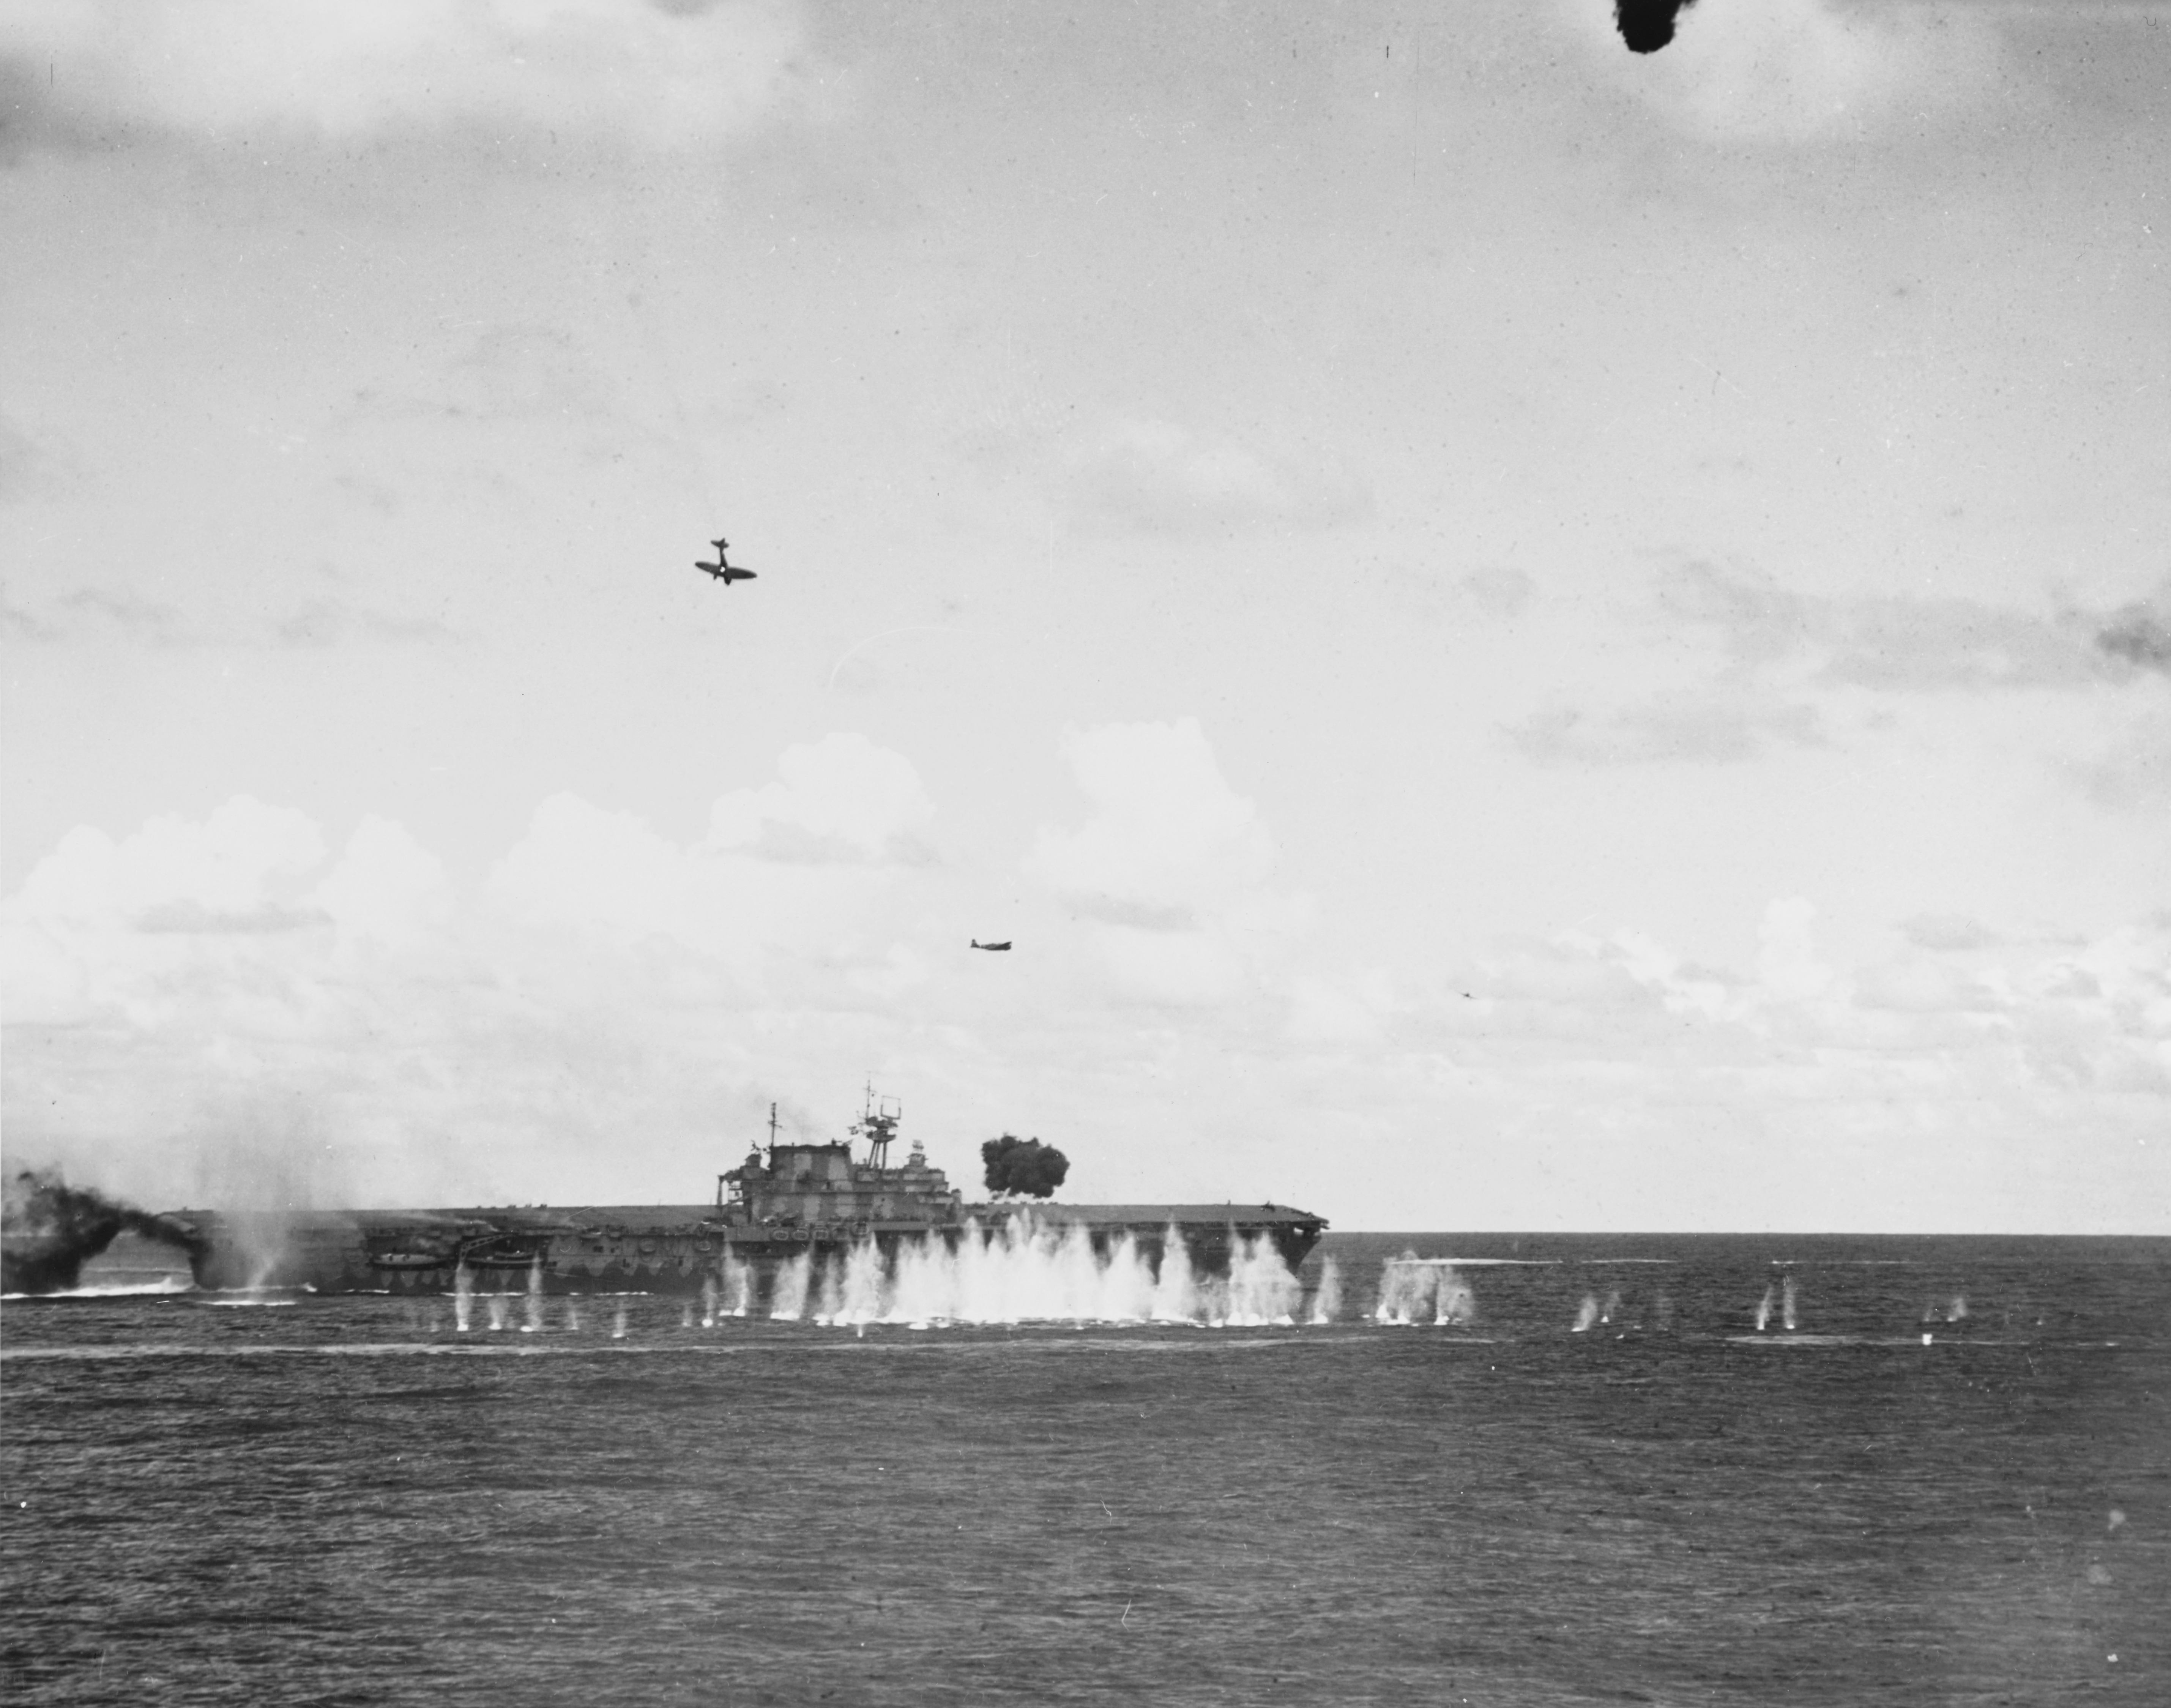
In the thick fog of the day, Ark Royal’s pilots dove on the first ship they saw, failing to check target; it was only due to their torpedoes being armed with new and untested magnetic detonators that Sheffield was not sunk that day; Re-arming the planes with contact detonator fitted torpedoes, the attack wave that would carry the golden bullet took off at 19:10 (7:10 PM), 9 hours after Bismarck had been spotted.

Image
'Stringbags' launching into a Force 8 storm required spectacular timing on the parts of the pilots; if they rolled forward at the wrong moment, the plane would be swallowed by the waves crashing over Ark Royal's forward flight deck.
“At 20:47, the torpedo bombers began their attack descent through the clouds. As the Swordfish approached, Bismarck fired her main battery at Sheffield, straddling the cruiser with her second salvo. Shell fragments rained down on Sheffield, killing three men and wounding several others, prompting Sheffield to quickly retreat under cover of a smoke screen. The Swordfish then attacked; Bismarck turned violently as her anti-aircraft batteries engaged the bombers. One torpedo hit amidships on the port side, just below the bottom edge of the main armour belt. The force of the explosion was largely contained by the underwater protection system and the belt armour but some structural damage caused minor flooding.

The second torpedo struck Bismarck in her stern on the port side, near the port rudder shaft. The coupling on the port rudder assembly was badly damaged and the rudder became locked in a 12° turn to port. The explosion also caused much shock damage. The crew eventually managed to repair the starboard rudder but the port rudder remained jammed. With the port rudder jammed, Bismarck was now steaming in a large circle, unable to escape from Tovey's forces. Though fuel shortages had reduced the number of ships available to the British, the battleships King George V and Rodney were still available, along with the heavy cruisers Dorsetshire and Norfolk.”

“Bismarck attempted to steer by alternating the power of her three propeller shafts, which, in the prevailing force 8 wind and sea state, resulted in the ship being forced to sail towards King George V and Rodney.”
Unable to retreat, Bismarck expressed her displeasure by once again opening fire at Sheffield, straddling the cruiser with a quartet of near-misses that prompted her to once again flee; as Sheffield broke contact, she turned over the mission to maintain contact with the Bismarck to a group of five destroyers, the Tribal-class Cossack, Sikh, Maori, and Zulu, and ORP Piorun (Thunderbolt), of the Free Polish Navy.

Image
ORP Piorun, a British-made N-class destroyer, was returned to the Royal navy after World War 2, and recommissioned as HMS Noble.
“Arriving first on the scene with the British Tribal-class destroyer Maori, Piorun charged at Bismarck by herself, while Maori manoeuvred for position to fire torpedoes. Alone, Piorun exchanged fire with Bismarck for an hour, with neither side scoring any hits—although after the third salvo, Bismarck missed by only 20 yards, causing Captain Pławski to pull away. According to one report, Pławski transmitted the message "I am a Pole" before commencing fire on Bismarck; other sources say the signal to commence fire was "Trzy salwy na cześć Polski" ("Three salvoes in honour of Poland").”
Cossack also ended up facing Bismarck’s ire in the nighttime fog, a shell carrying off the destroyer’s entire radio mast, even as the five destroyers fired star shell flares and launched torpedoes, attempting to harass and exhaust Bismarck’s crew before the arrival of the main force.
“Numerous hits were reported by wishful captains and for a while the German ship lay stopped dead in the water, but continued to spit fire whenever a destroyer came too close. After an hour she got underway once more. Star shells, once fired in the steadily worsening weather illuminated the great battleship, but also revealed the destroyers in the darkness, a great help to Bismarck’s gunners.”
All five destroyers were forced to disengage between 5:00 and 7:00 in the morning of the 27th, Piorun due to very nearly running out of fuel, while the Tribal-class destroyers due to running out of ammunition.

The last of the five destroyers to break contact, Maori, stayed around until the King George V sighted Bismarck at 8:43 AM, and in fact would try to rescue survivors after the battle’s conclusion.
“Norfolk, steaming from the North, sighted Bismarck first, though in the heavy weather, mistook the German ship for Rodney; she only realized her error when the battleship did not return her identification signal. Smartly turning about and retreating to avoid being taken under fire, Norfolk maintained visual sighting, once again shadowing Bismarck; after having let the battleship slip away earlier in the mid-atlantic, it was a measure of vindication.”

“At 8:43 AM on May 27th, King George V sighted Bismarck for the first time, a visage they had been longing for and dreading these recent endless days and nights. As the Bismarck emerged from a distant rain squall, she looked to Admiral Tovey like “A thick, squat ghost of a ship coming straight towards us.”
It was Rodney, the old lady of the trio, who should have been in refit docks and not in the midst of historic battle who fired first, at 8:47. To many aboard, it felt as though the aging battleship’s hullplates would separate violently from the shock of her nine 16-inch guns.

King George V’s first salvo caused the bridge’s compass to bounce out of its mounting, smashing on the deck as the draft created by the guns tore sheafs of signal papers out into the air around the bridge. Bismarck’s first shot in return caused every bridge officer on both ships to hold their breaths; Tovey later commented “It took two hours for those shots to fall.”

The first shells landed only a few hundred metres short of the Rodney, causing more than one crewman aboard the King George to privately thank the heavens that they were not the target of the intimidating battleship.

The British ships closed the range as Norfolk added her 8-inch guns to the deluge of firepower directed at the Bismarck, while the Germans held their own; Bismarck’s third salvo straddled Rodney on both sides, shell splinters destroying the old warhorse’s anti-air gun director; The Rodney’s American Exchange officer, Lieutenant-Commander Wellings, later wrote in his personal diary that ‘If the salvo had landed a mere 20 yards further aft, our entire bridge structure would have been completely wrecked, with the captain and other key personnel killed or wounded.’

Minutes after 9 AM ticked over, Dorsetshire arrived on the scene, now adding her own firepower to besieging the Bismarck from three sides; since leaving her convoy, the cruiser had steamed 600 miles non-stop.

A witness to the final battle, Naval Historian Ludovic Kennedy, was aboard HMS Tartar, and described the engagement thus;
“In all my life, I doubt I will remember another hour so vividly as that one. It was the colour contrasts I recall most, so rare in the eternal grey of voyaging at sea. The sun appeared for the first time in days, shining through blue cracks between white, racing clouds; and the wind, painfully strong, was marbling and stippling the green water, creaming the tops of the heavy, high seas. There was the somber blackness of the Bismarck and the grey of the British ships, the orange flashes of the guns, the brown of the cordite smoke, shell splashes as tall as houses, white as shrouds.

“It was a lovely sight to begin with, wild, majestic as one of our officers called it, almost too clean for the matter at hand. It seemed strange to think that in those three battleships were five thousand men; it seemed almost irrelevant for this was a contest between ships, not men.”
Image
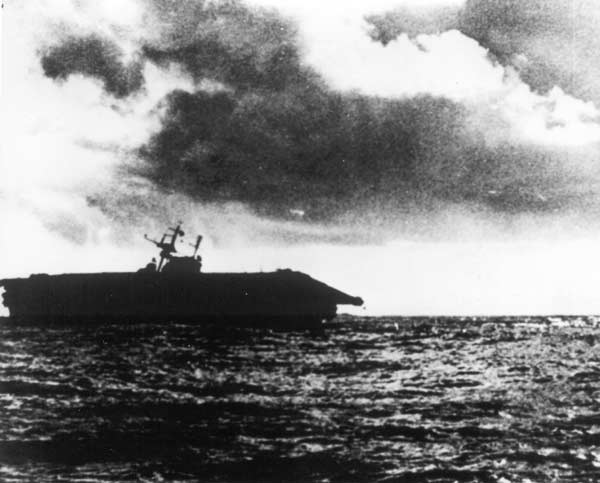
The last moments of the Bismarck, immortalized in paint. Dorsetshire lurks in the distance, waiting to pick up survivors.

Bismarck’s final battle, which took from 8:47 to 10:40 that morning, could have been described as a one-sided slaughter. With Bismarck unable to steer and moving erratically, her ability to accurately aim her guns deteriorated rapidly.
“At 8:59 with the battle only twelve minutes old, a 16-inch shell from Rodney exploded between turrets Anton and Bruno, knocking both out of action. Almost at the same instant an 8-inch shell from Norfolk destroyed the foretop fire control director, taking with it Commander Adelbert Schneider and his newly-awarded Knight’s Cross. The battle had barely begun, but already Bismarck was fighting with one eye blind and one hand broken.”
Bismarck’s after turrets and director, unable to see Rodney on the port flank, instead focused on the King George V, clearly in view some two and a half miles away; with Bismarck unable to maintain a stable course, the Aft gunnery officer, Lieutenant Mullenheim-Rechberg (who would eventually be the highest-ranking survivor of the Bismarck’s crew), managed to order four salvoes before another shell, unrecorded as to its origin, would destroy the aft director, leaving Bismarck entirely blind.

It was 9:15 AM when Rodney and King George V brought their secondary guns to bear as well; while numerous hits had been scored against the Bismarck, Admiral Tovey was unsure about how much damage had been done. And so the endless hail of fire continued. One Aide to the Admiral claimed that “Shells bored their way through the armour belt like it was cheese” (A 2012 survey of the wreck would later find that only two shells, both from Rodney had penetrated Bismarck’s belt)
“Executive officer Hans Oels took command of the ship from his station at the Damage Control Central. He decided at around 09:30 to abandon and scuttle the ship to prevent Bismarck being boarded by the British, and to allow the crew to abandon ship so as to reduce casualties. Oels ordered the men below decks to abandon ship; he instructed the engine room crews to open the ship's watertight doors and to prepare scuttling charges.

Gerhard Junack, the chief engineering officer, ordered his men to set the demolition charges with a 9-minute fuse but the intercom system had broken down, so he sent a messenger to confirm the order to scuttle the ship. The messenger never returned, so Junack primed the charges and ordered his men to abandon ship. They left the engine spaces at around 10:10. Junack and his comrades heard the demolition charges detonate as they made their way up through the various levels. Oels rushed throughout the ship, ordering men to abandon their posts. On the battery deck a huge explosion killed him and about a hundred others.”
Admiral Tovey later wrote “After half an hour of action, the Bismarck was on fire in several places and virtually out of control. Only one turret remained in action, and the fire of this and her secondary armament was wild and erratic. But she still steamed on.”

The British ships continued to fire, turning the forward third of the Bismarck into a flaming ruin, gun barrels twisted skyward or drooping ‘like dead flowers’, according to one witness. At 9:21, a shell from Rodney ricocheted off of Caesar turret; the gun crew inside were unharmed, but the starboard gun would no longer elevate. Six minutes later, the mangled ruin of Turret Anton, forwardmost, fired a single salvo. Three minutes following, at 9:30, the left barrel of Turret Dora burst, shredding over 100 tons of steel like a peeled banana.

At 9:31, Bismarck fired her last salvo; then her main guns laid silent, ruined and blind. And still the British poured fire into their stricken foe. Tovey’s orders were to sink the Bismarck, to gain full revenge for the sinking of Hood, even if it meant using every ounce of ammunition available.

The expenditure was Enormous. In all, 2,876 shells were fired at the German ship, 719 from the 14 and 16 inch guns on the two battleships. At least 400 struck home, but, as the range was so close, the trajectory of the shells so flat that many skipped off of the waves before striking, next to no damage was done below the waterline, preventing the flooding that would have killed the battleship. At one point, Tovey, exasperated with the punishment that Bismarck was enduring, was overheard saying “Someone get my darts; we’ll see if we can’t sink her with those.”

Rodney, ordered to disengage at 10:15, fired two torpedoes from her underwater tubes at Bismarck; one hit, making it the only time in history that a battleship successfully torpedoed another battleship. As King George V and Norfolk also disengaged, the battleship and cruiser starved of fuel, Dorsetshire closed in and fired torpedoes at both sides of Bismarck as the battleship began to roll over.

At 10:40, Bismarck disappeared from the sight of men; of perhaps 400 survivors of her 2,221 crew, only 110 were picked up by Dorsetshire and the destroyer HMS Maori before both ships disengaged, having been alerted to a U-boat in the area. (As a U-boat in World War I had sunk 3 cruisers in a row as the ships were undertaking rescue operations, Admiralty policy was to leave the shipwrecked to their fates when hostile submarines were spotted)

Including survivors picked up by German ships the following day, only 114 men survived.

Image

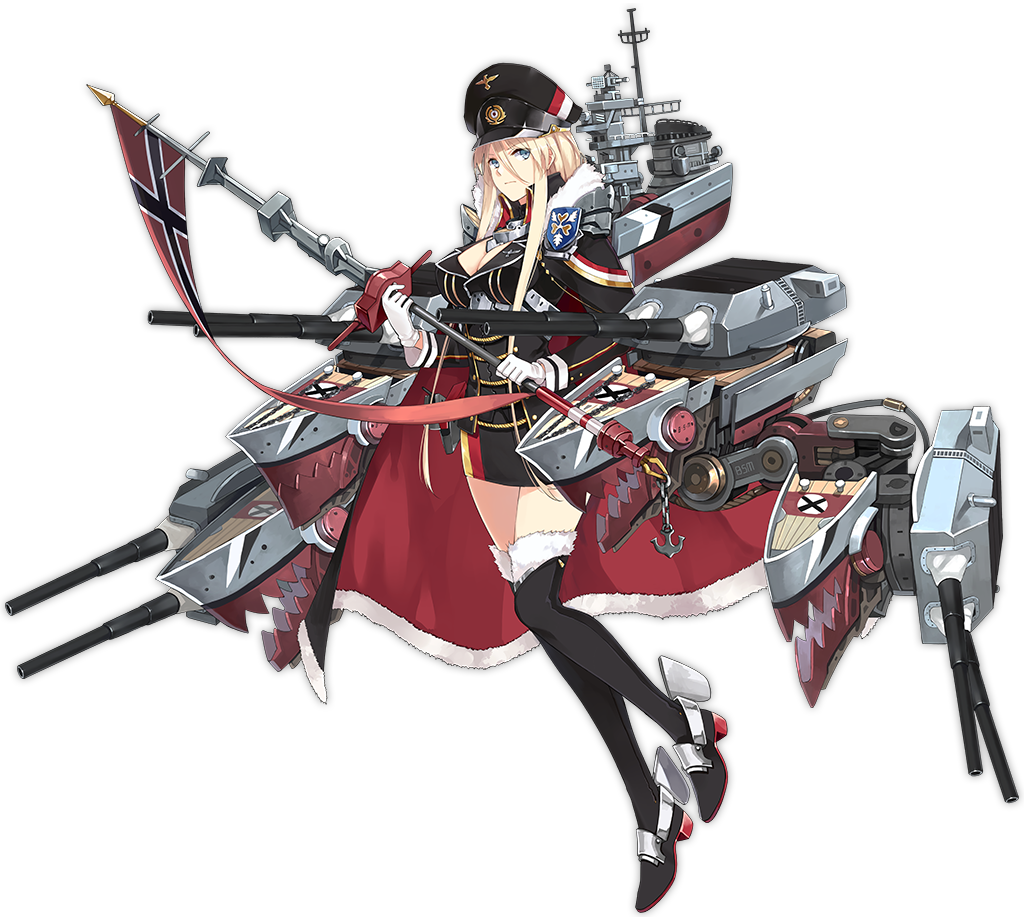
In-game, Bismarck is an ungodly tough character, with the third-highest health pool in the entire fleet (beaten only by the two Ultra-rare tier Battleships), extremely respectable firepower, and an abysmal AA score that gets laughed at by some destroyers, what she brings to the table is a series of offensive and support skills built around boosting her faction members.

Firstly, Wahrheit, or Truth, is Bismarck’s main offense; as long as she is afloat, the first salvo of each main gun barrage always critically hits. In addition, as a reference to the noted accuracy of German rangefinding and high-velocity shells used, as long as Bismarck is using CL guns for her secondary slot, her firing range with the point-defence weapons is boosted from its default of 45-50 to 90, allowing her to snipe half the battle screen regularly, though at the expense of 35% of the secondary guns’ listed damage.

Secondly, Unwavering Strength is Bismarck’s flagship skill. Only in effect when she is in the flagship position, it flatly boosts the damage done by all German Aircraft Carriers by 20%, and gives her at 70% chance to unload a special barrage whenever she fires her main gun.

Thirdly, and finally, Will of the Iron Blood is Bismarck’s support skill, bumping the Critical hit rate of Main guns, Torpedoes, and Planes on all German ships in the same fleet by 20%, and boosting the reload score by 12% so everything fires just that little bit sooner. It also boosts the damage done by Tirpitz by 40%, supplanting her Lone Queen of the North via the sisterly bond.

Image

To the brave men and women who fought and died in war, not for ideology or profit, but for love of one's home.

Post Reply